For exploring the most voluminous organ, three points allow standardized protocols, expedite the investigation of critically ill patients, and warrant the accuracy published in the BLUE-protocol native article.
The lung is our most voluminous organ (skin apart): about 1,500 cm 2 surface and 17 % of the body skin area. Where to apply the probe may appear as a quandary. We could answer simply but not efficiently “at the same places as the stethoscope.” Some experts simplify the problem but complicate the technique by advocating comprehensive scans. In critical settings, time is too precious. The 7th principle of LUCI states that the life-threatening disorders have usually an extensive projection. Apart from some small and aberrant lung consolidations, the daily profiles are extensive: pulmonary edema (even moderate), pneumothorax (even small), pleural effusion, etc. This remarkable property allows to use standardized points for expediting a BLUE-protocol. A basic empiricism associated with a long research has allowed us to define the BLUE-points. We defined six BLUE-points, exactly like the 6 thoracic electrodes of standard ECG. There are three points per lung, two anterior and one semiposterior.
1. THE CONCEPT OF THE BLUE-HANDS
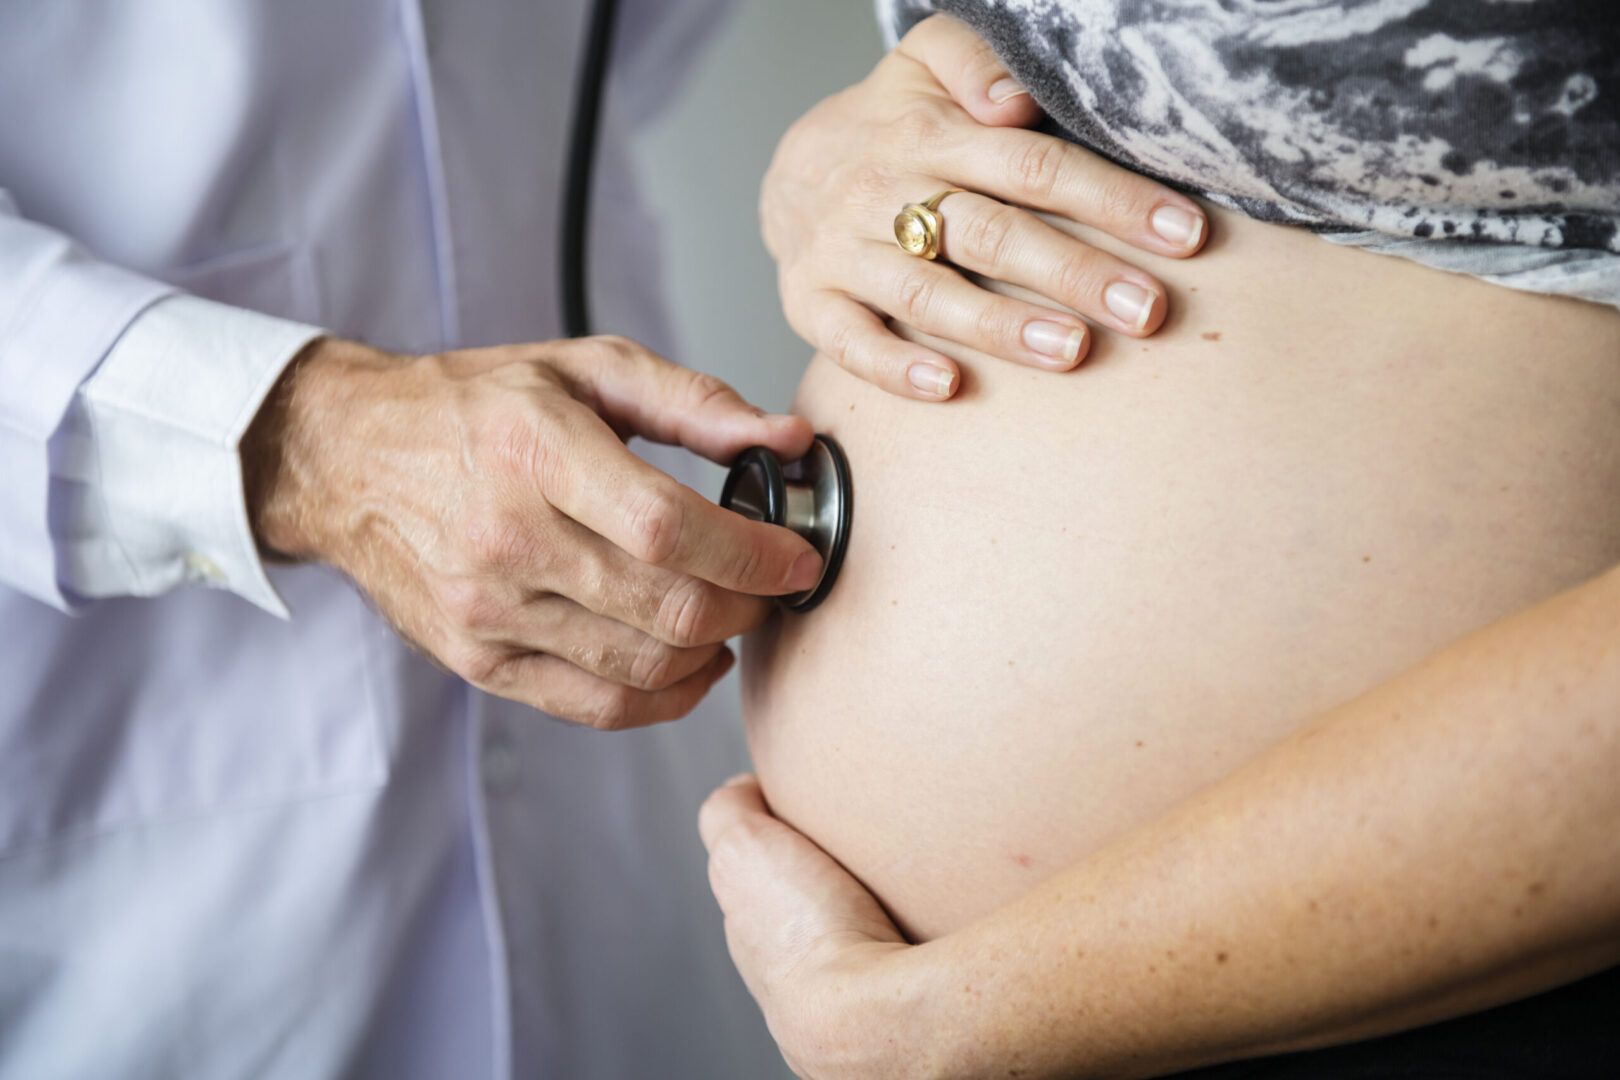
This concept allows to immediately locate the lung on any patient, from skinny to bariatric ones, from firm youngsters to old, tired ladies, and from babies to giants. The physician first compares both hand sizes (the term BLUE-hands refers to the patient). Between 1.65 and 1.85 m, the difference is insignificant. Then, the physician applies the “upper” hand, just below the clavicle, with tip of fingers at the midline (Fig. 1). Therefore, the upper hand is oblique. The physician then applies the “lower” hand, just below the upper one, thumbs excluded. The geometry of the hands makes the lower finger of the lower hand naturally transverse on the thorax.

Fig. 1 The anterior BLUE-points. The upper hand is applied with the little finger against the lower border of the clavicle (in its long axis). The finger tips touch the midline. The lower hand is applied below the first one. The thumbs do not count. The upper BLUE-point is at the root of the middle and ring fingers of the upper hand ( upper cross ). The lower BLUE-point is in the middle of the palm of the lower hand ( lower cross ). In this subject, the lower BLUE-point is near the nipple. This definition makes a symmetric analysis usually avoiding the heart. The lower edge of the lower hand roughly indicates the phrenic line ( arrow ), i.e., the end of the lung. Note that the shape of the hands has been studied in order to correct the obliquity of the clavicle, yielding a roughly transversal phrenic line. An examination at the lower BLUE-point, in a supine patient at Earth level, defining a Stage 1 examination (1’ in actual fact, since the subject is in semirecumbent)
Once this is done, the anterior lung is located, in almost all cases, exactly facing both hands. The lower finger of the lower hand indicates the lower anterior border of the lung (i.e., what we may call the phrenic line). The BLUE-points replace our previous concepts.
The BLUE-protocol was designed for exploring supine or semirecumbent patients without bothering them too much. The anterior and lateral chest walls are rather accessible. The posterior wall, of high relevance, requires more technical subtleties.
2. LUNG ZONES, THEIR RELEVANCE IN THE BLUE-PROTOCOL, THEIR COMBINATION WITH THE SKY-EARTH AXIS FOR DEFINING STAGES OF INVESTIGATION
The anterior zone, defined using the BLUE- hands, is of utmost relevance, defining in a few seconds half of the profiles of the BLUE-protocol.
The lateral zone, defined from the anterior to the posterior axillary line, is not used in the BLUE-protocol, for reasons of redundancy. It may be however useful on occasion (if PLAPS- point is hard to reach) (Fig. 2).
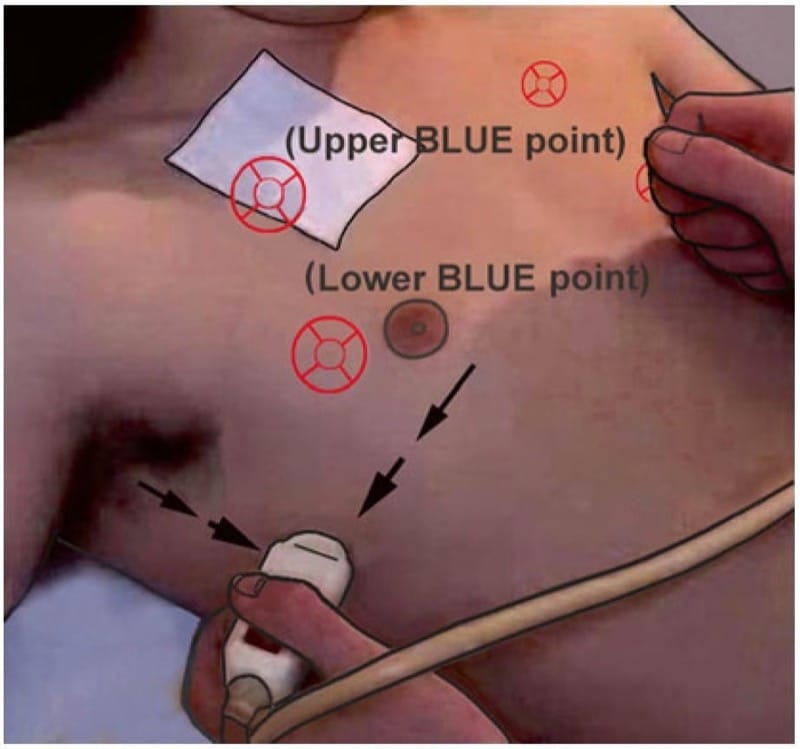
Fig. 2 Phrenic point. This figure shows a Stage 2 examination, i.e., a lateral continuation of the Stage 1. The probe here is at the intersection between the middle axillary line ( vertical arrow ) and the phrenic line ( horizontal arrow ): the phrenic point.
The posterior zone, i.e., all that is behind the posterior axillary line, may appear of limited access in supine patients, a kind of twilight zone, a hidden face of the moon, etc., because the patient’s weight squashes the bed. The aim of the PLAPS-point is to make this zone accessible, precise, and easy (without searching for a help, turning difficult patients, losing time for unleashing the hands, etc.).
We define stages by considering these areas and the fact that the patient is seen in the supine position and (for most of us) at Earth level. The notion of stages specifies that the finding is done at Earth level, a kinda tribute to Scott Dulchavsky and Andrew Kirkpatrick, who investigate astronauts.
Stage 1 investigates the anterior wall in supine patients.
Stage 2 adds the lateral wall.
Stage 3 adds the external part of the posterior wall (zone “3”).
In Stage 4, the patient must be positioned laterally, or seated, in order to comprehensively study the posterior chest wall. Stage 4 also includes the apex. Only a microconvex probe can efficiently do this. With Stage 4, ultrasound is nearly as competitive as CT.
3. SOME TECHNICAL POINTS FOR MAKING LUNG ULTRASOUND AN EASIER DISCIPLINE
One major interest of the BLUE-points is to define points far enough from the abdomen. The advantages are as follows:
- Energy for explaining what the diaphragm looks like (although not a big issue) is avoided, at least initially.
- Energy for explaining how to recognize a diaphragm in challenging patients (a bigger issue) is avoided.
- Energy for explaining how to distinguish a pleural from a peritoneal effusion is avoided.
- Energy for explaining signs we don’t use (e.g., spinal sign) is avoided.
- Energy for explaining how to distinguish a basithoracic lung consolidation from some common abdominal fat (or organ) is avoided. Without any notion of probe location, it can be a challenge (Fig. 3).

Fig. 3 Abdominal fat. Such an image given to a reader without the notion on where it was taken (here, far more podal than the lower BLUE-point or PLAPS-point) could mislead this reader for a lung consolidation. This abdominal fat may be distinguished, but this would require complicated knowledge: a waste of energy.
We guess that many users would be frustrated not to see the diaphragm. Its anterior insertion is located at the lowest finger of the BLUE-hands, defining the phrenic line. One main point must be understood. Using our perpendicular approach, we do not need to see the diaphragm: its location and dynamics are much more important. The diaphragm insertion is the location where the image displays on inspiration a thoracic structure at the left of the screen (i.e., air barrier or pleural or alveolar disorders) and on expiration an image of the liver (or spleen) at the right of the screen. We then know exactly where the diaphragm is (and how it works) without any direct visualization, sparing energy.
Following the BLUE-points prevents some mistakes, such as applying the probe too low. If applying it on the zones 2 and 4 of (color) of the international consensus conference on lung ultrasound (2012), for instance, the users would regularly see the liver/kidney interface (which may look at very first sight as a diaphragm), would be happy to recognize the “diaphragm,” would diagnose a huge lung consolidation (the… liver) above, and would prescribe antibiotics to a patient who has nothing to do with a diagnosis of pneumonia (and will remain untreated).
We should avoid to position patients with their hand behind their head, as often done for inserting chest tubes. In this position, the scapula comes in the field, generating an image really difficult to understand.
4. STANDARDIZATION OF A LUNG EXAMINATION: THE BLUE-POINT
There are 6 BLUE-points, three per lung. Like the 6 standard derivations of the ECG, the concept of the BLUE-points should help the users when they apply their probe on the largest organ of the body. The label upper and lower BLUE-points assumes a Stage 1 (supine) or 1’ (semirecumbent) analysis (if not, position has to be specified). They aim at following the trapezoidal shape of the lung.
5. STANDARDIZATION OF A LUNG EXAMINATION: THE UPPER BLUE-POINT
It is defined between the 3rd and 4th finger of the upper BLUE-hand, at their palmar insertion.
6. STANDARDIZATION OF A LUNG EXAMINATION: THE LOWER BLUE-POINT
It is defined at the middle of the palm of the lower BLUE-hand. This allows to avoid the heart in most cases, while having a symmetric definition. The lower BLUE-point is near to the nipple in the adult and far below in the neonate, but works at any age. When the heart occupies the lower BLUE-point, the probe should be placed more laterally.
The little finger of the lower BLUE-hand indicates the phrenic line. The continuation of this line and its intersection with the middle axillary line define the phrenic point, locating the usual lateral place of the cupola (which can vary if there is atelectasis or lung overdistension).
7. THE PLAPS-POINT
This paragraph is long. Several details make this point more complicated than the anterior ones. One of the multiple benefits is the possibility to postpone a transfer to CT.
PLAPS is a practical abbreviation (a bit of an onomatopoeia, since PLAPS often looks like “splashes”) for posterolateral alveolar and/or pleural syndrome. The PLAPS- point is posterior (Fig. 4). PLAPS is sought for in a Stage 3 examination, i.e., in supine (or semirecumbent) patients. The PLAPS-point is designed for detecting most alveolar or pleural disorders. Its basic description is simple: “the intersection between the posterior axillary line and the transversal line continuing posteriorly the lower BLUE-point.” The reality is more complex:

Fig. 4 PLAPS-point. This figure shows a probe applied at the PLAPS-point: this is a Stage 3, which adds this external part of the posterior area, using a short probe. This is the intersection between the transversal line continuing the lower BLUE-point ( dotted line ) and the longitudinal posterior axillary line ( arrow ) or, as seen here, as far as possible behind. This figure shows how the back of the patient is made slightly accessible by taking the elbow and rotating the thorax to the left, here. We gain precious centimeters of posterior exploration, with the probe head
as perpendicular as possible and mostly pointing (as far as possible) to the sky, i.e., suitable for detecting small effusions in supine patients. Rigid beds require more of this maneuver, since the operator’s hand cannot make a “hole” in the bed. The PLAPS-point immediately detects small and large pleural effusions (and 90 % of cases of lung consolidations in the critically ill). On the target to the left, the numbers 1 and 2 indicate the down extensions of the PLAPS-point. Using the PLAPS-point, the probe is just above the diaphragm, i.e., in full lung area. PLAPS : posterolateral alveolar and/or pleural syndrome. The right index of the operator points on the phrenic point (cross)
- Critically ill patients are usually supine, ventilated, sedated, and curarized. The bed makes a physical hindrance to the progression of the probe at the back and above all to a 100 % perpendicular approach of the probe on the posterior chest wall (a general rule in LUCI). A long probe would be a major issue to this maneuver. We aim at showing the maximal of this posterior wall. The probe head must point as far as possible to the sky, in accordance with the principle N°2. We wish at shooting at the lung (probe being considered like a gun) and not the parietal layers (Fig. 5). Several solutions are now showed for optimizng this step:
- Using the shortest probe. Each cm of saved length is providential for analyzing more the posterior lung (i.e., developing LUCI). Our microconvex probe is 88 mm long.
- Making a kind of “hole” in the bed. The hand depresses the bed to gain important cm. Rigid beds make this gesture more difficult.
- Slightly turning the patient by putting the ipsilateral arm above the thorax and pushing slightly the elbow toward the midline. This opens a few (sometimes providential) degrees (Fig. 4). Turning the patient too much would maybe locate a small effusion at the mediastinal pleura, preventing to locate it posteriorly.
- Our last solution for being 100 % perpendicular to the pleural line: just inserting a TEE probe posteriorly, a maneuver pompously labeled the BAPLUTEEP maneuver (bedside assessment of posterior lung using transesophageal echography probes).

Fig. 5 PLAPS-point and perpendicularity of the probe. The left red arrow is a little perpendicular to the chest wall and will display the lung consolidation quite well. The right red arrow goes through soft tissues and will never show lung ultrasound patterns. Intermediate images will give ill-defined images. The operator should care at applying the probe as far as possible perpendicular to the wall.
- How to hold the probe is diametrically opposed to the anterior way, where there is no constraint. Here, we have no visual control on the probe. We will hold it like a tennis racket, firmly, using the whole hand (Fig. 6). Like orbital walls that protect an eye, the thumb and index will protect the probe head. This allows to softly feel the skin and avoid a harmful pressure (for the patient and for the probe). The cable of the probe should also be protected from excessive curvature, and the hand, holding a short probe, will be able to protect both head and cable.

Fig. 6 PLAPS-hand. For PLAPS-point explorations, the probe must be held this way, like a tennis racket. See in the text why.
- The probe should be as perpendicular as pos-sible: this allows to have well-defined, standardized images of lung ultrasound signatures (lung line, fractal line, etc.); it ensures the best correlations with measurements (a tangential probe would overestimate dimensions).
- The image acquisition. It can be useful to slightly rotate the probe for correcting the obliquity of the ribs. A clear bat sign must be displayed for locating the pleural line with confi dence.
- For optimizing this approach, the variable geometry of the PLAPS-points must be studied.
- As regards the horizontal component, the short probe is inserted as far as possible medially (toward the rachis), after the posterior axillary line, depending on the body habitus, the possibility to slightly turning the patient’s back. The shorter the probe, the easier the PLAPS-point.
- As regards the vertical component, a negative examination makes already ultrasound as accurate as radiography. But the user wants more.
- The “extended PLAPS-point”: one intercostal downward defines a first extension of the PLAPS-point. Finding a PLAPS there makes ultrasound superior to radiograph. Logically, if no PLAPS has been found at the native PLAPS-point, a PLAPS found at this first extension must have a small volume .
- The second extension (one more intercostal space down), done if the first extension is negative, makes ultrasound as accurate as CT. If a PLAPS is present, its volume will be logically very small, just above the cupola. If a large image appears on the screen, it cannot be a PLAPS: this is the liver. This detail (useful in challenging patients) makes ultrasound easy.
The aim of the PLAPS-point is to have the probe located at the thorax. Too cranial would miss small juxtaphrenic lesions and too podal would make sometimes an insertion of the probe at the abdomen, showing structural images which can mimic consolidations, such as the liver, spleen, or fat. It is much simpler to avoid these structures than trying to explain why they are not a lung consolidation. Using the notion of extended PLAPS-point, the operator will descend and detect the diaphragm easily. The principle of this flexible approach allows to define PLAPS with maximal accuracy and minimal explanations.
The user is free to use a lateral analysis first, more easy than the PLAPS-point in some ventilated patients. If large effusions or consolidations are detected this way, the BLUE-protocol is concluded as well.
8. LOCATION OF THE LUNG IN CHALLENGING PATIENTS
The lung volume is the same in batriatric and thinner patients, yet all this fat may make it difficult to locate it. The BLUE-hands allow to confidently locate the anterior lung and acquire an information rather easily. Although the PLAPS- point will be strictly defined, the image acquisition is more diffi cult. We use some principles inspired from air navigation. If there is a doubt about the diaphragm, the user will scan podally and identify a large mass podally that will maybe look also ill defined. This tissular mass is supposedly the spleen, but may be a lung consolidation. If the user scans downward, and detects an organ, also ill-defined, but looking, even from far, to a kidney, the probability of a kidney surrounded by a spleen is major. And the phrenic location is confidently done.
9. OTHER POINTS? THE CASE OF THE PATIENT IN THE PRONE POSITION
The simplest way we found was to consider the scapula. The point just inside its internal border at half way would be an equivalent of the upper BLUE-point (upper prone point?). The point at its lower end would fit for the lower BLUE-point (lower prone point?). A horizontal line drawn from one or two fingers above the point where the lower rib reaches the rachis usually indicates the diaphragm, at least in young adults (Fig. 7).
Regarding the whole thorax, we could have added many other points, but, from Sybile Merceron’s words, “too many points kill the points.” We agree.
Fig. 7 The prone points, suggestion. Patient in the prone position. The upper prone point is located just inside the middle of the scapula. The lower prone point is just below the scapula. We determine the junction between the lung and abdomen, in young adults, at one or two cm above the point where the last ribs reach the rachis.
10. BLUE-POINTS AND CLINICAL INFORMATION
- The upper and lower BLUE-points immediately indicate anterior interstitial syndrome.
- The upper BLUE-point immediately indicates pneumothorax in semirecumbent, dyspneic patients.
- The lower BLUE-point immediately indicates pneumothorax in supine, ventilated patients.
- The PLAPS-point immediately indicates the huge majority of pleural effusions, whatever their size, and 90 % of locations of acute lung consolidations. Obviously, substantial effusions or consolidations are detected at the phrenic point.
11. ASIDE NOTE MORE DEVOTED TO PULMONOLOGISTS
Of minor interest to the intensivist, the upper BLUE-point is roughly located at the upper lobe or culmen, the lower BLUE-point at the middle lobe (lingula), and the PLAPS-point at the lower lobe. In the prone position, one can correlate the upper third to the upper lobe, the middle to the Fowler segment of the lower lobe, and the lower third to the basal pyramid of the lower lobe.
12. PHILOSOPHY OF THE BLUE-POINTS: CAN THE USERS DO WITHOUT?
Yes, the operator is always free to insert the probe at will of course.
Specifically designed for the BLUE-protocol, the BLUE-points make lung ultrasound simple. They are standardized and reproducible, associating clinical efficiency and easiness of use. They were carefully designed for optimizing the search for pleural or alveolar disorders, even small. One main idea is (reminder) to be far enough from the abdomen. The BLUE-points follow the principle N°7 of LUCI: most disorders have substantial extension. A disorder not seen behind a rib will for sure be seen also above or below. Interstitial syndrome, pneumothorax, and pleural effusion especially will be detected as well at a given BLUE-point than just beside and even at any other area (the only exception would be a minute isolated consolidation). Therefore, the BLUE-points are indicative, but also very flexible. If a BLUE-point is not accessible (dressing, subcutaneous device, electrode applied by not trained paramedical team, etc.), applying the probe just beside is faster than tearing the electrode or training the nursing team to put them at the shoulders (which should be ideal). As indicated on page 7, the ribs hide maybe half of the lung surface (at a given phase), but one can do perfectly with the other half.