 Nerve Blocks App
 Pain Medicine Assistant App
 POCUS App
 IV Access App
 MSK Knee App
 VetRA App
 Nerve Block Manual
 Regional Anesthesia Updates
 Anesthesiology Manual
 Anesthesiology Review
 Anesthesia Updates 2025
 Anesthesia Updates 2026
 Pediatric Anesthesia Updates
 Airway Management Updates
 US Interventional Pain Manual
 Pain Medicine Updates
 Mastering Difficult IV Access
 PACU Nursing Manual
 RA Veterinary Manual
 About
AboutIndications
These are pathologies where lung ultrasound has been documented to be of immense value in making the definitive diagnosis or providing crucial guidance in diagnostic algorithms.
- Assessment of acute respiratory failure
- Pneumonia
- Pulmonary edema
- Pulmonary embolism
- COPD or asthma
- Pneumothorax
- Etiology of shock
Essential info
- Healthy lungs: Lung tissue typically cannot be imaged due to substantial attenuation (absorption) and scattering of ultrasound by air. Consequently, the pleurae are reflected on ultrasound.
- Here’s how reliable ultrasound is as a diagnostic tool for common lung pathology:

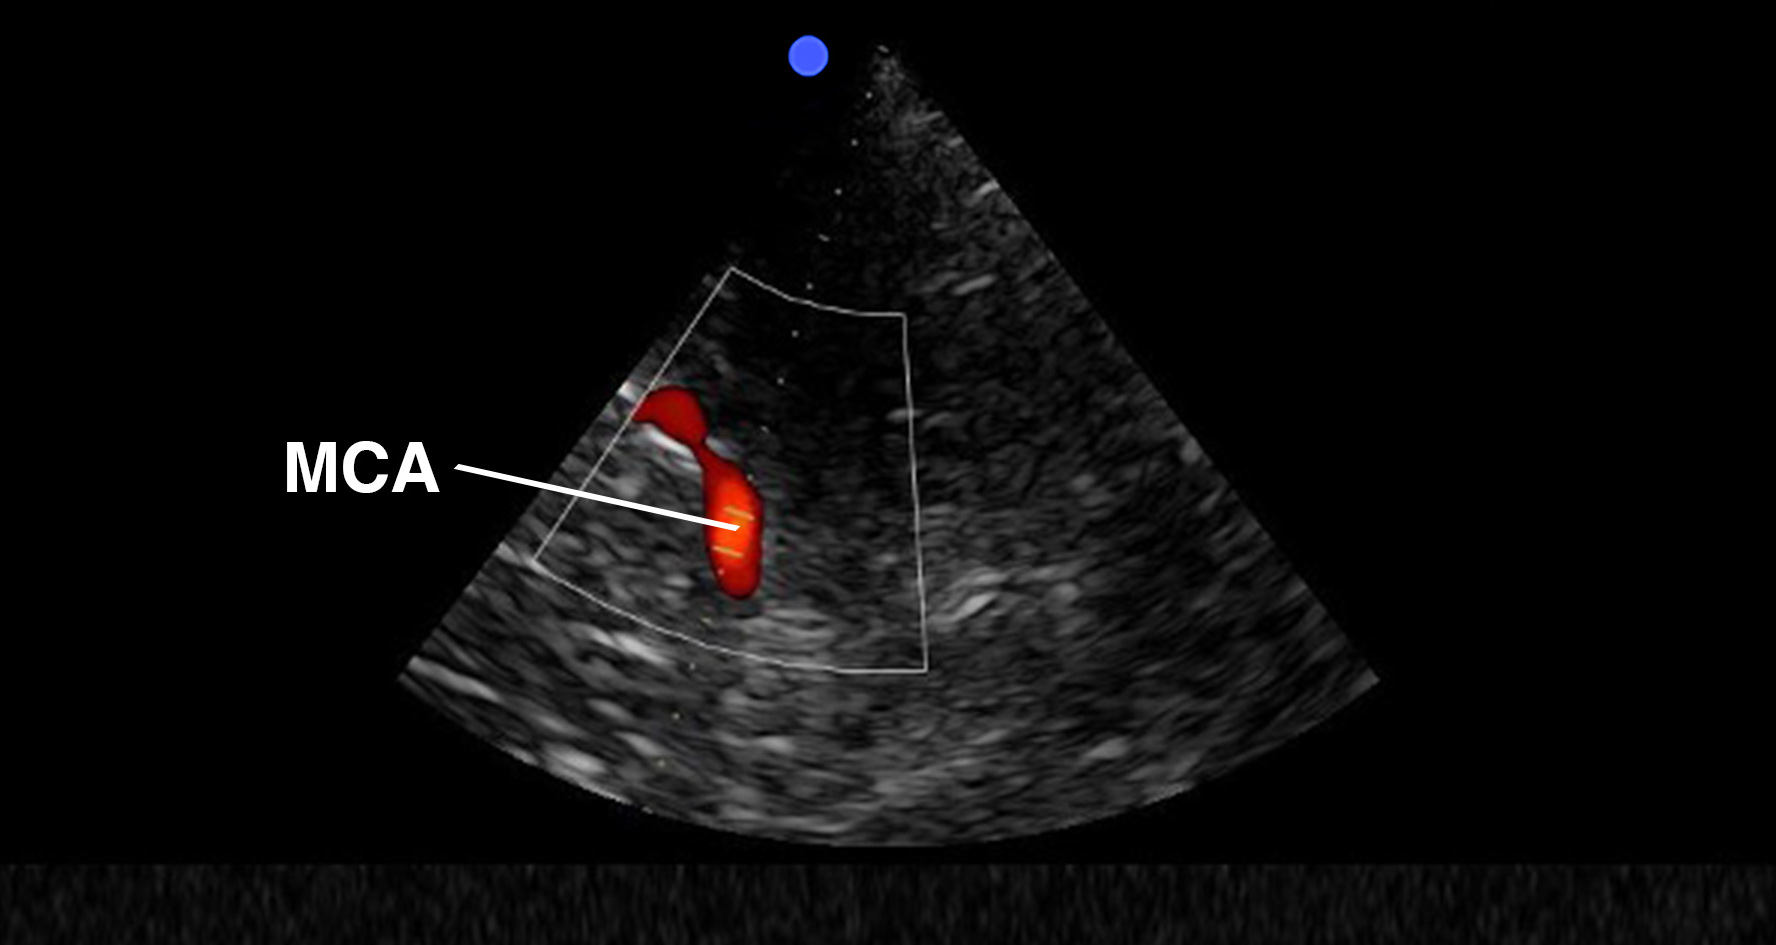
Functional anatomy
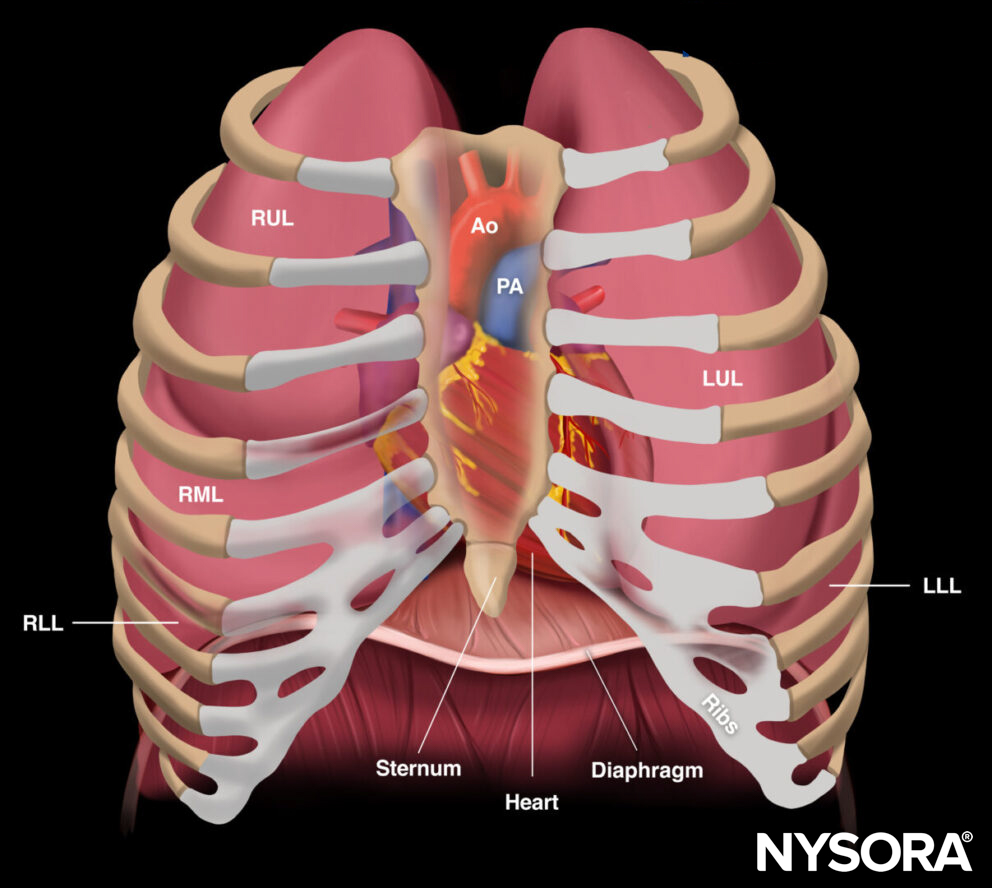
Relevant anatomy for POCUS examination of the lungs. RUL, right upper lobe; RML, right middle lobe; RLL, right lower lobe; LUL, left upper lobe; LLL, left lower lobe; Ao, aorta; PA, pulmonary artery.
Ultrasound machine setup
Transducers
- A curvilinear transducer is mostly used for a standard lung ultrasound. It will allow you to assess the lung tissue, diaphragm, and pleura.
- If there is only interest in the pleura, it may be better to use a linear transducer.
- A phased array transducer may also be used for a standard lung exam, but it may be more difficult to address the pleura.
Tip
A microconvex transducer has a small footprint (1 x 2 cm) and provides good resolution from 1 to 17 cm depth, allowing both posterior analysis and fine resolution. It has therefore been suggested as the optimal choice for point-of-care ultrasound, but most ultrasound machines will not be equipped with this type of transducer.
Ultrasound preset
Use the abdominal or lung setting.
Tip
Factory-set ultrasound machines will typically have these presets already installed. The best is to start off by asking the ultrasound manufacturer’s specialist to install the stock presets for the desired anatomy. You can improve upon the factory presets and make your own preset, but this typically requires considerably more experience and technical skills.
Depth settings
- For pleura: Use 1-5 cm (linear or curvilinear transducer)
- For lung tissue: Use 5-10 cm (curvilinear or phased array transducer)
- For diaphragm: Use 10-15 cm (curvilinear or phased array transducer)
Tips
- Often, practitioners will start with a depth of 8 cm and change the depth settings according to the obtained ultrasound images.
- Slightly deeper settings may be required for larger patients, especially for assessments of the diaphragm.
Patient position
Position the patient supine with the arms abducted to allow application of the ultrasound transducer on the anterior and lateral aspects of the chest wall.
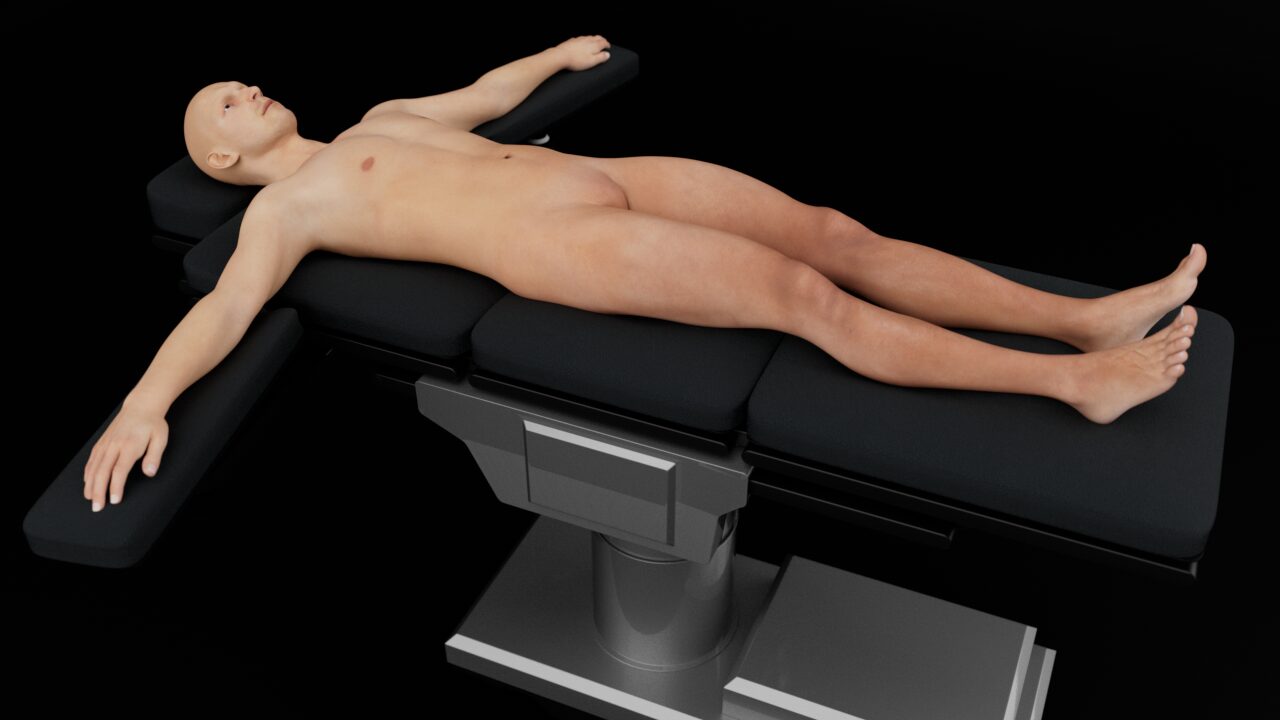
Patient position for lung ultrasound.
Landmarks
- Clavicle: Midclavicular line
- Axilla: Anterior, midaxillary, posterior axillary lines
- Nipple: Approximate estimate of the 4th intercostal space
- Costal margin
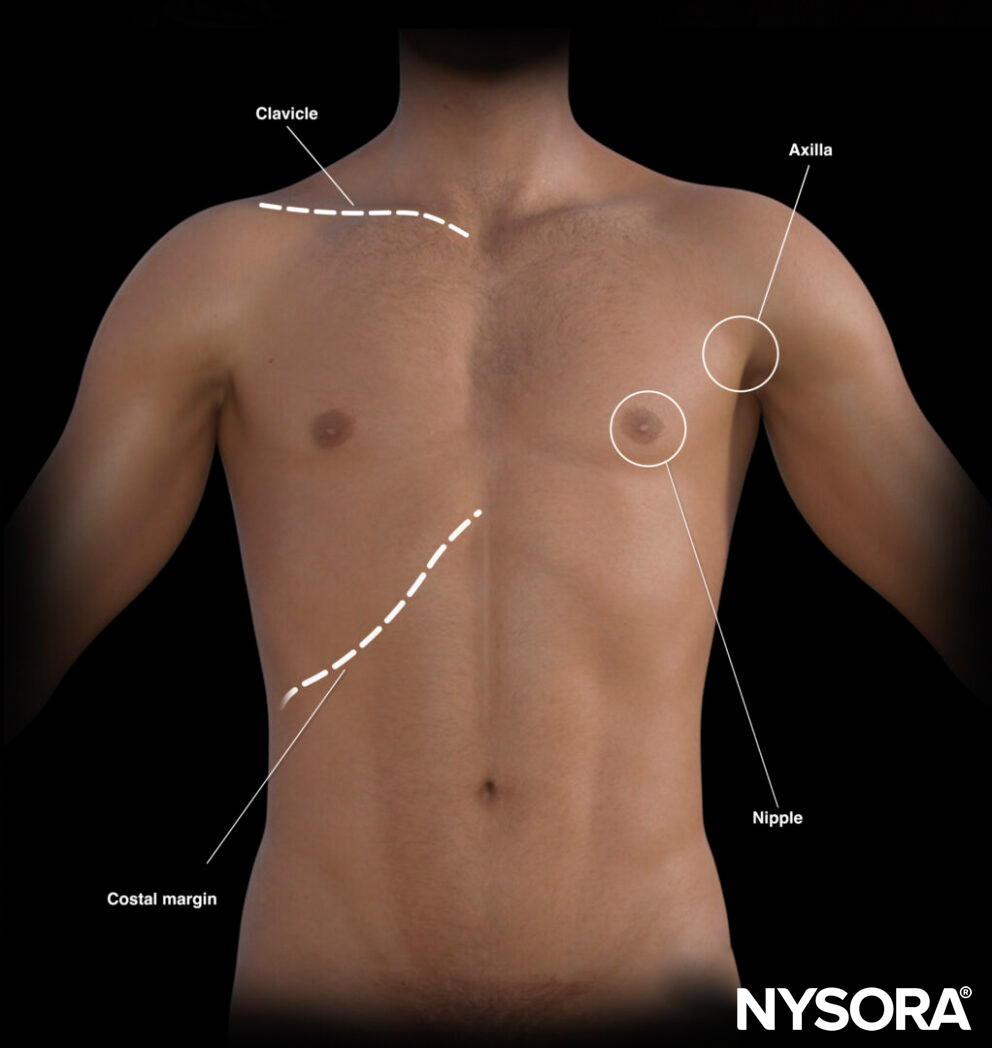
External landmarks for lung ultrasound.
The landmarks on the thorax can also help draw virtual lines to guide transducer placement.
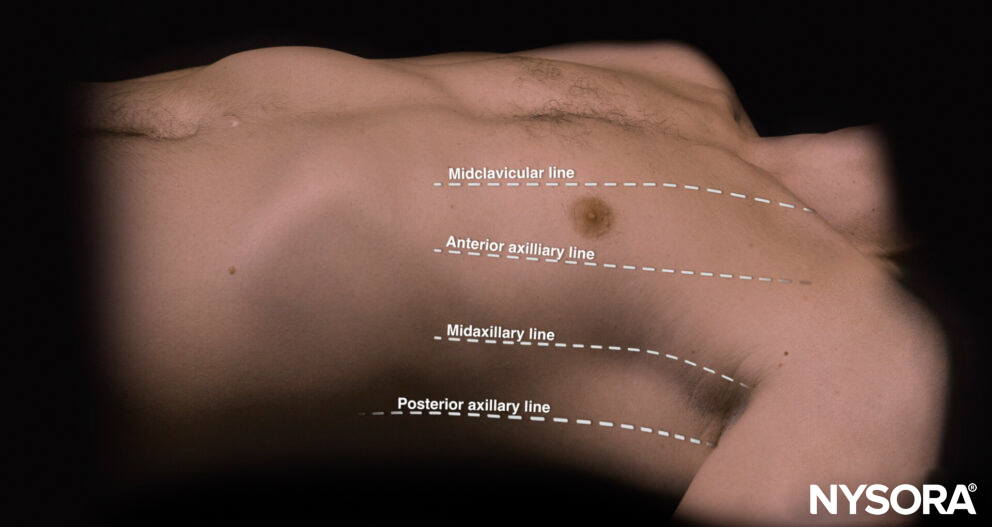
Virtual lines on the thorax.
Transducer position
A standard point-of-care lung exam involves the assessment of three specific ultrasound positions for each lung with the ultrasound transducer in a longitudinal orientation:
- The 1st BLUE point (Bedside Lung Ultrasound in Emergency) is located on the anterior chest wall, just below the clavicle (2nd-3rd intercostal space) and on the midclavicular line.
- The 2nd BLUE point is located on the anterolateral chest wall, just lateral to the nipple (4th intercostal space) and somewhere between the anterior axillary and midaxillary line. When the heart is visualized on the left side of the chest, slide the transducer posteriorly to obtain a clearer image of the lung.
- The PLAPS point (Posterior and/or Lateral Alveolar and/or Pleural Syndrome): Continue sliding the transducer from the second point as posterior as possible. Keep the transducer perpendicular to and posterior to the posterior axillary line to image the lung tissue just above the diaphragm.
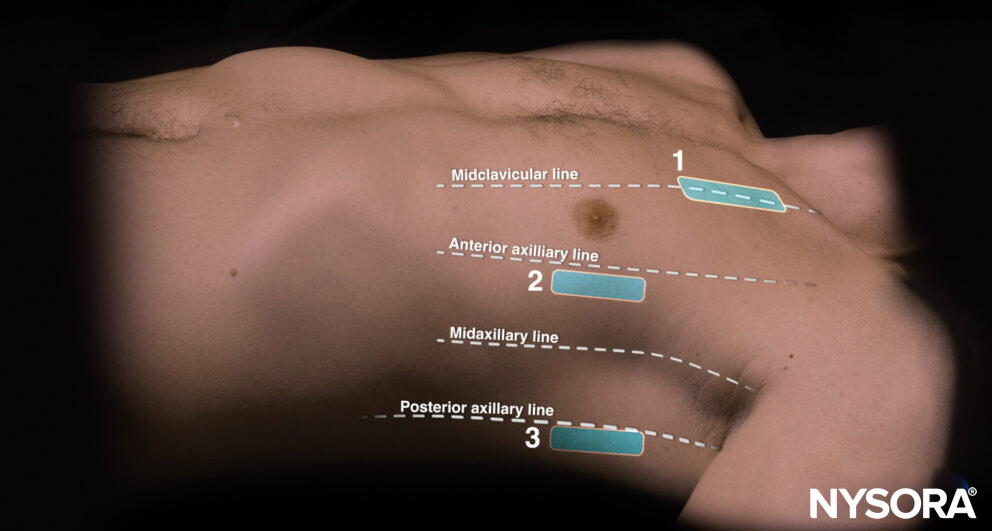
Transducer positions for lung assessment in relation to the external anatomical landmarks. 1, 1st BLUE point; 2, 2nd BLUE point; 3, PLAPS point.
Tip for estimating optimal transducer positions for lung assessment:
Position the hands parallel to the clavicle with the little finger just next to the clavicle. The thumbs do not count; remove them from the estimate. The middle of the upper hand or the root of the middle and ring fingers are the first positions (also called the first BLUE point). The second BLUE point is the middle of the palm of the lower hand. The “phrenic line” is the transverse line that follows the little finger of the lower hand. This line correlates with the end of the lung.
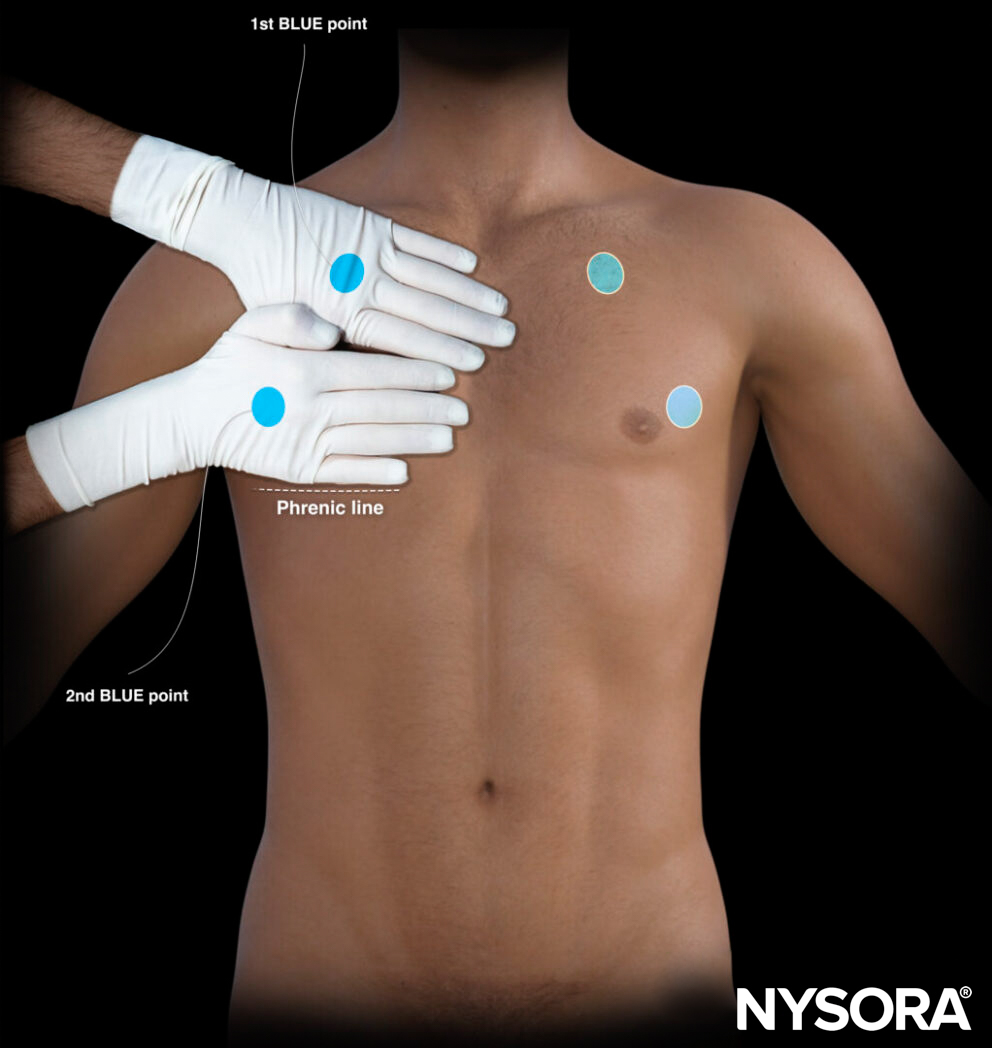
Estimation of the BLUE point positions by using the hands.
For obtaining the third point or the PLAPS point, follow the 2nd BLUE point as posterior as possible and perpendicular to the posterior axillary line. The “phrenic point” is an additional point that can be used to assess the diaphragm. It is the intersection between the phrenic and midaxillary line.
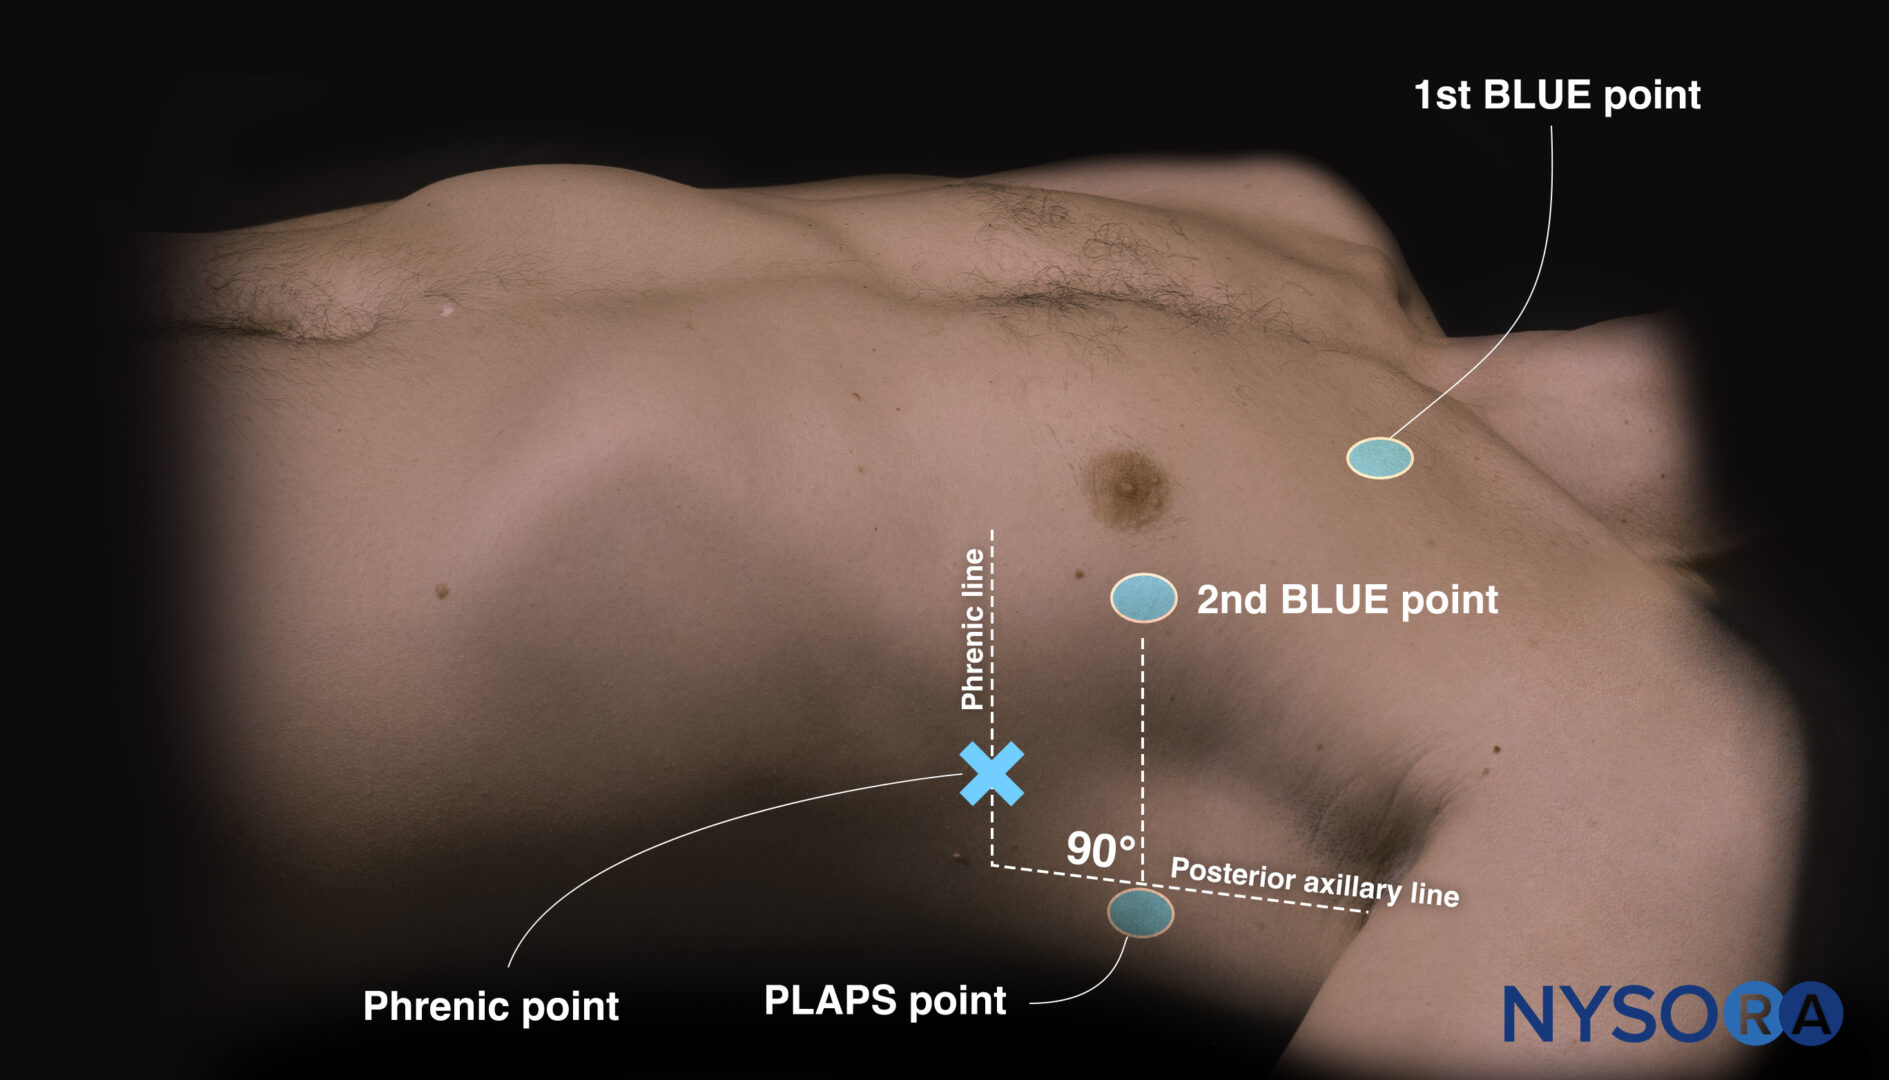
The third or PLAPS point is obtained after following the 2nd BLUE point perpendicular to and posterior to the posterior axillary line.
Tips
The third, or PLAPS, point assesses the lower lobes of the lungs and is the best position for scanning for lung consolidations and pleural effusions.
When scanning healthy lungs, the “curtain sign” is present at the PLAPS level. The curtain sign occurs when imaging of organs beneath the diaphragm is affected by respiratory motion or by aerated lungs.
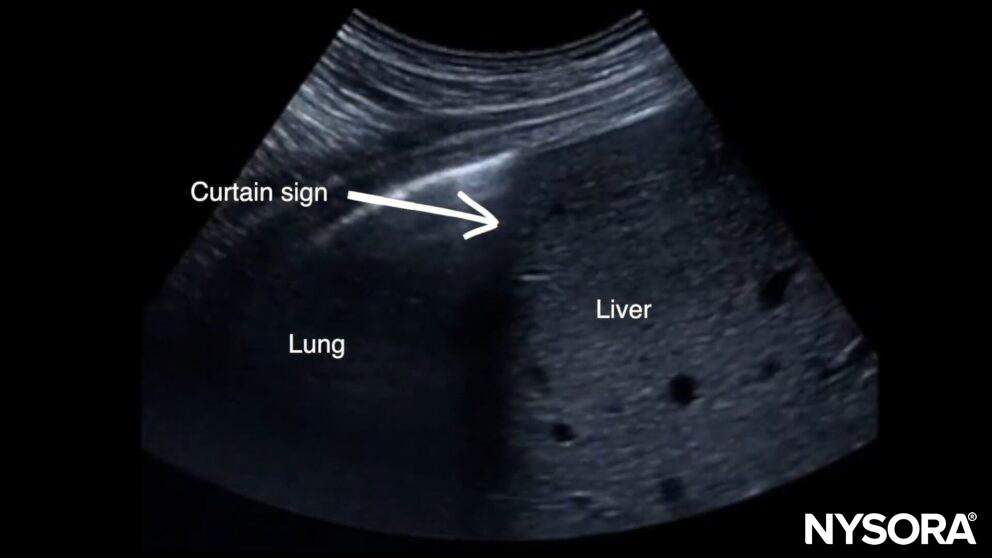
Curtain sign.
Performing a lung ultrasound should cover all three points on each side of the chest. As a result, it will cover all the lobes of the right and left lungs.
A. Transverse anatomy of the chest and ultrasound positions on the right chest. B. Bilateral ultrasound positions on the right and left lung covering all the lobes of the lungs.
Scanning
In each of the three positions, the lungs should be assessed for the following six signs:
- Bat sign
- Lung sliding
- A-lines
- B-lines
- Consolidation
- Pleural effusion
These will provide you with more information on the correct position of the transducer and pathologies.
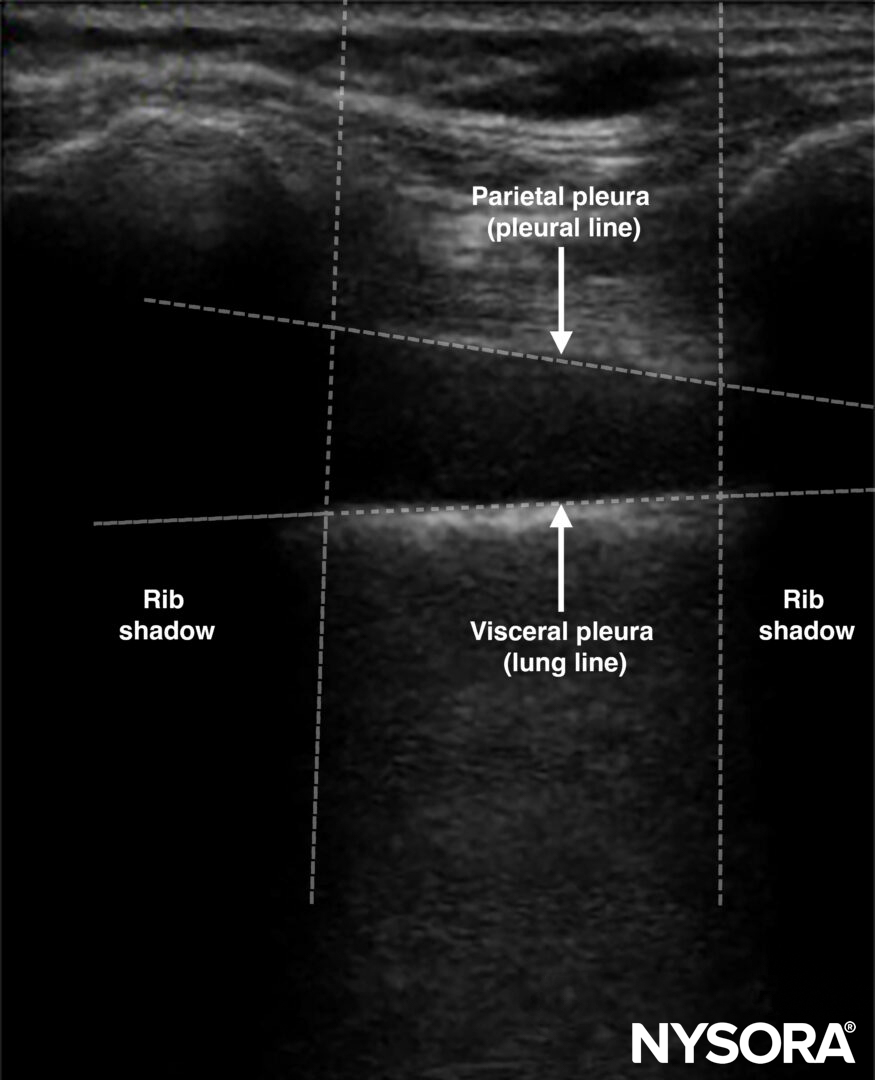
Bat sign
Bat sign = two adjacent ribs with pleura in between.
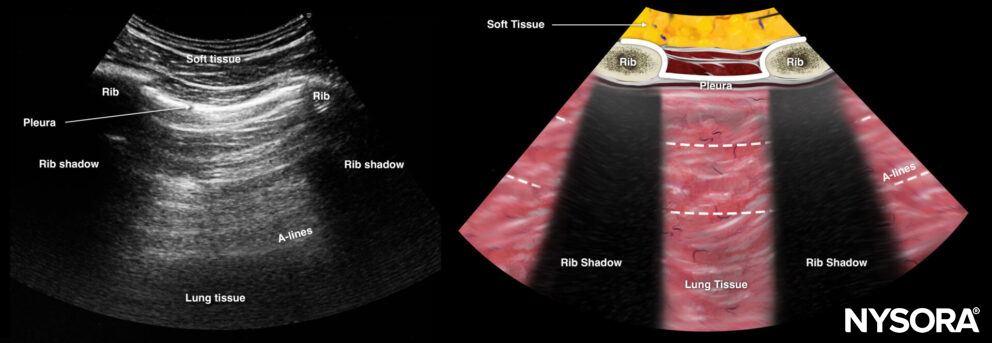
The bat sign is indicated in white: Two adjacent ribs with pleura in between.
The bat sign indicates the position of the transducer between two ribs and the ability to image the lung surface as well as deeper structures. This should always be the first step that makes sure you are in the correct position to address the pleura and the underlying lung. It is called the “bat sign” since the ribs resemble the wings and the pleura resembles the body of the bat.
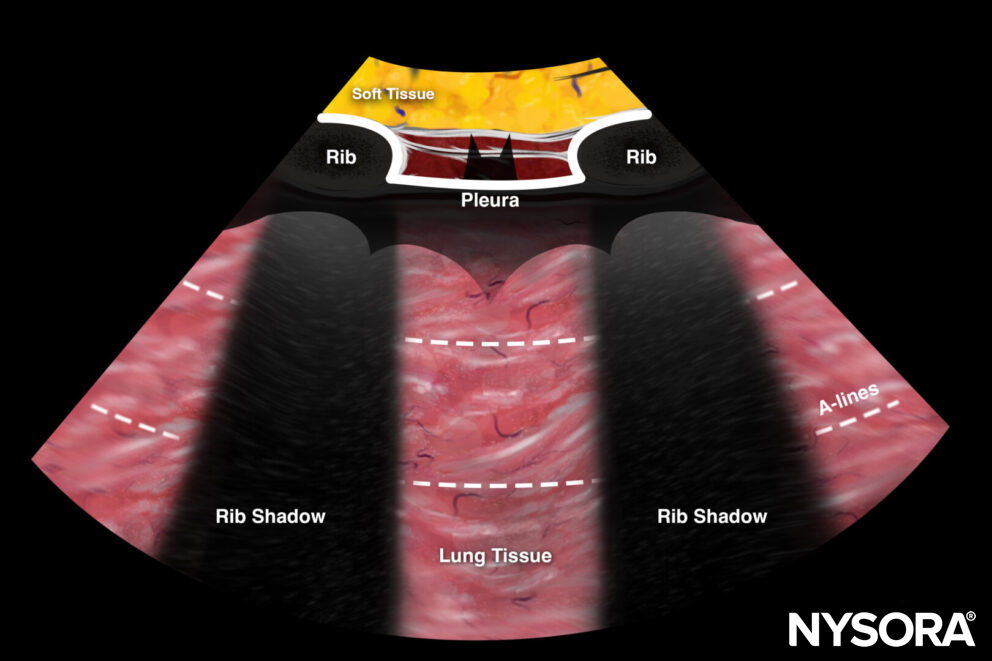
The bat sign was named like this due to its bat shape.
Lung sliding
Lung sliding = the two pleural layers sliding over each other, resulting in a shimmering or comet tails.
Notes
The absence of lung sliding is highly sensitive for pneumothorax.
Specificity is estimated to be above 80%. Other causes for absent lung sliding:
- Massive atelectasis
- Mainstem intubation
- Pleurodesis
- Apnea
- Pneumonia
Tips
- The presence of lung sliding rules out a pneumothorax (100%).
The presence of the lung pulse has the same value as lung sliding and also rules out a pneumothorax. The lung pulse is the pleural movement caused by cardiac contraction. It is present only when the parietal and visceral pleura oppose each other.
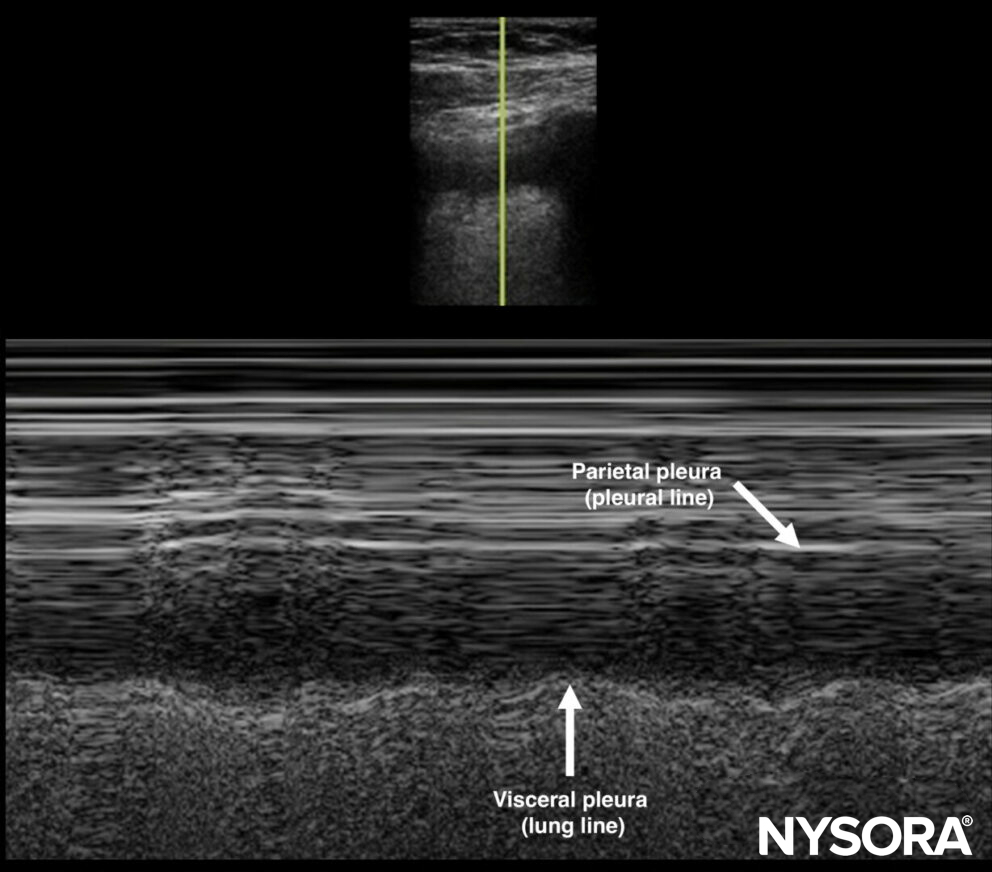
- M-mode of normal lungs exhibits a seashore sign. M-mode can be used instead of, or to supplement, the B-mode when lung sliding is difficult to demonstrate due to suboptimal images.
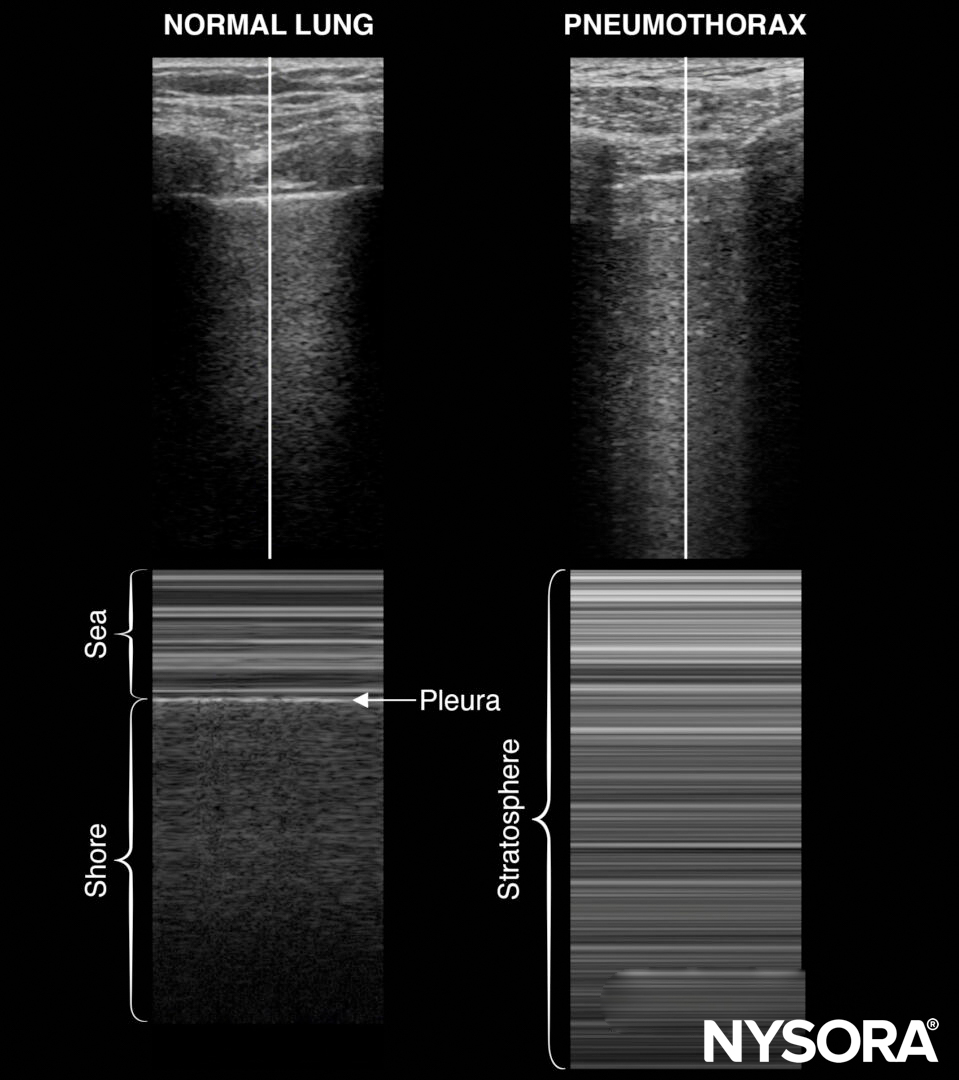
M-mode in normal lungs will show a seashore sign. Imagine the look of a sandy beach with the sea above. A pneumothorax will result in parallel horizontal white lines, also called the stratosphere sign.
- The stratosphere sign is sometimes called the “barcode sign”. This latter may be confusing with the current trend towards complex barcodes (cf. QR codes).
- The lung point is the transition of the inflated lung into the pleural air of the pneumothorax. It is 100% accurate for pneumothorax and can be searched in the absence of lung sliding or the presence of a stratosphere sign.
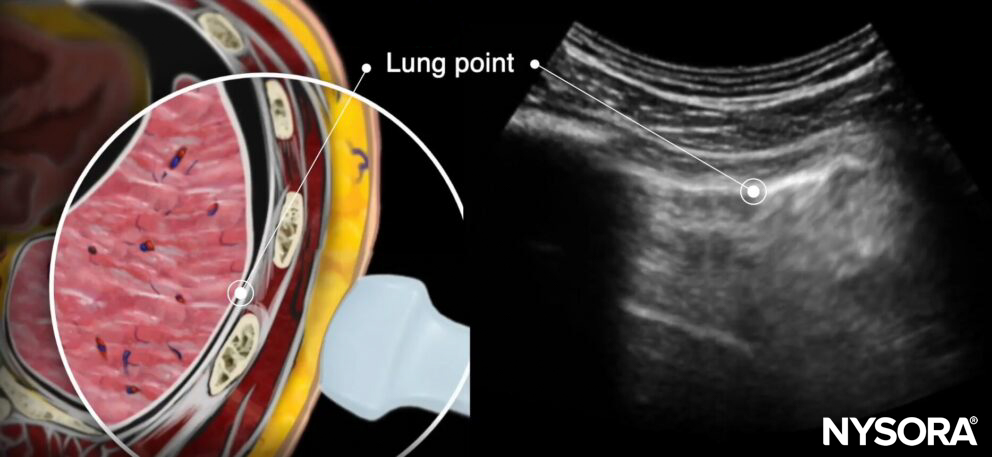
Lung point on transverse anatomy and ultrasound.
- Also, pay attention to the pleural line morphology when assessing lung sliding. A thick or irregular pleural line can be seen in the presence of pneumonia.
A-lines
A-lines = horizontal hyperechoic lines or equidistant artifacts below the pleura = presence of air.
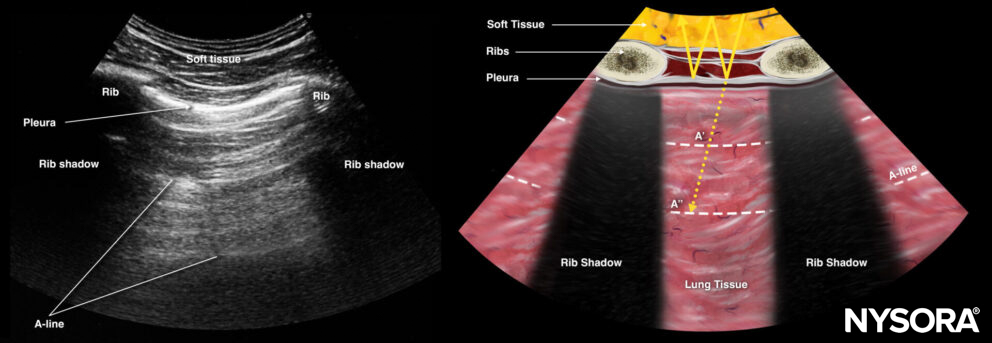
A-lines.
A-lines indicate the presence of air and are thus present in healthy lungs but also in pneumothorax.
Tip
A-lines are caused by reflections of sound between the pleura and the ultrasound transducer on the skin. It is, in fact an artifact (reverberation).
B-lines
B-lines = dynamic vertical hyperechoic lines or ring-down artifacts that originate from the pleural line. They usually appear over the entire ultrasound image, without fading. They look like laser rays and erase A-lines. B-lines indicate the presence of interstitial fluid in the lung parenchyma.
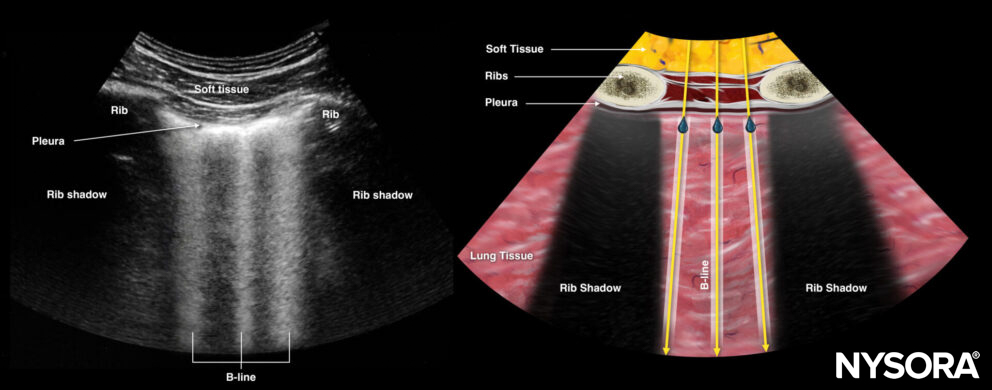
B-lines.

B-lines are reflections of subpleural interlobular extravascular lung water.
More on B-lines:
- B-lines are considered to be very closely spaced reverberations at a distance below the ultrasound resolution limit, interpreted as vertical echo or ring-down artifacts.
- 1 or 2 B-lines: Can be found under normal circumstances and define the mixing of air and fluid next to the pleura. They are often present in the elderly, in the bases of the lungs, and in fissures between lobes.
- 3 or more B-lines are also called lung rockets and represent interstitial abnormalities or disease such as congestive heart failure, ARDS, pneumonia, or interstitial lung disease.
- Diffuse B-lines: Lung rockets at all points of the anterior chest wall are mainly due to pulmonary edema (hemodynamic or inflammatory) and, less frequently, to pulmonary fibrosis.
Tips
- When managing hemodynamic shock, the absence of B-lines can guide further volume loading.
- The presence of B-lines essentially rules out a pneumothorax.
- Other vertical artifacts than B-lines have been described (e.g., E-lines, Z-lines, …), but are less applicable in daily practice. These differ from B-lines in that they do not cover the distal field of the ultrasound image.
Lung consolidation (alveolar syndrome)
Lung consolidation is associated with the ultrasound appearance of the “shred sign” and “hepatization.” Here’s what these signs look like and why they are given these “nicknames.”
Shred sign
“Shred sign” = an irregular line (fractal line) and is the boundary between consolidated lung and aerated underlying lung. It can be observed in non-translobar consolidations, most commonly in pneumonia but rarely also in case of lung infarcts, lung abscesses, or lung cancer.
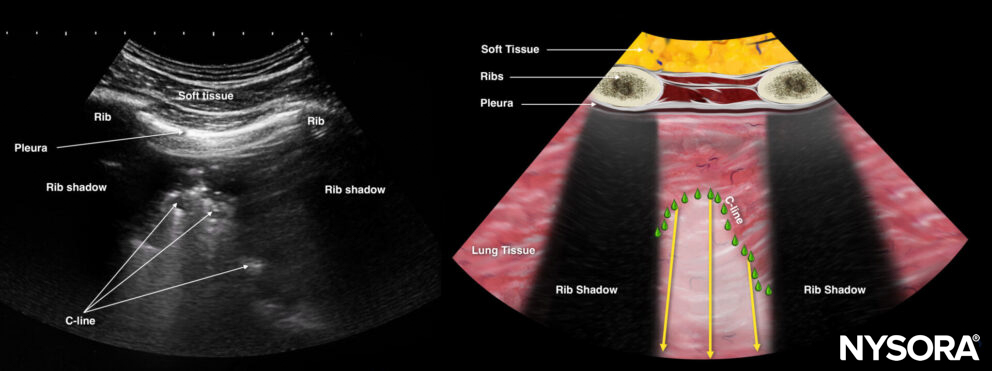
Shred sign or C-line.
Hepatization
“Hepatization” = an ultrasound image that is reminiscent of the ultrasound imaging of the liver. Therefore, “hepatized” lung is lung tissue that can be visualized due to the lack of air and mimics organ tissue. Essentially, it is a translobar consolidation due to pneumonia or atelectasis.
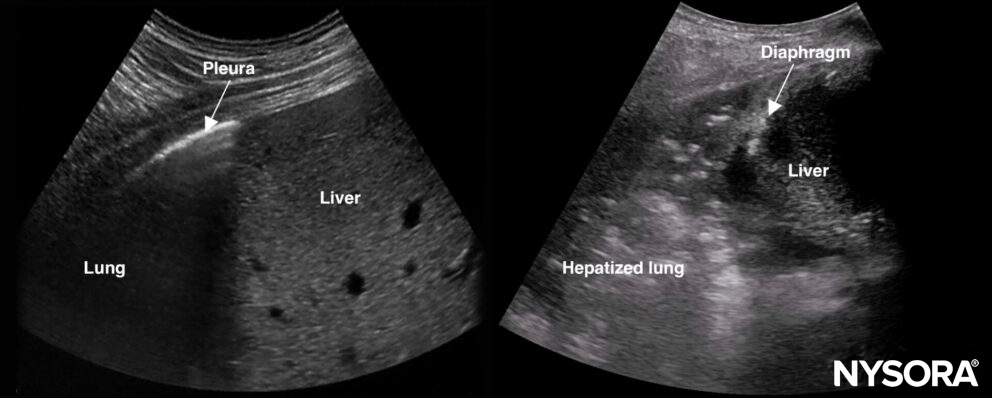
Normal lung on the left and hepatized lung on the right. Normal lung tissue cannot be visualized with ultrasound due to the reflections of the air, while hepatized lung tissue resembles organ tissue.
Tip
Air bronchograms can appear in consolidations. These can be static (with air-filled bubbles) in the case of atelectasis or dynamic in the case of pneumonia.
Pleural effusion
On ultrasound imaging, pleural effusion appears as fluid in the free space between the parietal pleura and lung.
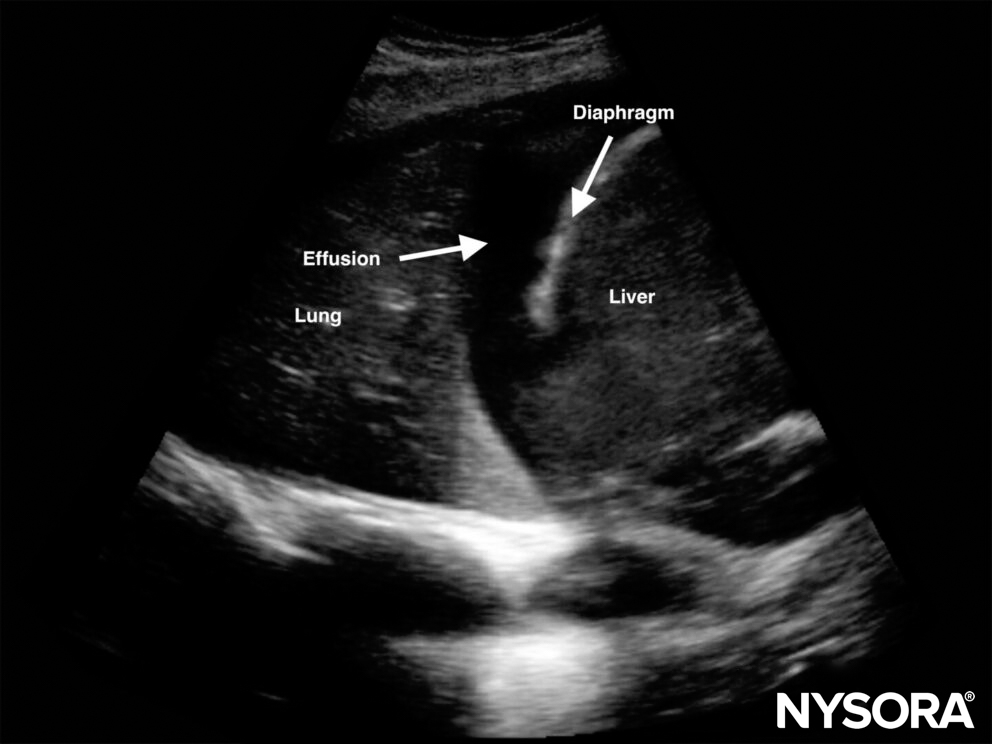
Pleural effusion at the level of the PLAPS point.
Pleural effusion can result in several different ultrasonographic findings:
- Quad sign: Quad image between the pleural line, lung line, and shadow of the ribs.
Quad sign.
- Sinusoid sign: Shows movement of the lung toward the pleural line and the possibility of inserting a needle in M-mode.
Sinusoid sign.
Spine sign: The thoracic spine is only visible as a hyperechoic line in the presence of pleural fluid.

Spine sign.
- Jellyfish sign: Atelectatic lung “swimming” in pleural effusion.
An estimation of the fluid volume can be made in the supine position by the equation: Pleural fluid (mL) = distance between the lung base and diaphragm (mm) x 20.
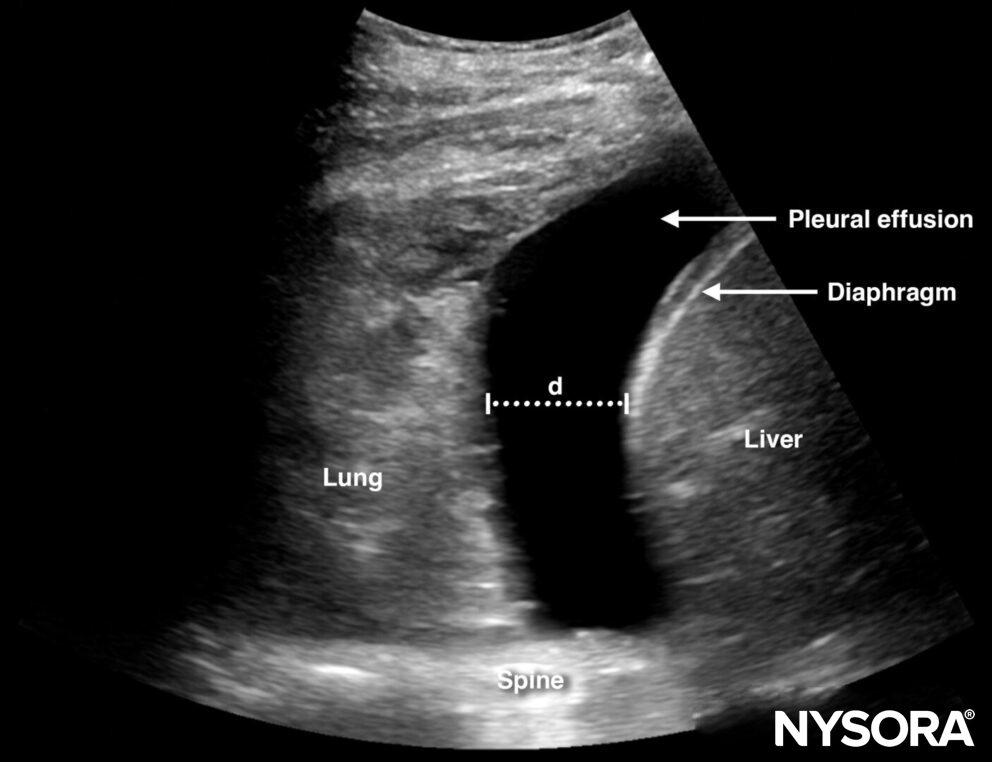
The distance (d) between the lung base and diaphragm can be used to estimate the volume of effusion.
- Pleural effusion may compress the lung tissue, leading to atelectasis.
- Pleural effusions may be simple or complex (loculated). Simple effusions will be present in cases of fluid overload or cardiogenic shock, visible as a lung surrounded by anechoic fluid. Complex effusions will be visible as white strings in the pleural fluid.
- Ultrasound can also enhance the safety of thoracentesis.
More on the type of pleural effusion
Effusions can be simple or complex:
- Simple effusions appear solely as anechoic and can be transudative or exudative.
- Complex effusions have a heterogeneous aspect or have septae and suggest an exudative origin such as pneumonia, lung injury, or malignancy.
- A homogeneous, echogenic effusion can be seen in cases of hemorrhage or empyema.
- The appearance of the pleural effusion can help to provide information on the origin of the effusion.
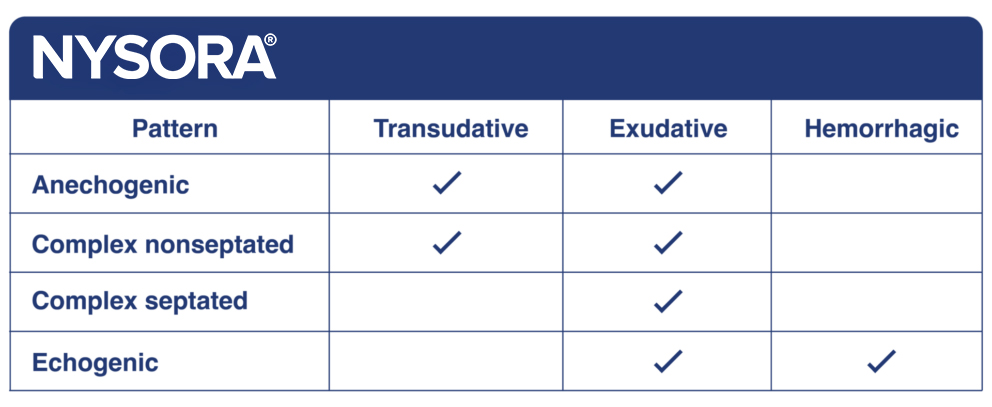
- Exudative effusions can also present as hyperechoic foci floating in hypoechoic fluid. This is called the plankton sign.
Clinical updates
- Sridhar et al. (POCUS Journal, 2025) conducted a retrospective review of 100 consecutive pulmonary outpatient visits and found lung POCUS was feasible within clinic workflow, with a median exam time of 5 minutes and 70% performed by residents . A normal bilateral A-line pattern was seen in 71% (most commonly obstructive airway disease), bilateral B-lines in 13% (associated with ILD or heart failure), and pleural effusions in 18%; among patients who underwent follow-up imaging (49%), lung POCUS showed 100% concordance with CXR. These findings suggest outpatient lung POCUS may reduce reliance on radiography and guide management decisions, particularly for effusions and heart failure monitoring .
- Sridhar P, Patrawalla P, Kim B. Lung POCUS in a Pulmonary Outpatient Clinic: Balancing Utility and Feasibility. POCUS J. 2025;10(2):34-41.