Indications
- Delivery of specific drugs, drug infusions, or long-term therapy
- Fluid resuscitation
- Hemodialysis
- Pulmonary artery catheterization
- Monitoring of central venous pressure
Considerations
- Coagulopathy
- Infection at the insertion site
- Underlying thrombosis
Tip
Check the patient’s chart with special attention to the laboratory results for coagulation disorders and the chest X-ray for possible previously inserted materials before the start of the procedure (if available).
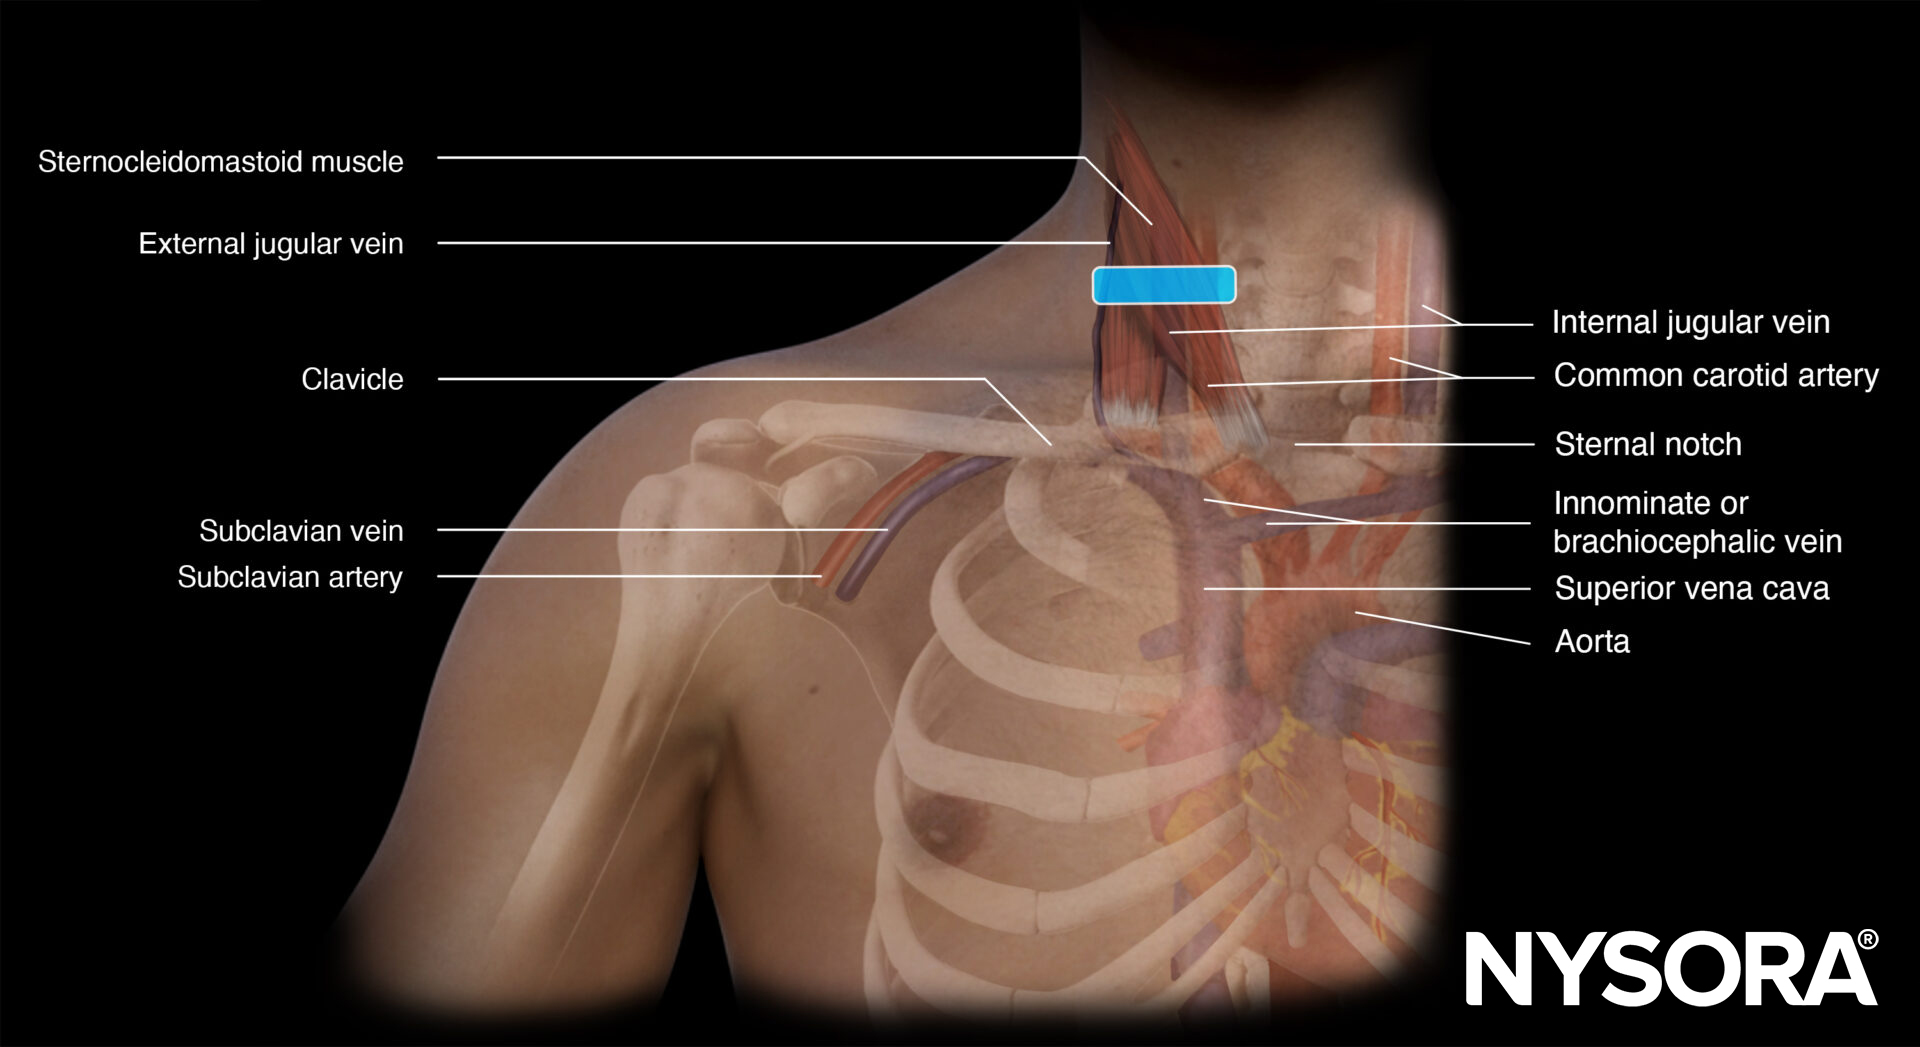
Functional anatomy
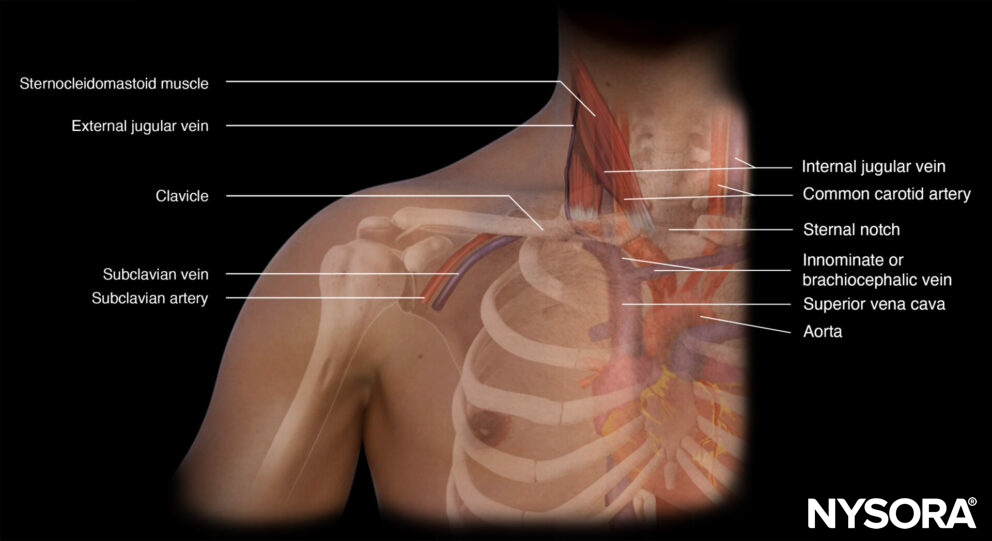
Anatomy of the subclavian vein.
Preparation
- Make sure that there is a nurse or physician to assist you with the procedure.
- It is advisable to use a box or a set containing all the necessary materials for central line insertion.
- A central line insertion is a complex procedure that requires a stepwise and systematic approach. This will be described in the ‘Technique’ section.
- Full ASA monitoring should be applied, as clinical information is important and relevant (e.g., desaturation, pulsatile red blood, right ventricular stimulation).
Patient position
Trendelenburg with the ipsilateral arm in 90° abduction and the head to the contralateral side.
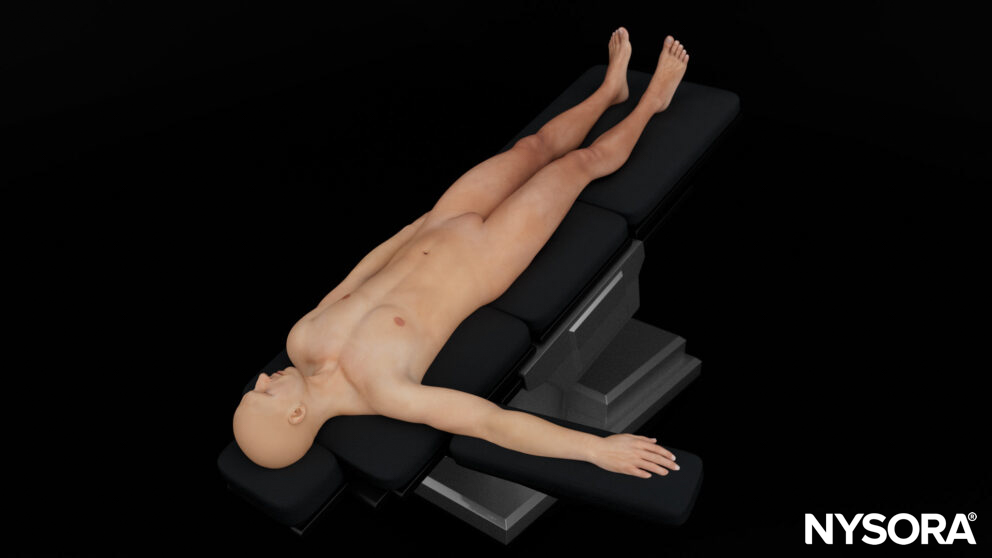
Patient position for a subclavian vein cannulation.
Note
Positioning the arm in 90° abduction positions the vascular structures more superficial.
Technique
General steps for central line placement
- Wear a mask and a surgical hat before starting the procedure
- Scrub
- Wear a sterile gown and sterile gloves
- Disinfect the area of interest (2% chlorhexidine in 70% isopropyl alcohol)
- Use sterile drapes to cover non-sterile areas
- Prepare the central line set (flush all lumens with saline and close all lumens except for the one that threads the guidewire)
- Use a sleeve to cover the ultrasound transducer
- Apply sterile gel to the patient’s skin
- Identify the vein of interest
- Freeze the skin under ultrasound guidance with 5 mL of lidocaine 2% if the patient is awake
- Introduce the needle with ultrasound guidance into the lumen of the internal jugular, femoral, or subclavian vein by using the creep technique
- Thread the guidewire when the needle tip is in the middle of the lumen of the vein
- Hold the guidewire at all times and slide the needle backward over the guidewire
- Confirm the position of the guidewire with ultrasound
- Make a small slip into the skin next to the guidewire with a surgical knife
- Dilate the skin while holding the guidewire
- Thread the catheter over the guidewire and hold the guidewire at all times
- When the catheter is in the right position, pull out the guidewire and check all lumens for positive blood aspiration
- Flush all lumens with saline
- Suture the catheter to the skin
- Apply a sterile dressing
Subclavian vein cannulation
First, the transducer is placed in a longitudinal orientation to the clavicle next to the deltopectoral groove. Identify the subclavian artery and vein, and position the vein in the middle of the screen. Rotate the transducer until the vein is seen in line. Now, you should also see the bony shadow of the clavicle.
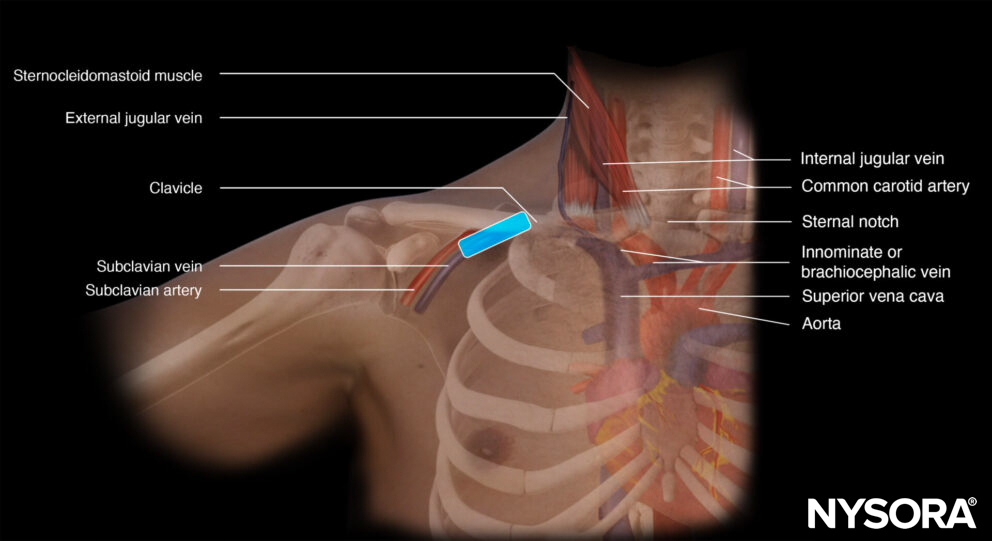
Transducer position for subclavian vein cannulation.
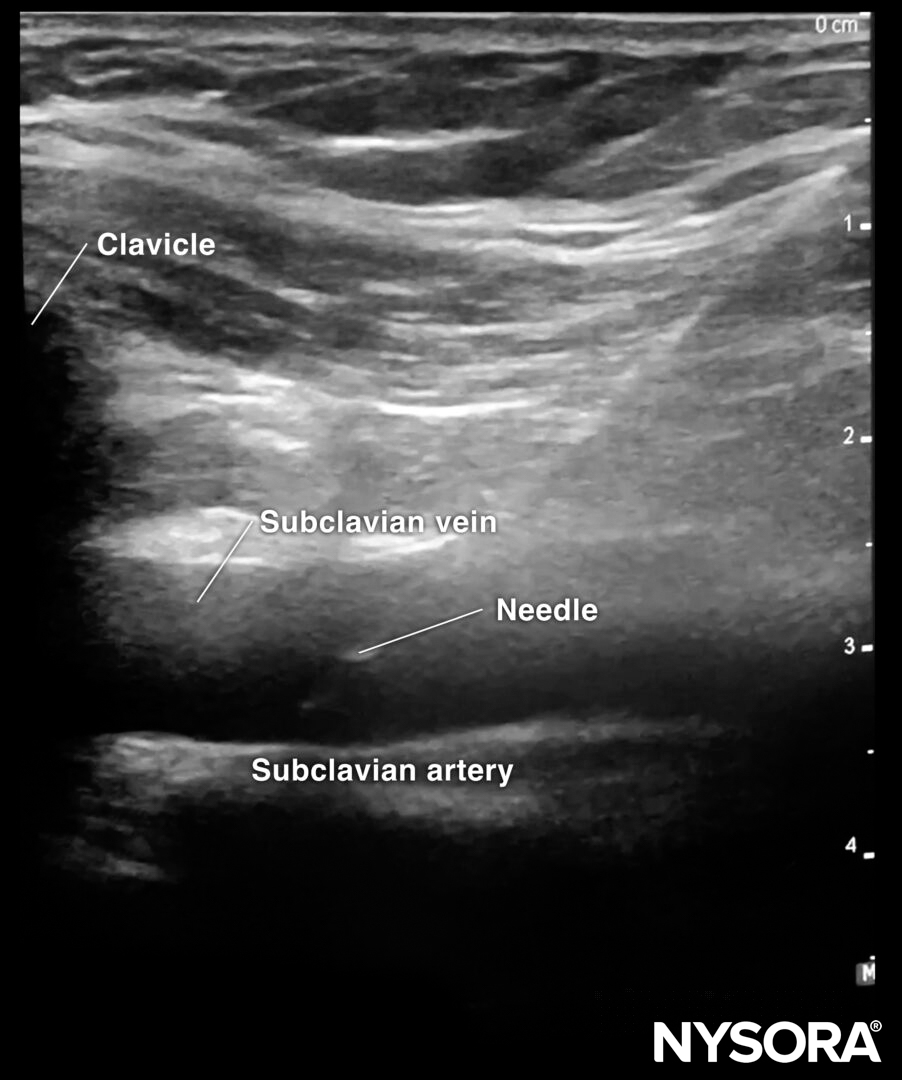
Sonoanatomy for subclavian vein cannulation.
The needle is inserted in-plane in a cranial direction.
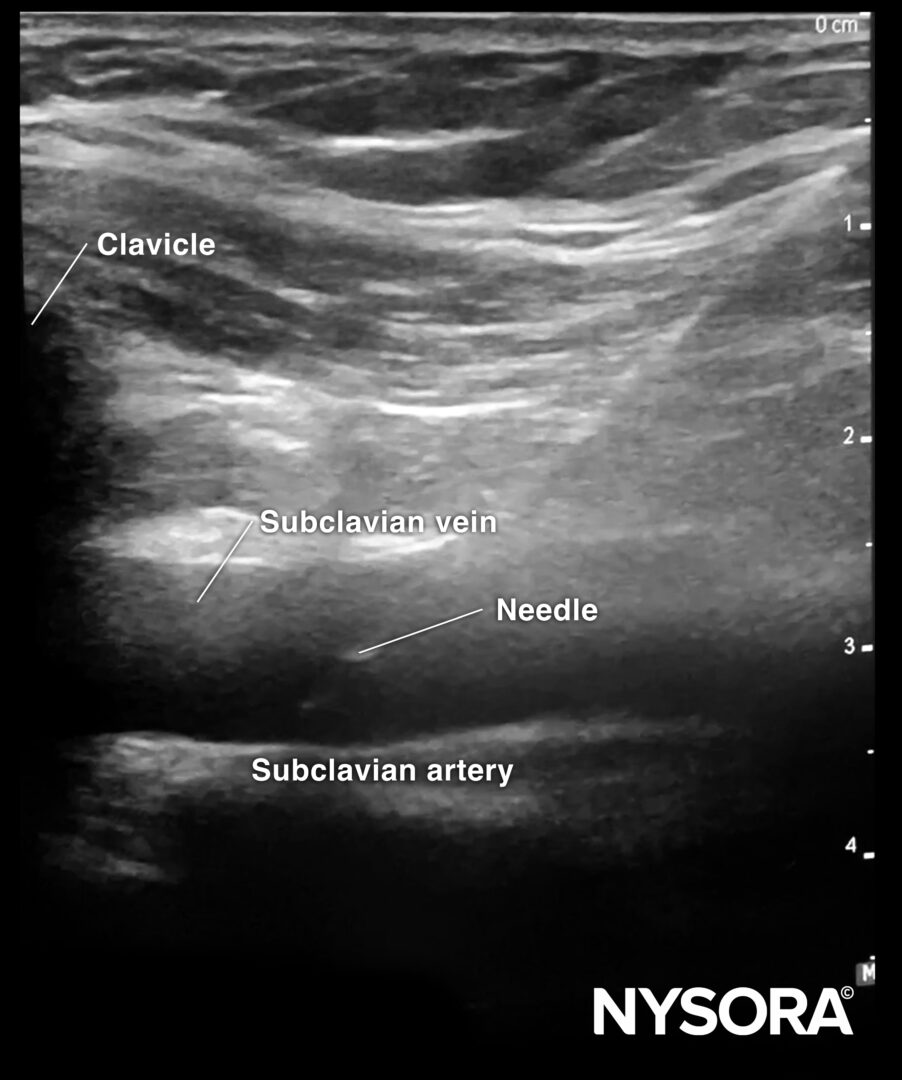
In-plane needle insertion in the subclavian vein.
Interesting facts
- An in-plane or oblique technique allows the needle to be visualized during the full needle path. This decreases the chance of unintentional pleural puncture during subclavian vein cannulation.
- Abduction of the arm helps to create extra ‘working space’ by lifting the clavicle.
Tips
- Ultrasound-guided central venous access reduces complication rates compared to a blind technique.
- Subclavian vein cannulation has the lowest risk of catheter-related infections, while femoral vein cannulation has the highest.
- In intubated patients, Valsalva or PEEP can increase venous distention and facilitate the procedure.
Post-procedure evaluation
Lung sliding, together with the rapid atrial swirl sign, can rule out pneumothorax or confirm the position of the catheter after internal jugular or subclavian catheter insertion.
Lung sliding
Lung sliding = the two pleural layers sliding over each other, resulting in a shimmering or comet tails.
Notes
- The absence of lung sliding is highly sensitive for pneumothorax.
- Specificity is estimated to be above 80%. Other causes for absent lung sliding:
- Massive atelectasis
- Mainstem intubation
- Pleurodesis
- Apnea
- Pneumonia
Tips
- The presence of lung sliding rules out a pneumothorax (100%).
The presence of the lung pulse has the same value as lung sliding and also rules out a pneumothorax. The lung pulse is the pleural movement caused by cardiac contraction. It is present only when the parietal and visceral pleura oppose each other.
M-mode of normal lungs exhibits a seashore sign. M-mode can be used instead of, or to supplement, the B-mode when lung sliding is difficult to demonstrate due to suboptimal images.
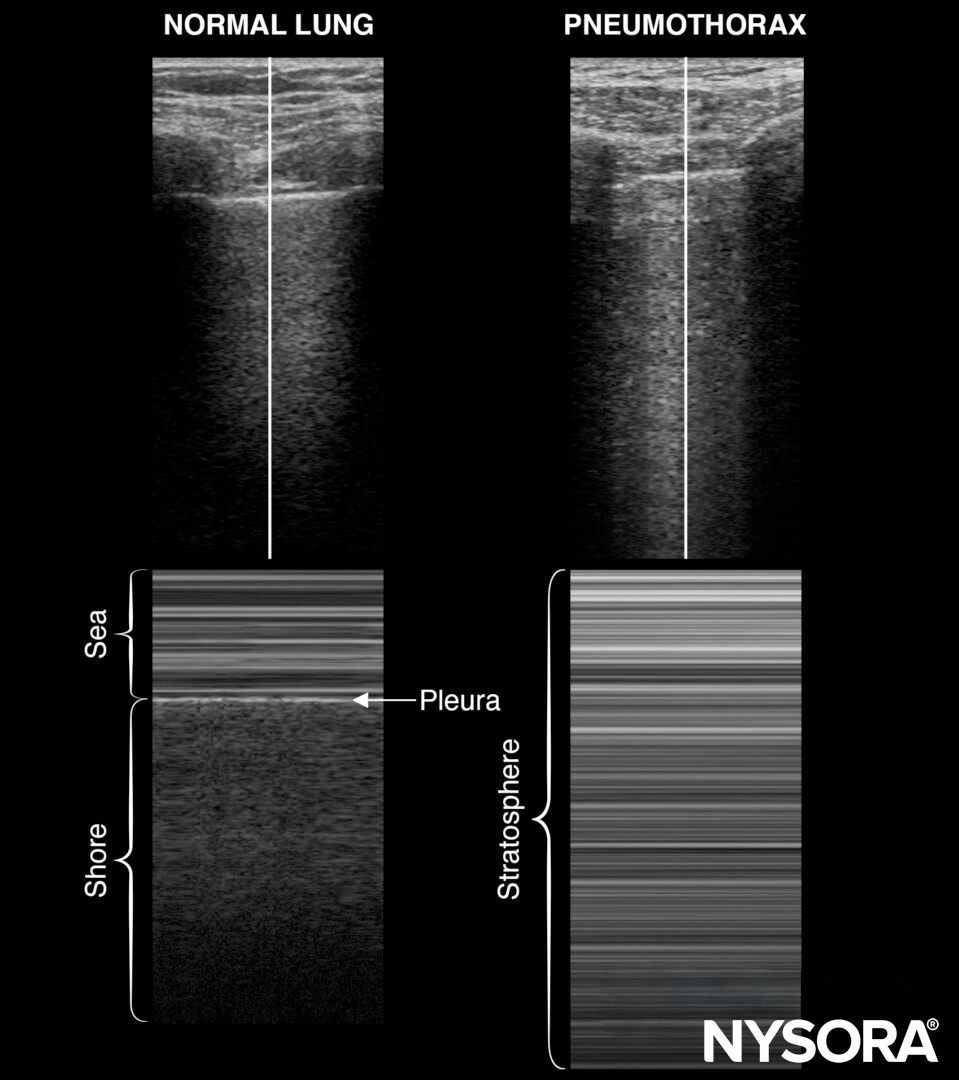
M-mode in normal lungs will show a seashore sign. Imagine the look of a sandy beach with the sea above. A pneumothorax will result in parallel horizontal white lines, also called the stratosphere sign.
- The stratosphere sign is sometimes referred to as the “barcode sign”. This latter may be confusing with the current trend towards complex barcodes (cf. QR codes).
- The lung point is the transition of the inflated lung into the pleural air of the pneumothorax. It is 100% accurate for pneumothorax and can be searched in the absence of lung sliding or the presence of a stratosphere sign.
Also, pay attention to the pleural line morphology when assessing lung sliding. A thick or irregular pleural line can be seen in pneumonia.
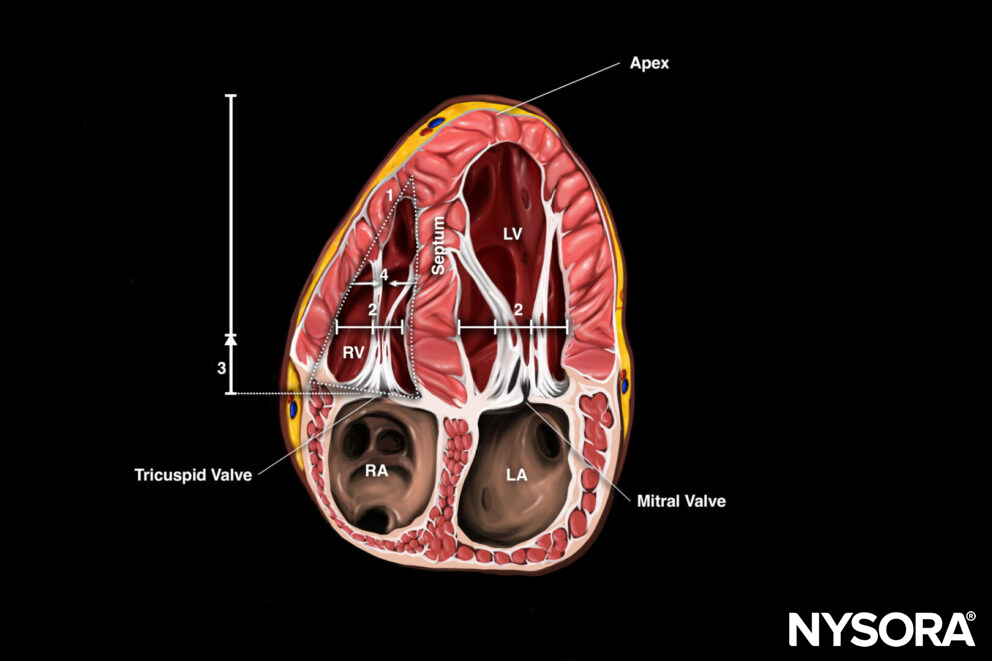
Rapid atrial swirl sign (RASS)
Following internal jugular vein or subclavian catheter insertion, the catheter’s correct position can be evaluated using the rapid atrial swirl sign (RASS). The tip of a central venous line should be positioned in a central vein between the superior vena cava and the atrium.
For venous catheter position evaluation, the subcostal 4-chamber view needs to be assessed.
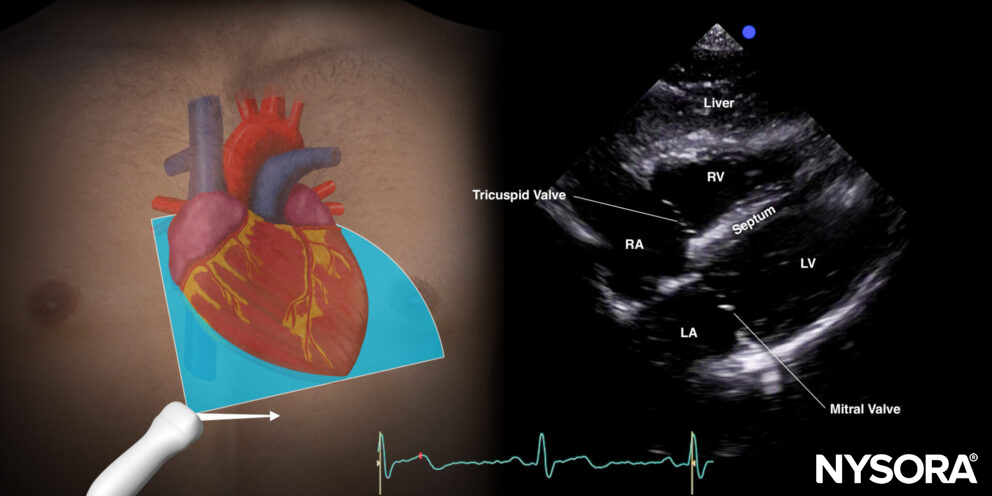
Subcostal 4-chamber view.
9 mL of a saline with 1 mL air mixture (‘shaken’/’agitated’ ) is injected rapidly through the distal port of the central venous line while visualizing the right atrium in the subcostal 4-chamber view.
- Immediate air bubbles: If a transient opacification in the right atrium appears immediately (<2s) following the injection of the mixture, the catheter is in the right position in a large central vein.
- Delayed air bubbles: If the opacification is delayed and appears slower (>2s), the catheter is probably placed at an atypical position in the internal jugular, subclavian, or brachiocephalic vein.
- Absent air bubbles: If the opacification does not appear at all, the catheter is probably malpositioned and may be placed in an artery or extravascular.
Clinical updates
- Subramony et al. (The Journal of Emergency Medicine, 2022) conducted a prospective randomized trial (n=85) in an academic ED comparing ultrasound-guided versus landmark subclavian vein catheterization and found a significantly higher overall success rate with ultrasound (79.5% vs. 58.5%, p=0.036), including effective rescue after failed landmark attempts. Although ultrasound guidance resulted in longer median time to successful cannulation (85 s vs. 35 s, p=0.012), complication rates (arterial puncture, pneumothorax, hemothorax) did not differ significantly between groups, and outcomes were similar for residents and attending physicians, supporting ED adoption of ultrasound guidance despite modest time tradeoffs.
Subramony R, Spann R, Medak A, Campbell C. Ultrasound-Guided vs. Landmark Method for Subclavian Vein Catheterization in an Academic Emergency Department. J Emerg Med. 2022;62(6):760-768.