Indications
The goal of an extended Focused Assessment with Sonography in Trauma (eFAST) is to increase diagnostic speed in blunt or penetrating trauma and detect:
- Pneumothorax and intrathoracic fluid
- Cardiac tamponade
- Intra-abdominal free fluid
Essential info
- The FAST exam was one of the earliest applications of POCUS.
- The ‘extended’ FAST (eFAST) exam includes evaluation of the lungs, while the ‘regular’ (FAST) exam does not.
- Unstable patients with a positive eFAST exam should be scheduled directly for the operating theater.
- An absolute contraindication for an eFAST examination is the need for immediate surgery
- An eFAST should be performed during the assessment of circulation and hemorrhage (during the “C” of “ABC”)
- An eFAST can be used for blunt and penetrating trauma, but the sensitivity for eFAST in penetrating trauma improves with repeated scanning.
Limitations of eFAST
- Ultrasound cannot distinguish blood from other body fluids. Non-traumatic origins of intra-abdominal free fluid and thus false positive results:
- Physiological (peri-ovulation period in females)
- Inflammation or abdominal sepsis
- Ascites
- A positive eFAST scan will require a certain amount of intra-abdominal blood and is therefore considered less sensitive than a CT scan. False negative results are possible. However, hemodynamic instability caused by intra-abdominal bleeding is considered to be caused by a significant amount of blood loss.
- Subcutaneous emphysema or hollow organ injury may limit ultrasound imaging and thus its applicability.
- A negative eFAST scan does not rule out abdominal injuries that do not produce free fluid or other causes of blood loss that cause hemodynamic instability (e.g., fractures, etc.)
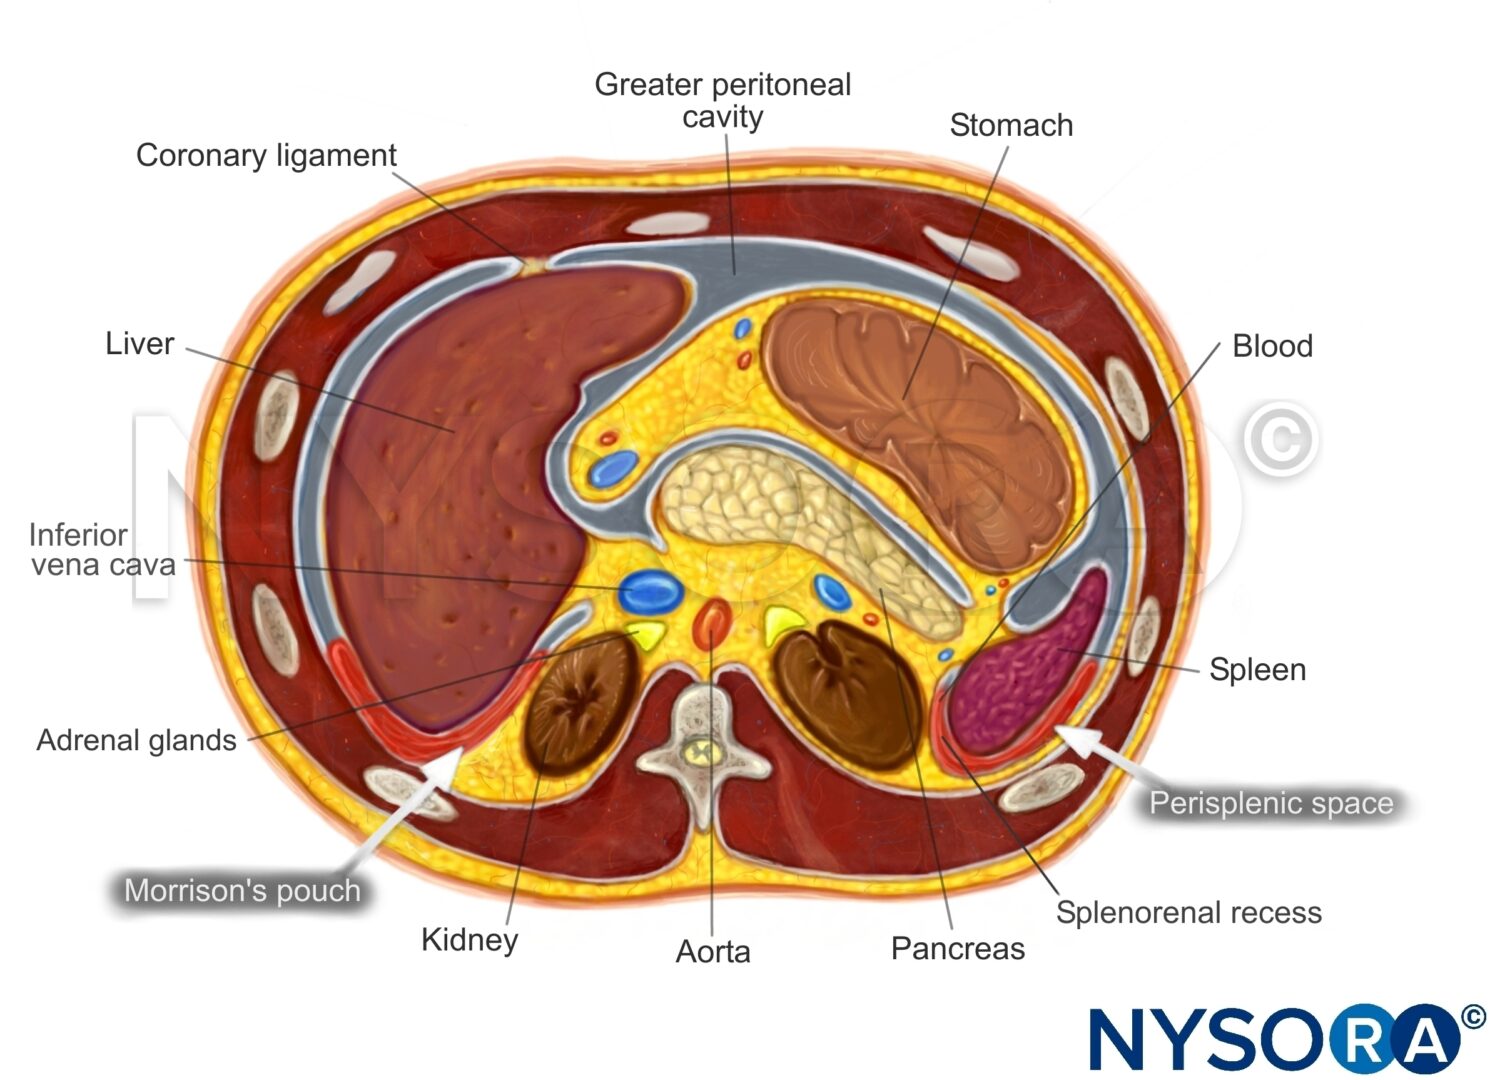
Functional anatomy
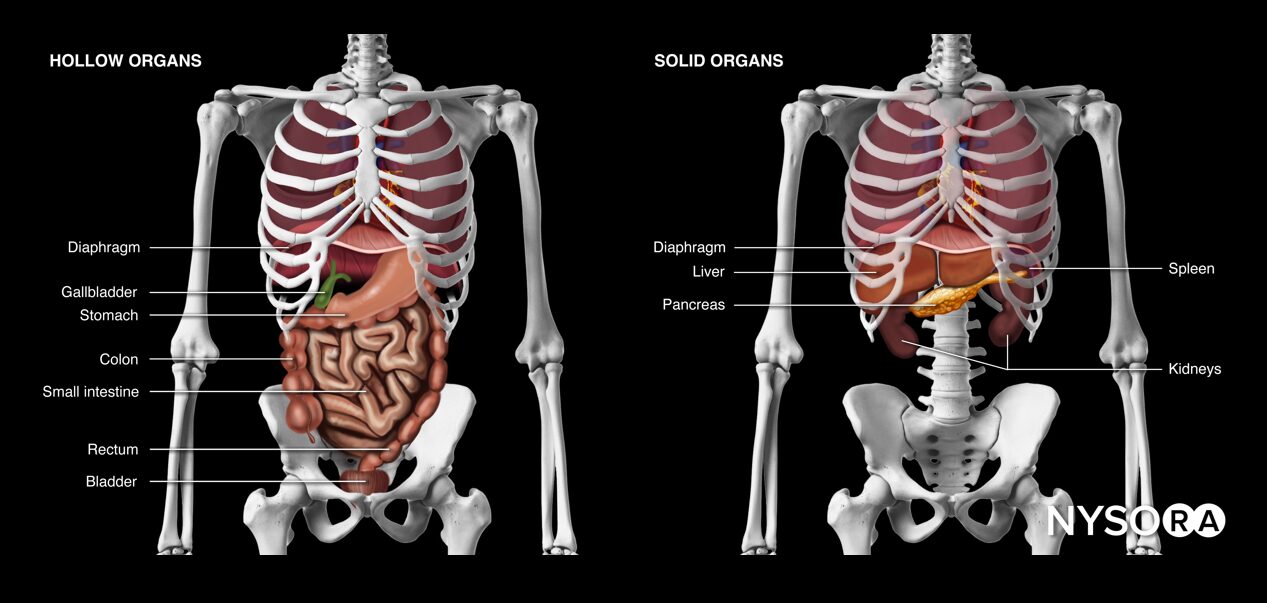
Hollow and solid abdominal organs.
Intraperitoneal fluid tends to accumulate in the greater peritoneal cavity surrounding the abdominal organs. Due to gravity, the most likely anatomical sites of fluid collection are in the space between the liver and the kidney (Morrison’s pouch), the space surrounding the spleen (perisplenic space), or the rectovesical/rectouterine pouch.
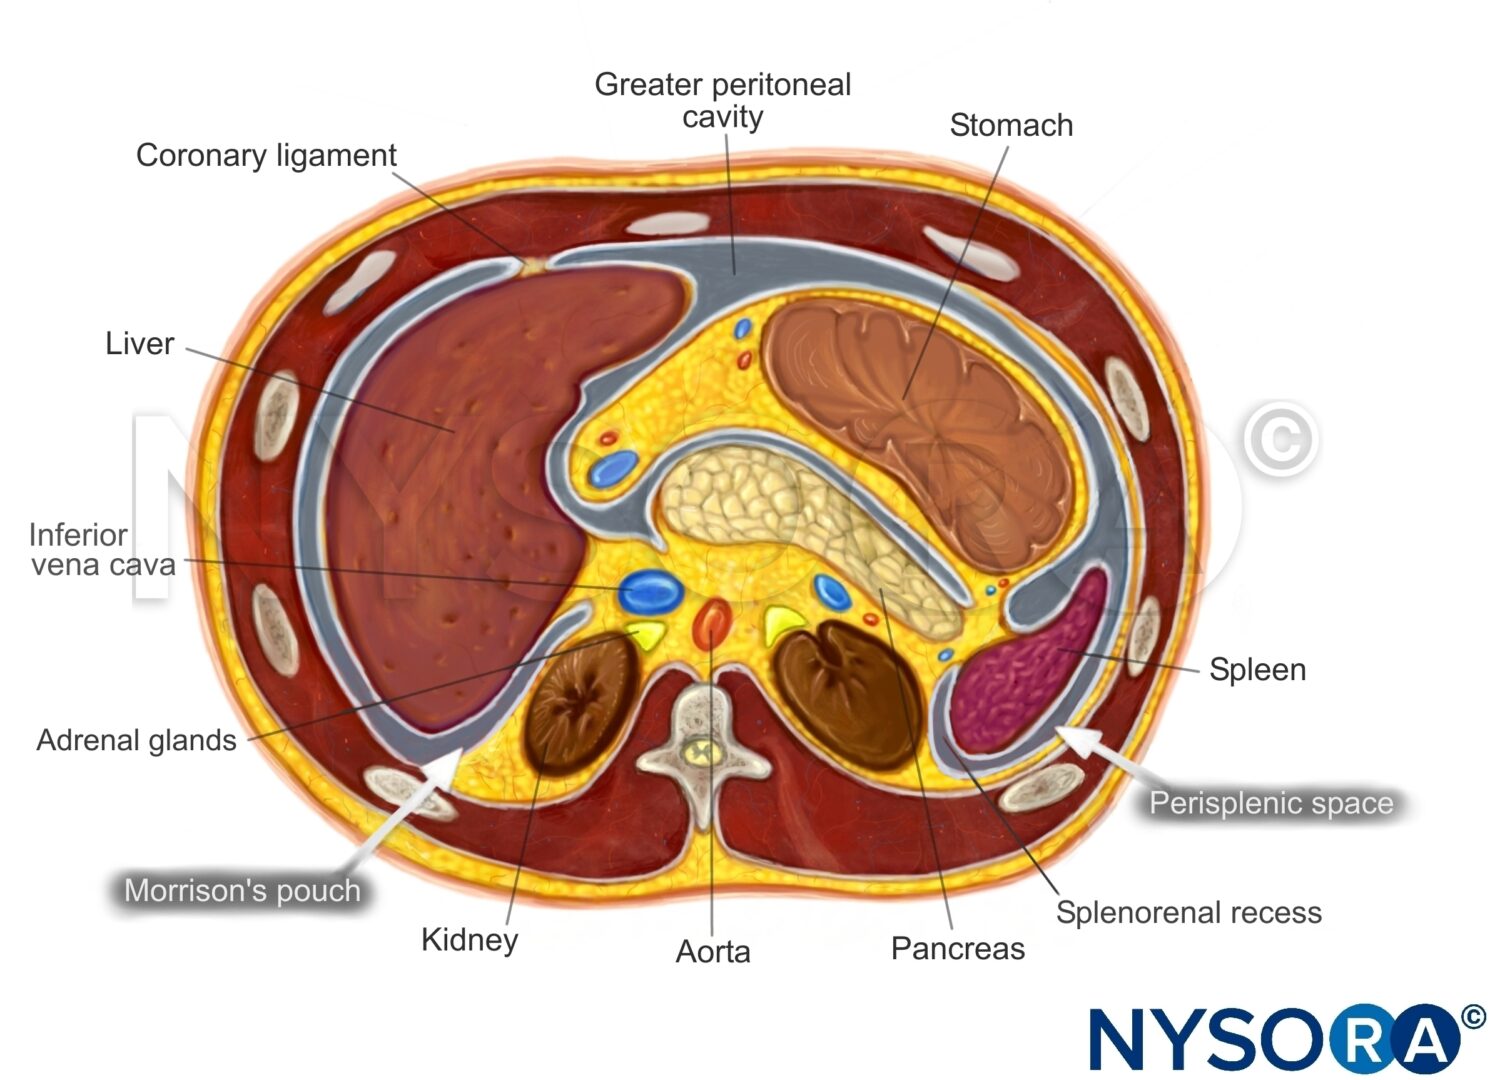
Transverse section through the upper abdomen.
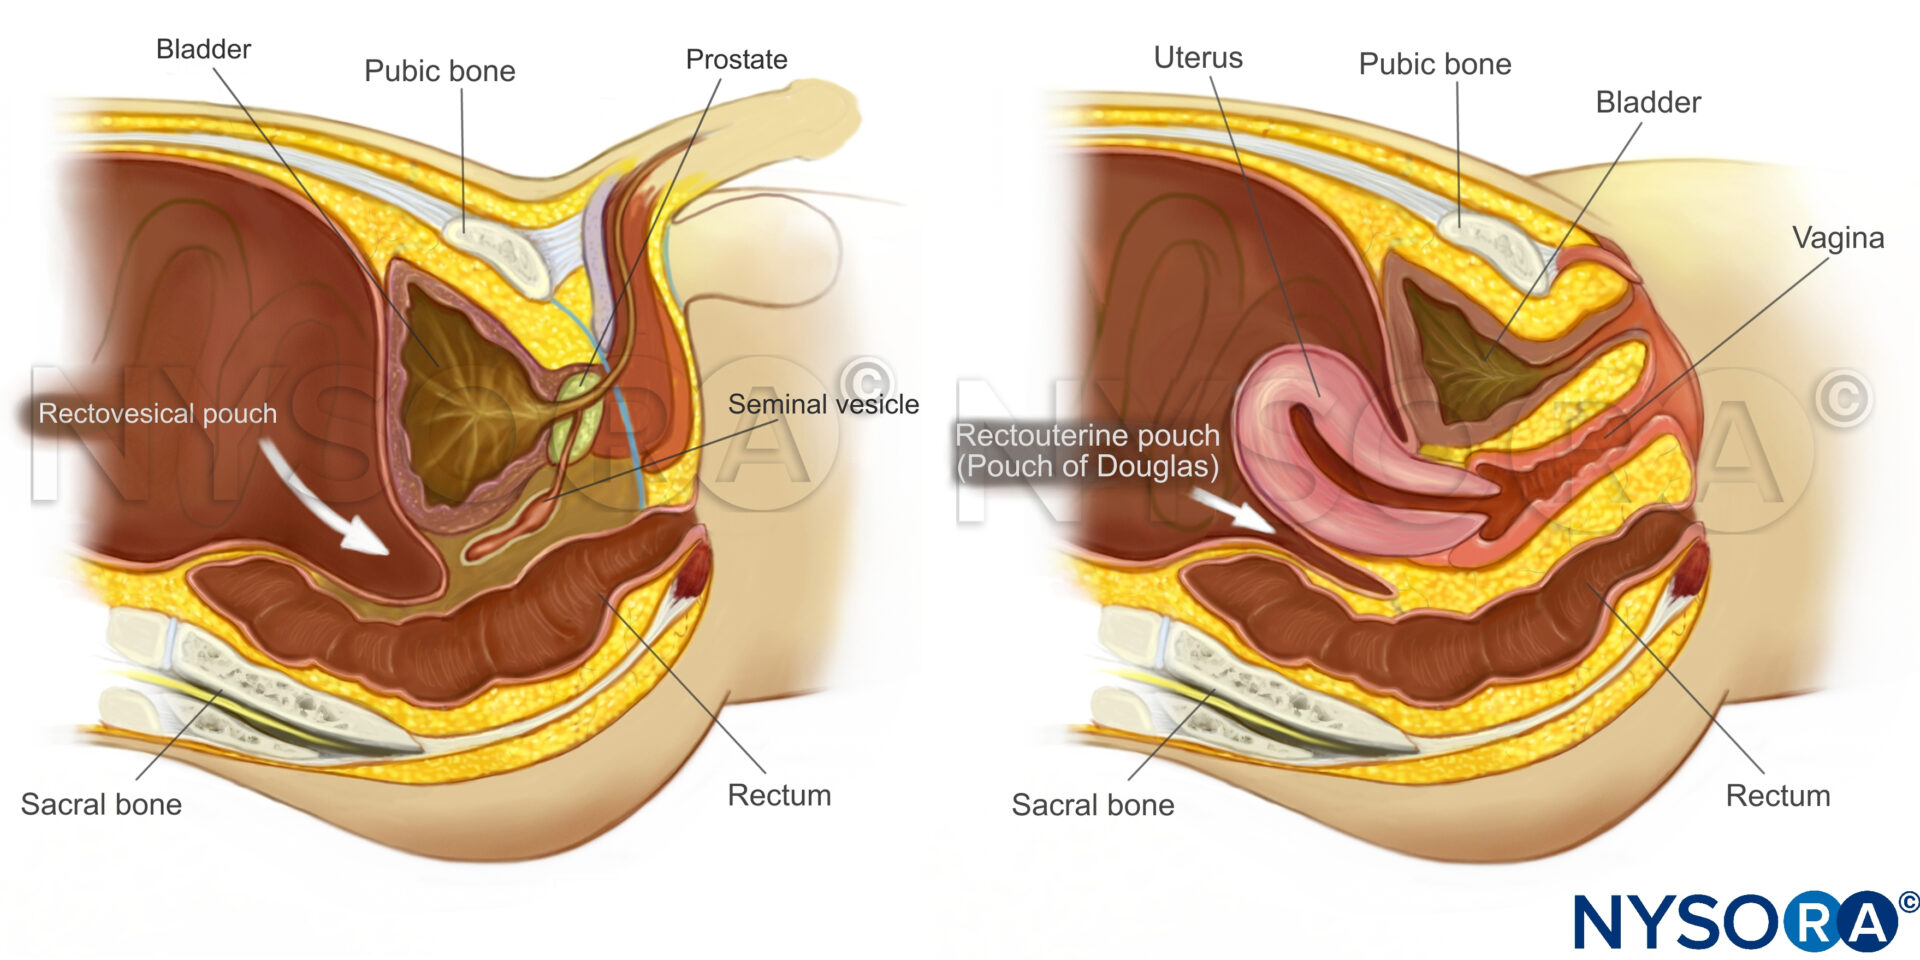
Sagittal section through the pelvis.
Ultrasound machine setup
- Transducer: curvilinear (or phased array)
- Ultrasound preset: abdominal or FAST
- Orientation: index mark toward the right side of the patient or cranial
- Depth: 8 – 20 cm
Tips
- For ultrasound of the lungs and abdomen, a depth of 10 – 15 cm is usually sufficient, but deeper settings are needed for the cardiac view.
- The phased array transducer has a smaller footprint and may result in fewer transducer switches. The field of view, however, is smaller at shallow depths, making it more difficult to detect lung sliding and thus rule out a pneumothorax.
Patient position
Position the patient supine and flat with the arms in abduction. If not flat, the fluid will shift and accumulate in the pelvis.
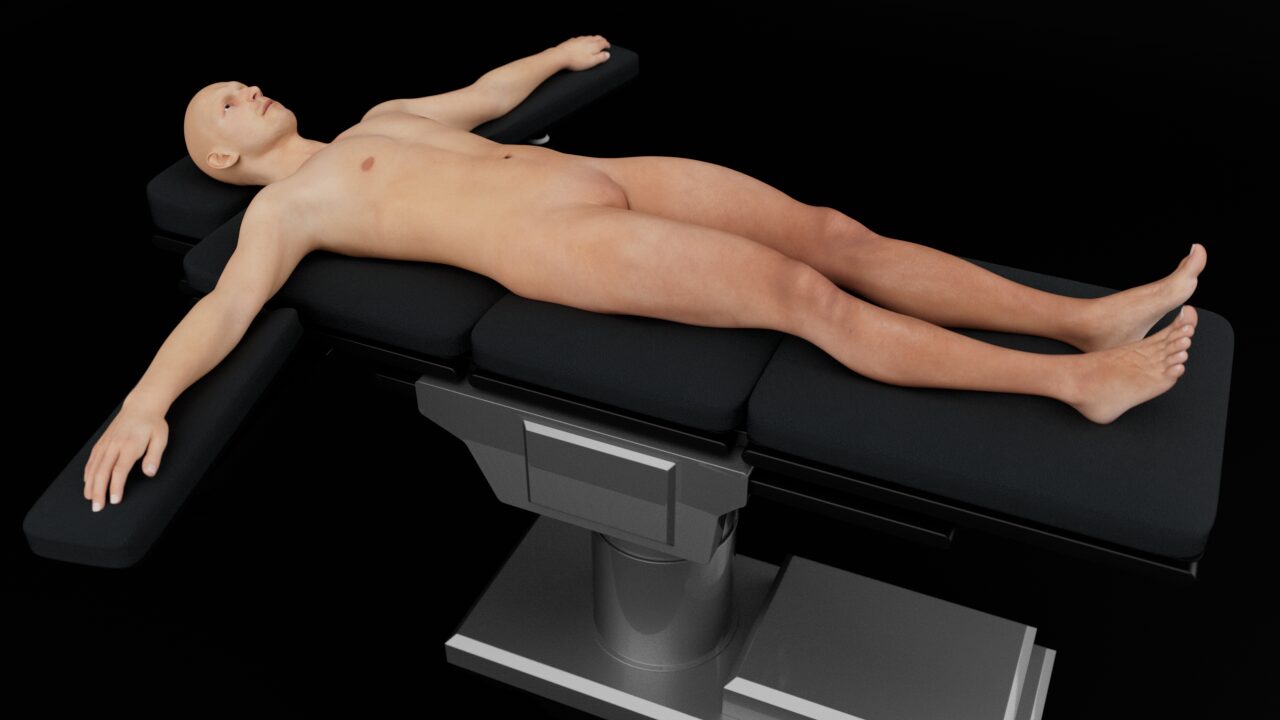
Patient position for an eFAST examination.
Landmarks
- Costal margin: Ribs in the upper abdomen protect the upper abdominal organs but may limit the acoustic window to the liver, spleen and kidneys.
- Xiphoid process: The upper border of the abdomen.
- Linea alba: Midline of the abdomen that separates the rectus abdominis muscles and connects the xiphoid process with the pubic bone.
- Umbilicus: Virtually separates the abdomen into four quadrants
- Pubic bone: Bony structure and lower margin of the abdomen. The pelvis starts at the level of the pubic bone.
- Anterior superior iliac spine: Bony structure that forms the lateral border of the pelvis.
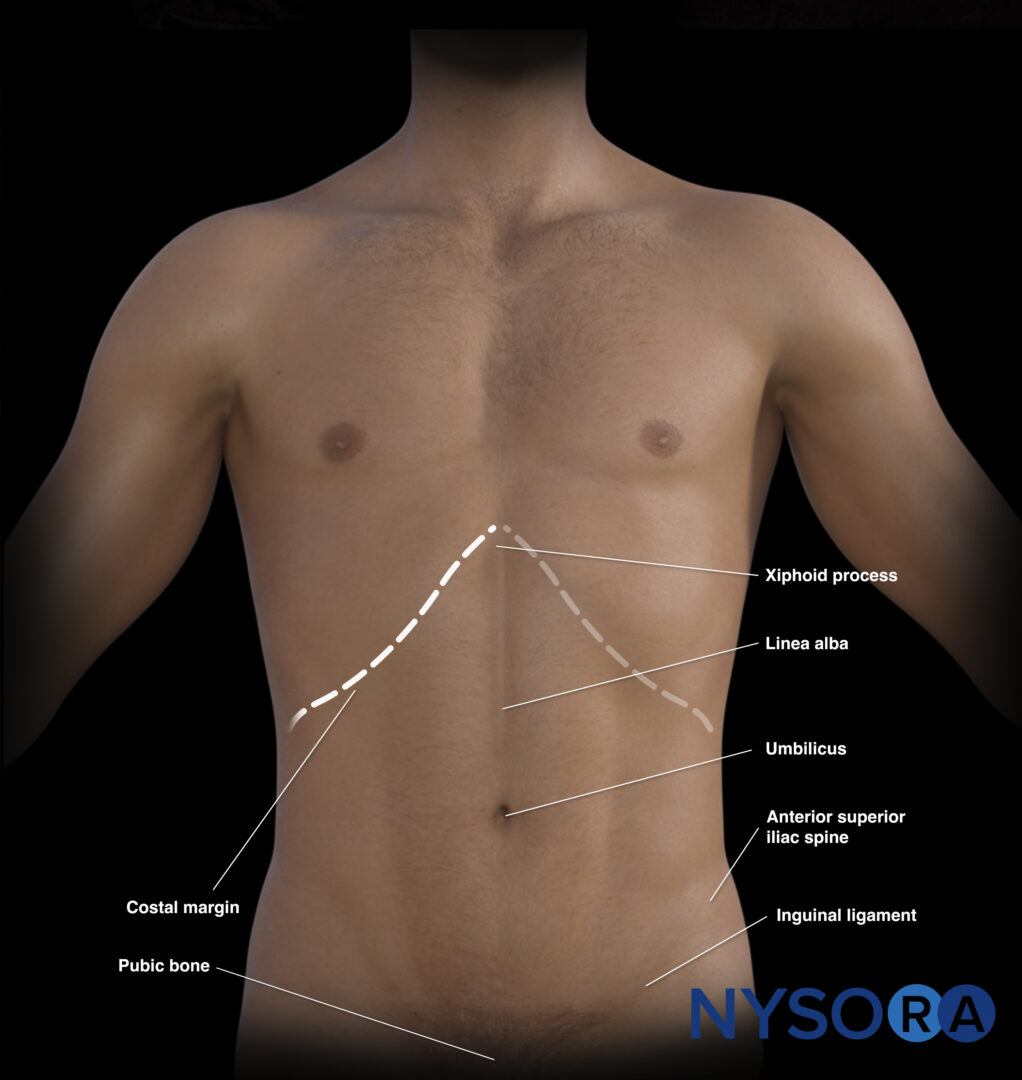
External landmarks of the abdomen.
The umbilicus also divides the abdomen into four quadrants that surface-map key organs.
- Right upper quadrant (RUQ): Liver, gallbladder, kidney
- Left upper quadrant (LUQ): Stomach, spleen, kidney
- Pelvic/paracolic region (lower quadrants) (LLQ & RLQ): Colon, small intestines, rectum, bladder, male or female reproductive organs
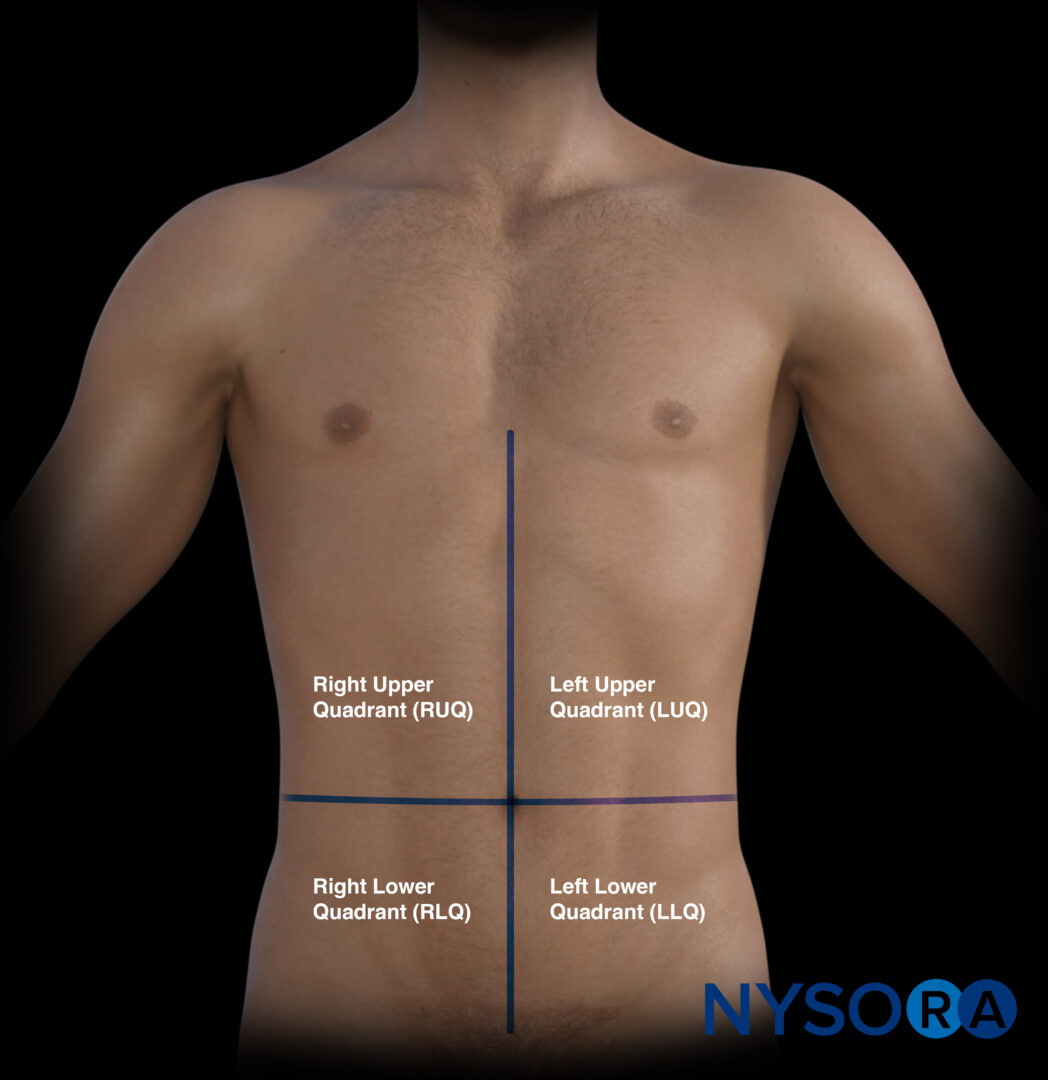
The four quadrants of the abdomen.
Transducer position
An eFAST scan is performed in six positions:
Transducer positions for an eFAST examination.
- The subcostal or cardiac (four-chamber view): place the transducer with an overhand grip at the subcostal position with the transducer almost parallel to the skin and the index marker toward the patient’s right.
- The right upper quadrant (RUQ): place the transducer between the mid- and the posterior axillary line at the level of the xiphoid process and start scanning caudally until you visualize the liver and the kidney.
- The left upper quadrant (LUQ): place the transducer on the posterior axillary line at the level of the xiphoid process and start scanning caudally until you visualize the spleen and the kidney.
- The suprapubic area for pelvic assessment: place the transducer on the linea alba, just above the pubic bone.
- Right lung: place the transducer on the right anterior chest wall, just below the clavicle (2nd-3rd intercostal space) and on the midclavicular line.
- Left lung: place the transducer on the right anterior chest wall, just below the clavicle (2nd-3rd intercostal space) and on the midclavicular line.
Note
Fanning or tilting in both directions increases the sensitivity for detecting free fluid in the cardiac and abdominal positions.
Tips
- There is no official order for the sequence of positions. However, most practitioners will exclude tamponade first. Try to keep the same scanning sequence for an eFAST exam.
- During the assessment of the RUQ and the LUQ, the thorax or the space above the diaphragm should be evaluated for free fluid.
- Small rotations of the transducer may improve the acoustic window between the ribs.
- Subcutaneous emphysema or intra-abdominal free air due to hollow organ injury can limit ultrasound imaging.
Scanning
Subcostal or cardiac (four-chamber view)
This view will allow the user to rule out pericardial effusion or tamponade.
- Place the transducer with an overhand grip at the subcostal position with the transducer almost parallel to the skin and the index marker toward the patient’s right. The goal is to identify hypoechoic fluid surrounding the myocardium.
- Use an overhand grip with the transducer almost parallel to the skin and the orientation marker toward the patient’s left. Aim toward the left shoulder.
Normal sonoanatomy:
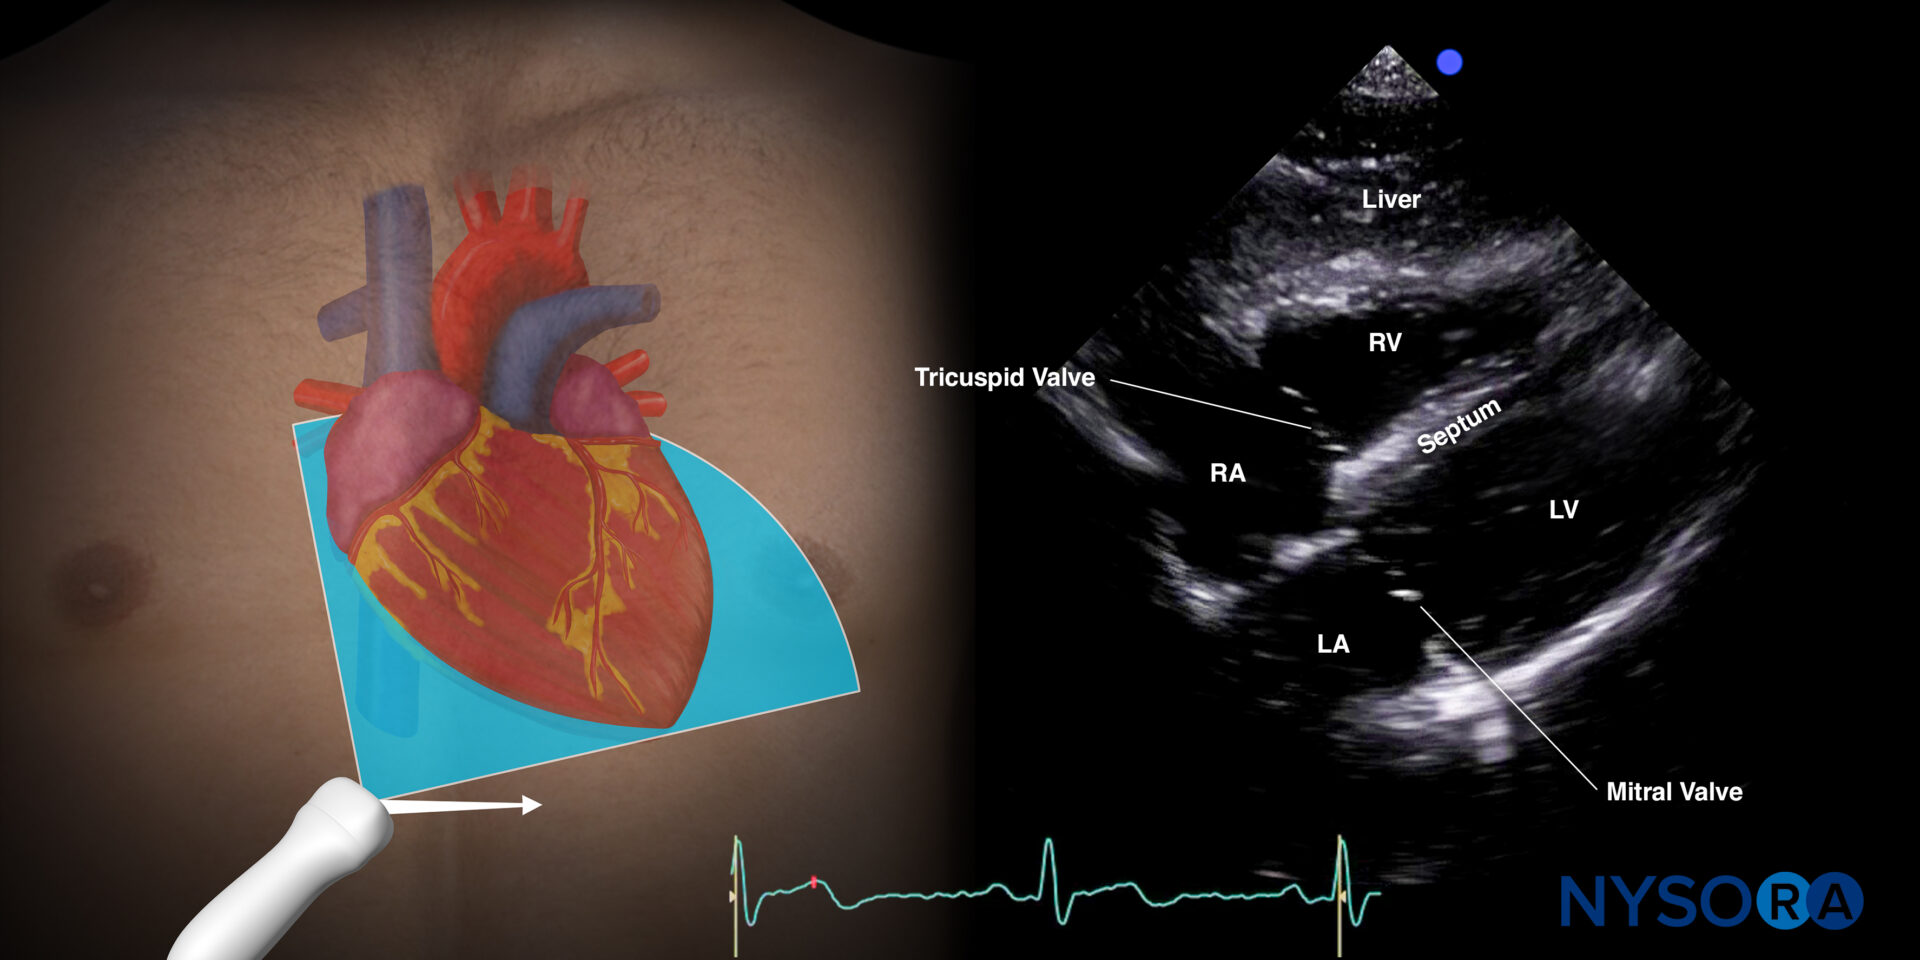
Sonoanatomy of the heart in the subcostal four-chamber view. Left atrium (LA), left ventricle (LV), right atrium (RA), right ventricle (RV), septum, tricuspid valve, mitral valve.
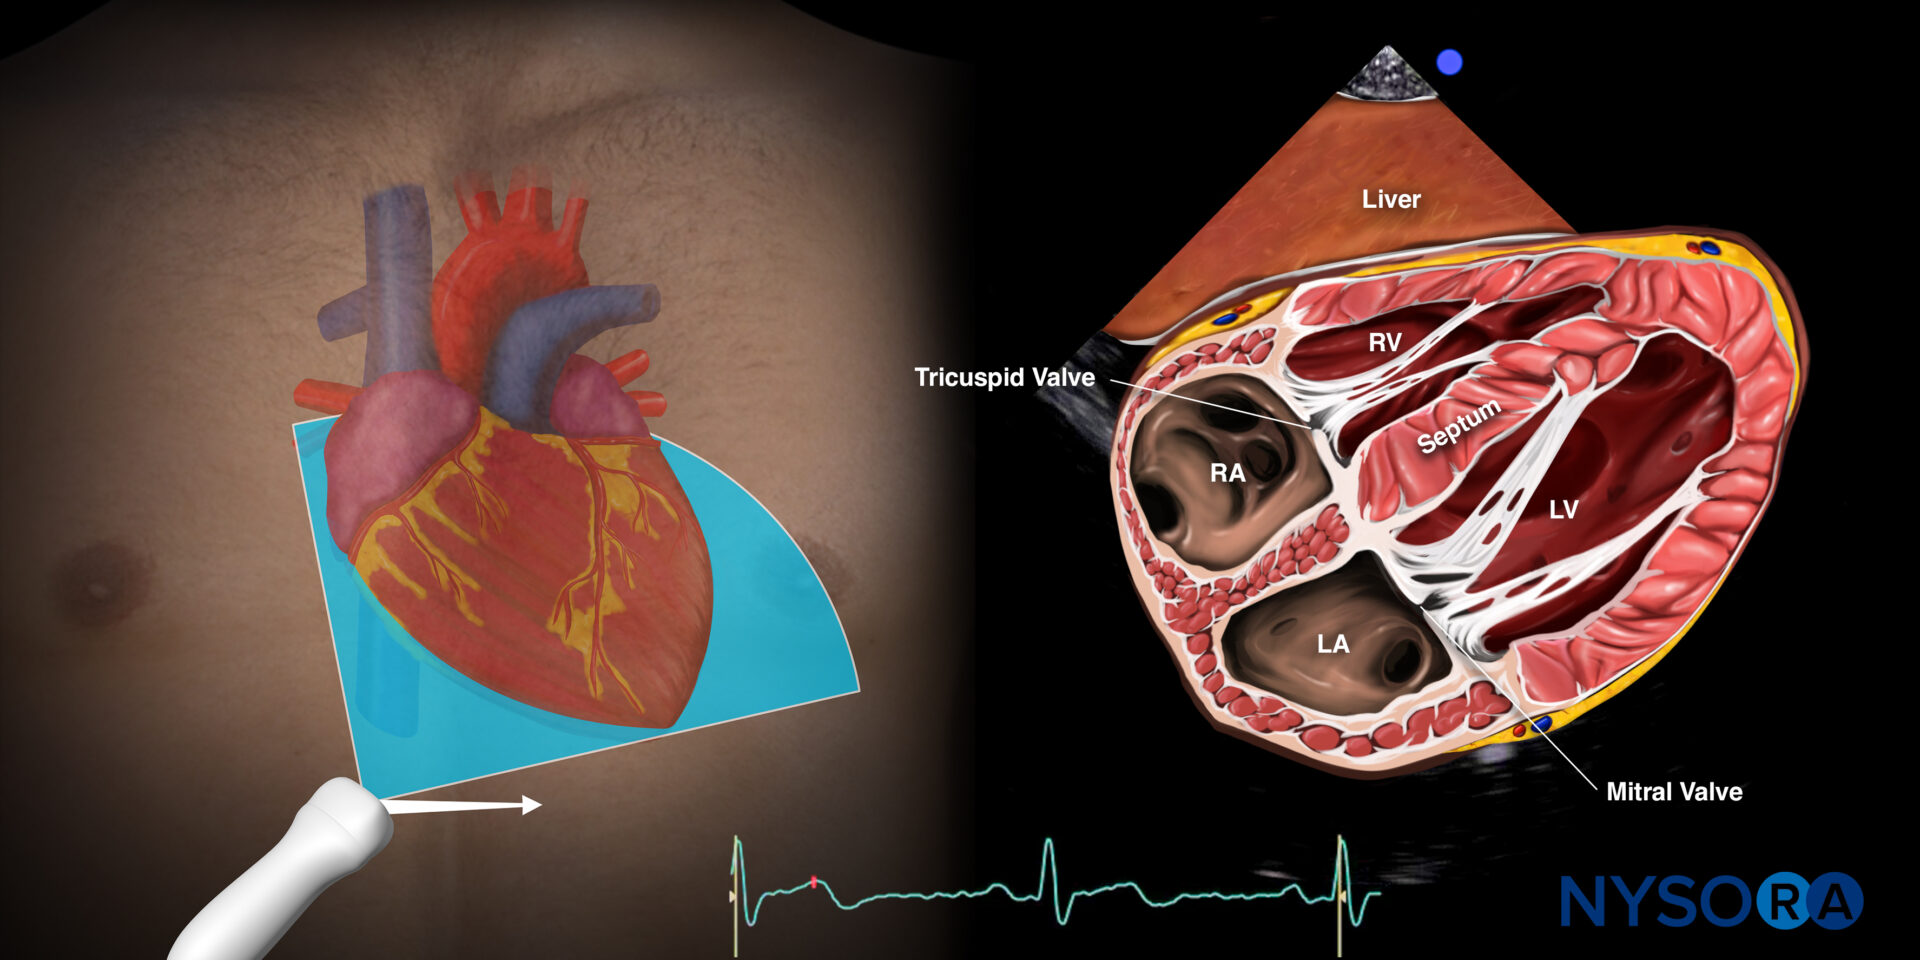
Reverse Ultrasound Anatomy of the heart in the subcostal four-chamber view. Left atrium (LA), left ventricle (LV), right atrium (RA), right ventricle (RV), septum, tricuspid valve, and mitral valve.
Note
The cardiac view may be challenging in obese or muscular patients.
Tamponade:
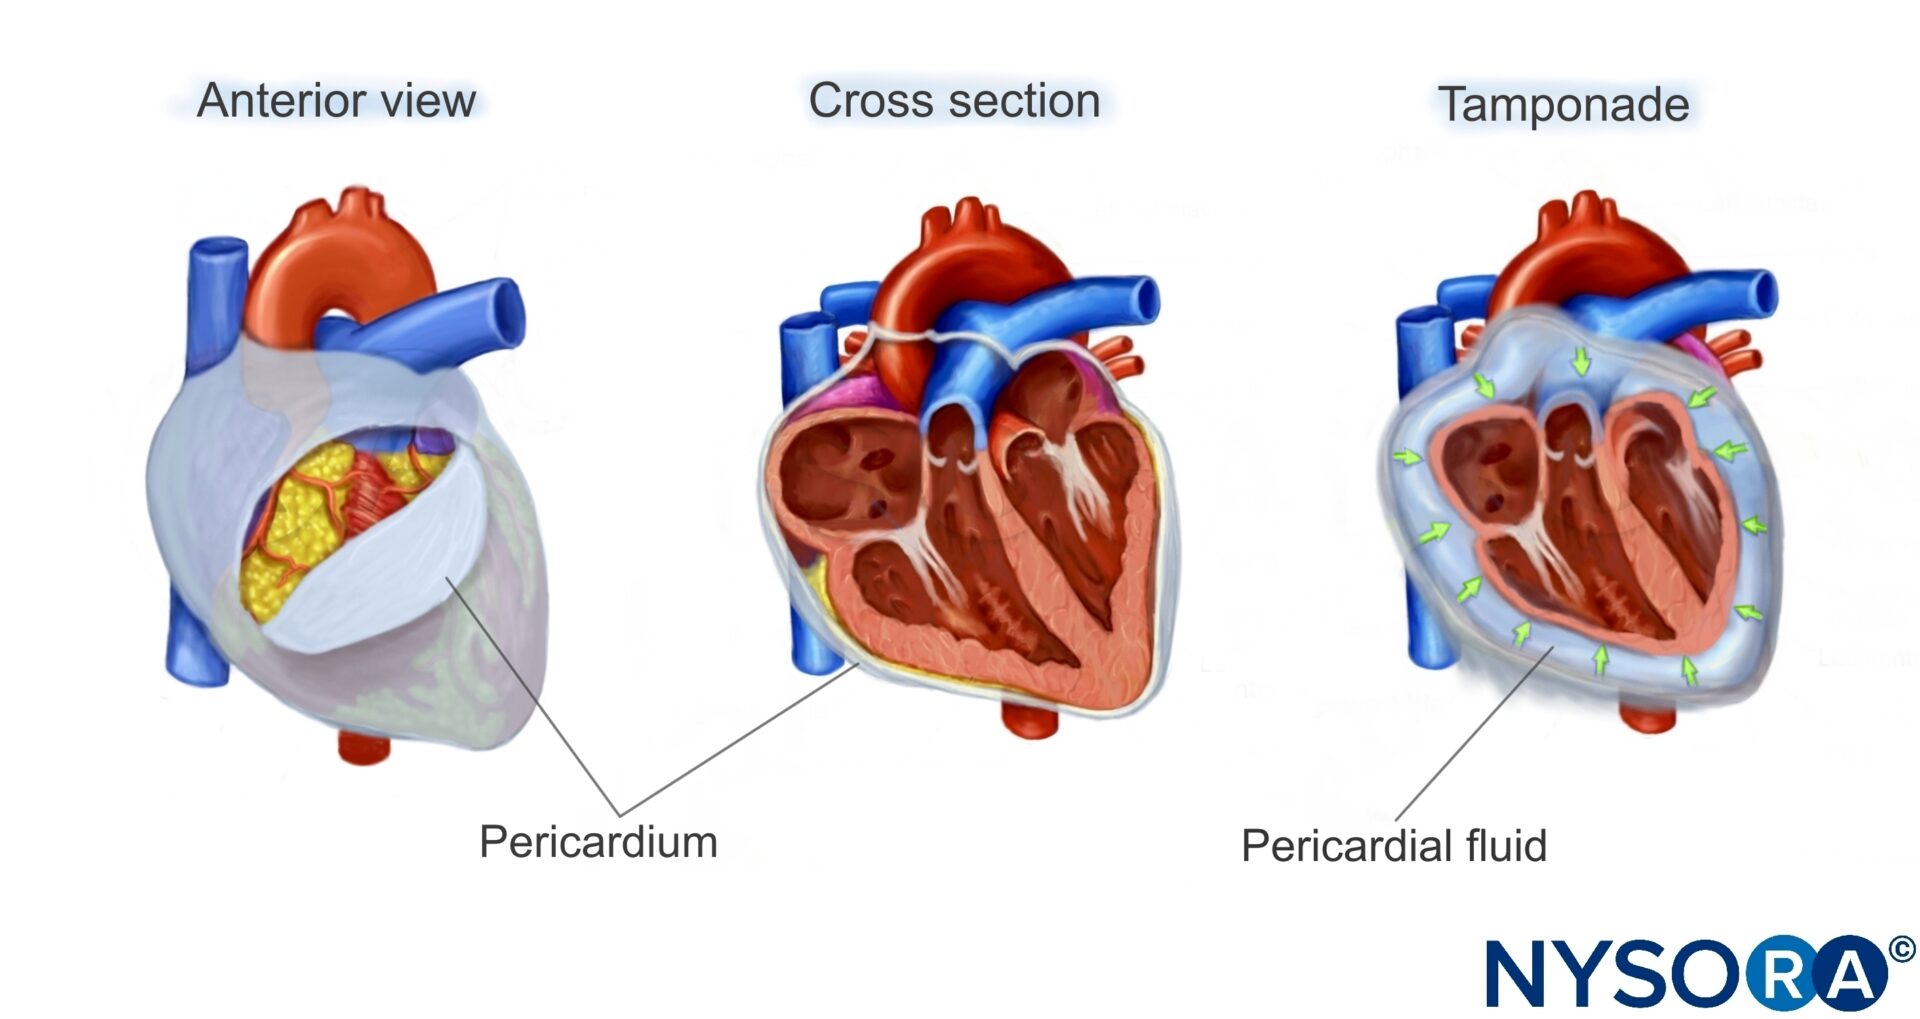
Fluid can collect in the pericardial space, decreasing cardiac output by interfering with cardiac filling.
Ultrasound features: Anechogenic layer between the heart and the pericardium.
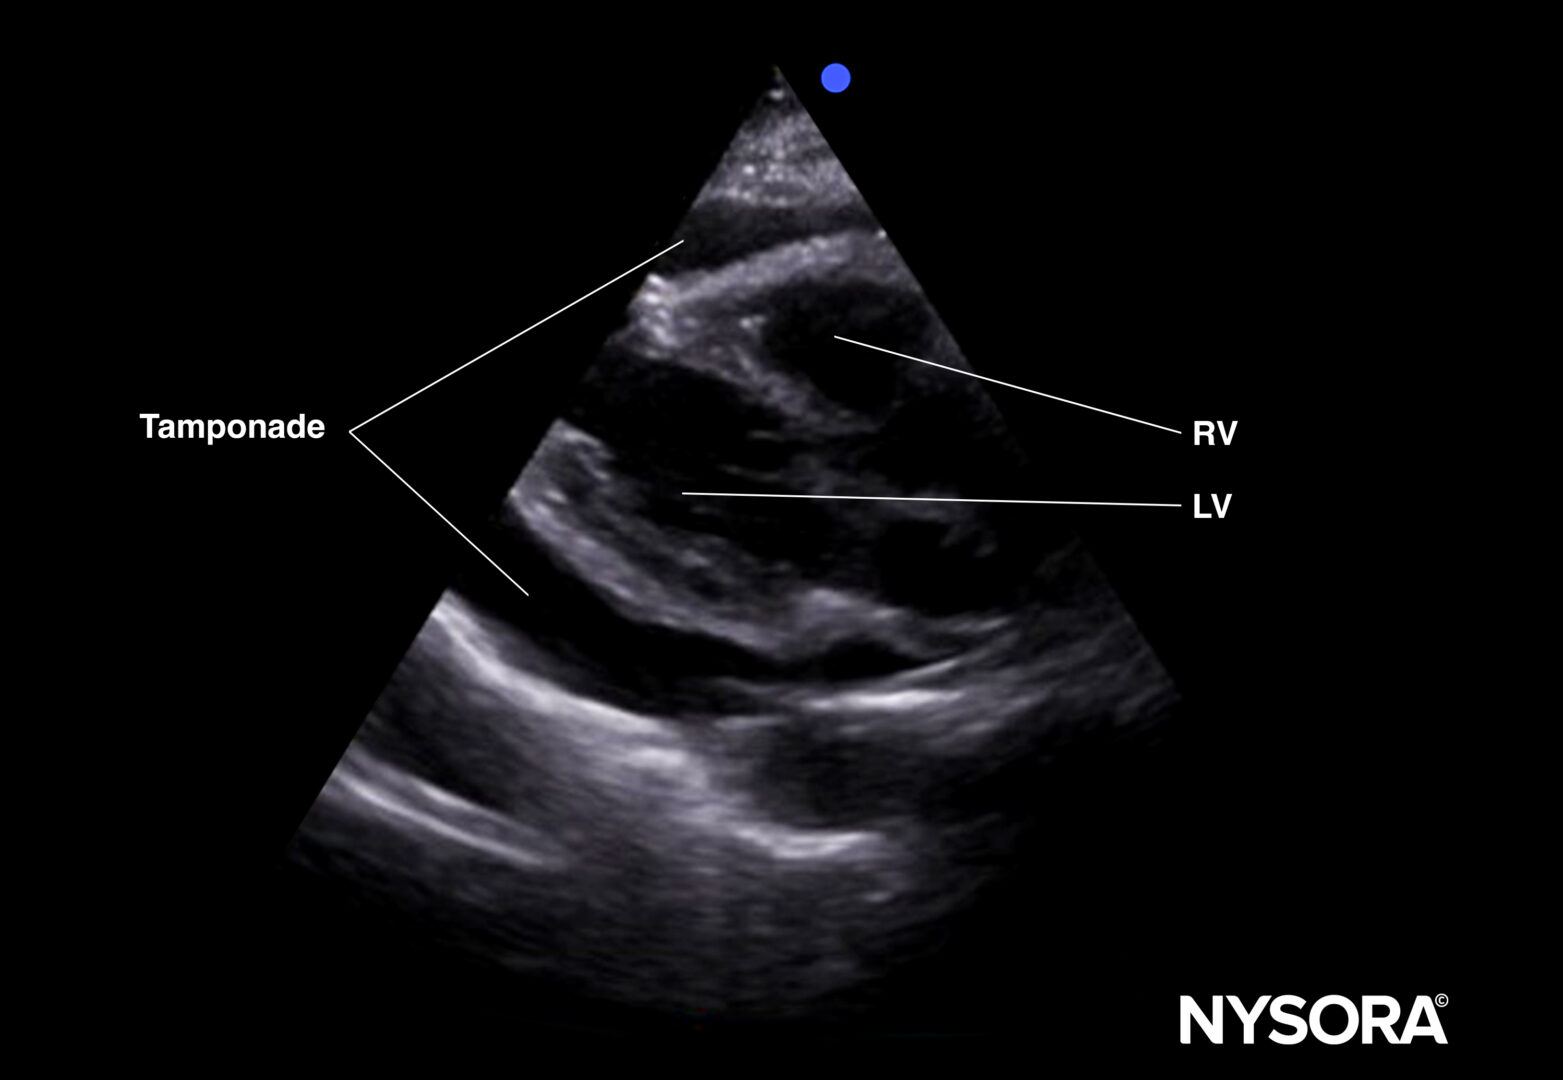
Tamponade (parasternal long-axis view).
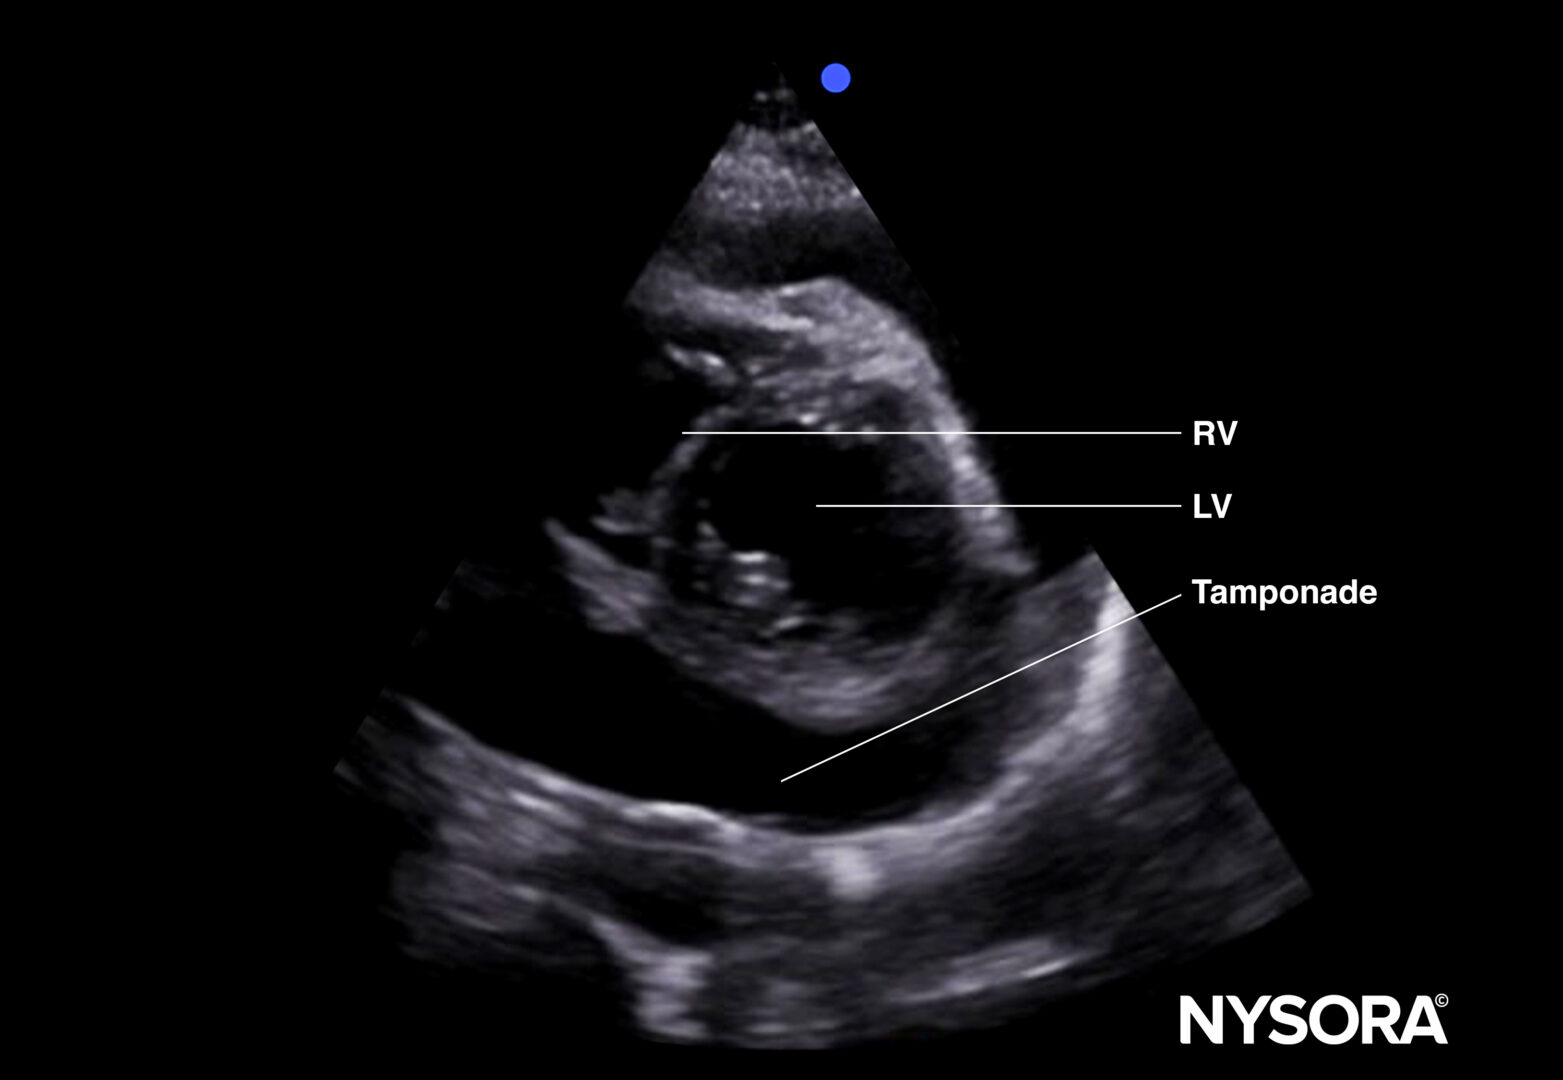
Tamponade (parasternal short-axis view).
Tips
- The size of the pericardial effusion does not always correlate with the hemodynamics.
- False negative results may be due to echogenic effusions (thrombi, pus) or loculated effusions (adhesions, malignancy).
- Fat pads in the myocardium can lead to a false-positive diagnosis. Usually, they move with the myocardium and are more heterogeneous on ultrasound.
- When it is difficult to differentiate pleural from pericardial effusion, use the parasternal long-axis view to locate the fluid in relation to the descending thoracic aorta and the pericardium.
- Anterior/superficial to the descending aorta and the pericardium: Pericardial effusion (rat tail sign).
Posterior/deep to the descending aorta and the pericardium: Pleural effusion.
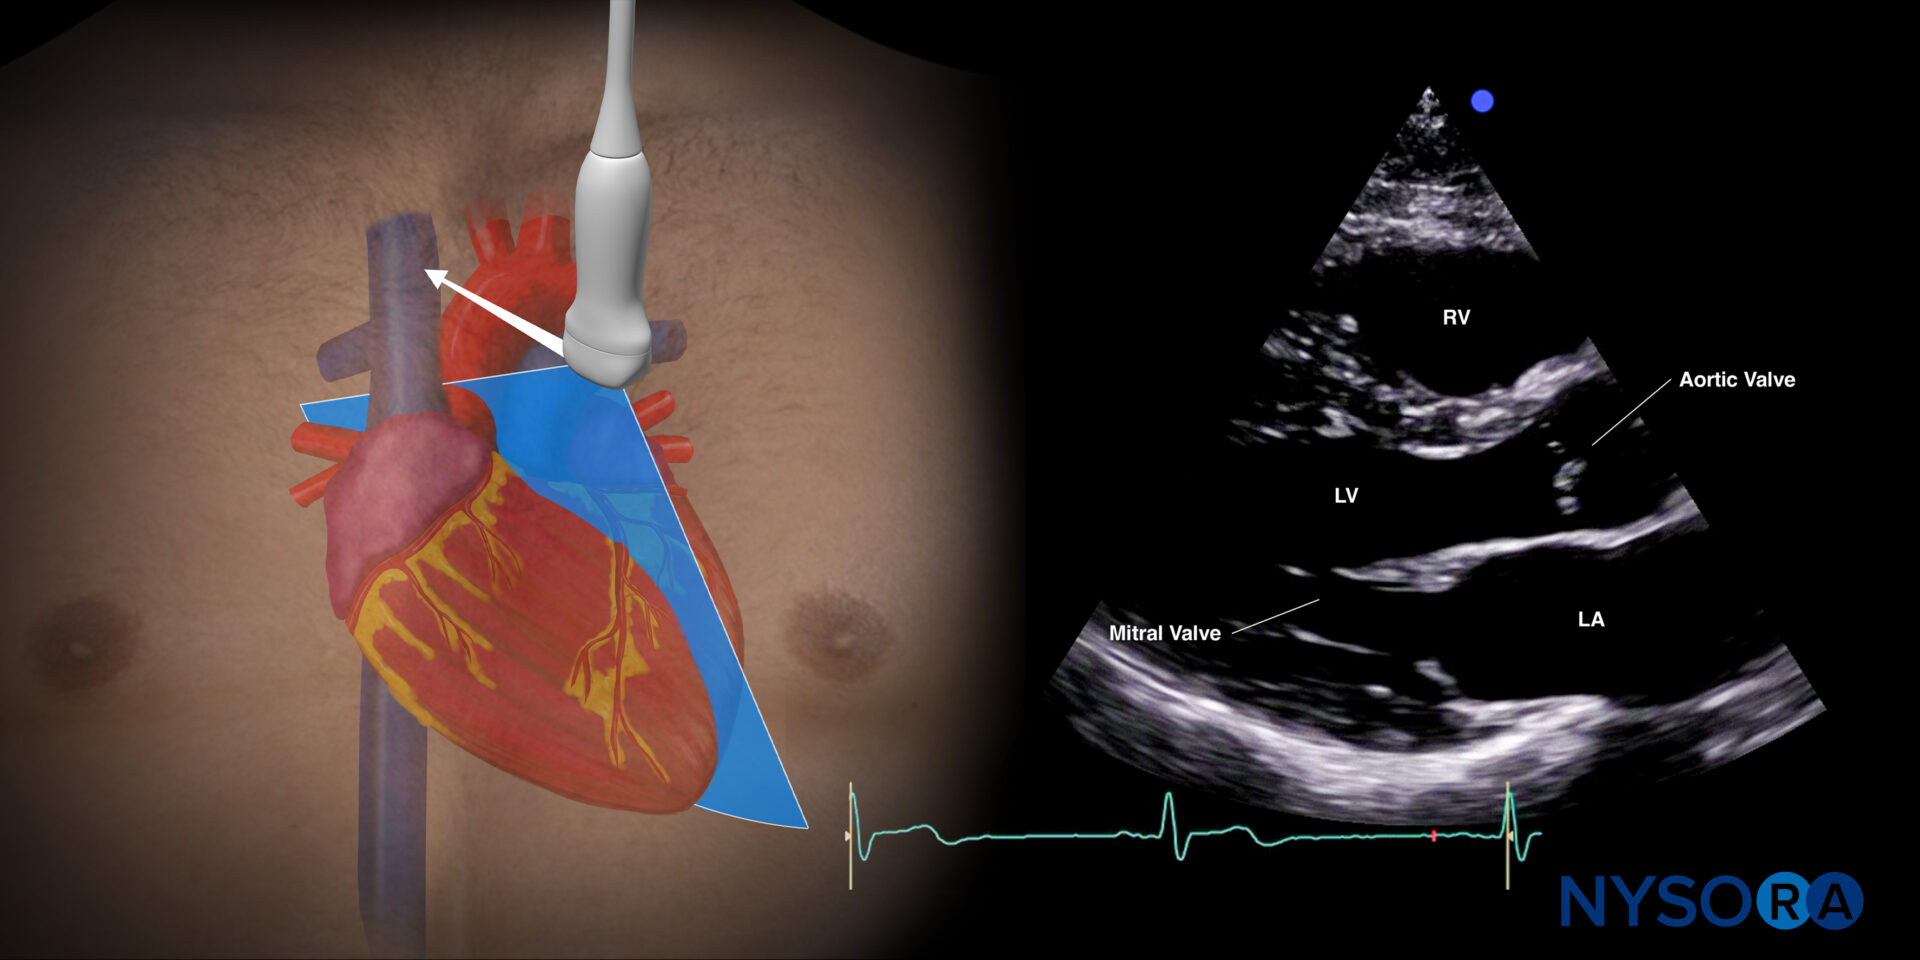
Sonoanatomy of the heart in the parasternal long-axis view. Left ventricle (LV), left atrium (LA), mitral valve, aortic valve, right ventricle (RV).
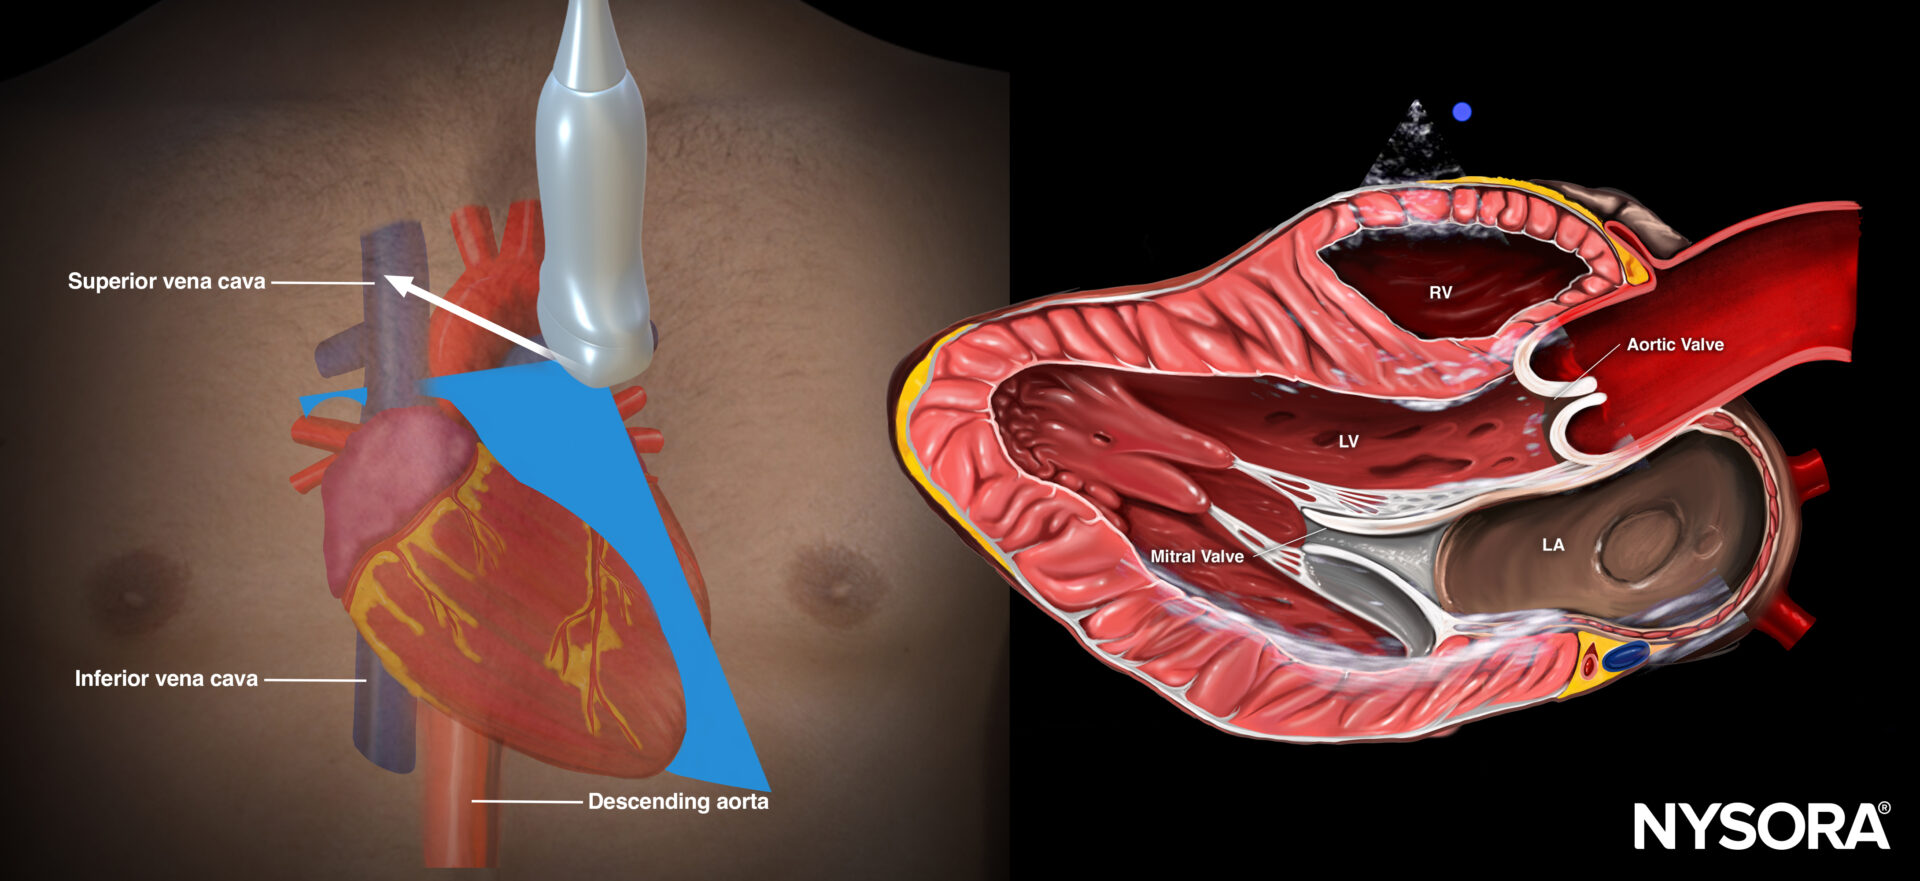
Reverse Ultrasound Anatomy of the heart in the parasternal short-axis view. Left ventricle (LV), left atrium (LA), mitral valve, aortic valve, right ventricle (RV).
Tip
The clinical presentation of the tamponade gives you an idea about the severity of the tamponade:
- Cardiac arrest or deep circulatory shock: Urgent pericardiocentesis or cardiac surgery is needed.
- Moderate hypotension, pulsus paradoxus: Fluid administration and consult cardiology.
Right upper quadrant (RUQ)
Detects free fluid in the right thorax and abdomen.
- Position the transducer between the mid- and posterior axillary lines at the level of the xiphoid process, with the orientation marker facing the patient’s head.
- Scan caudally until you visualize the liver and the kidney; fluid usually collects between the liver and the kidney, i.e., Morrison’s pouch.
- Structures of interest: lung, diaphragm, liver, kidney, Morrison’s pouch (virtual space between liver and kidney)
Normal sonoanatomy:
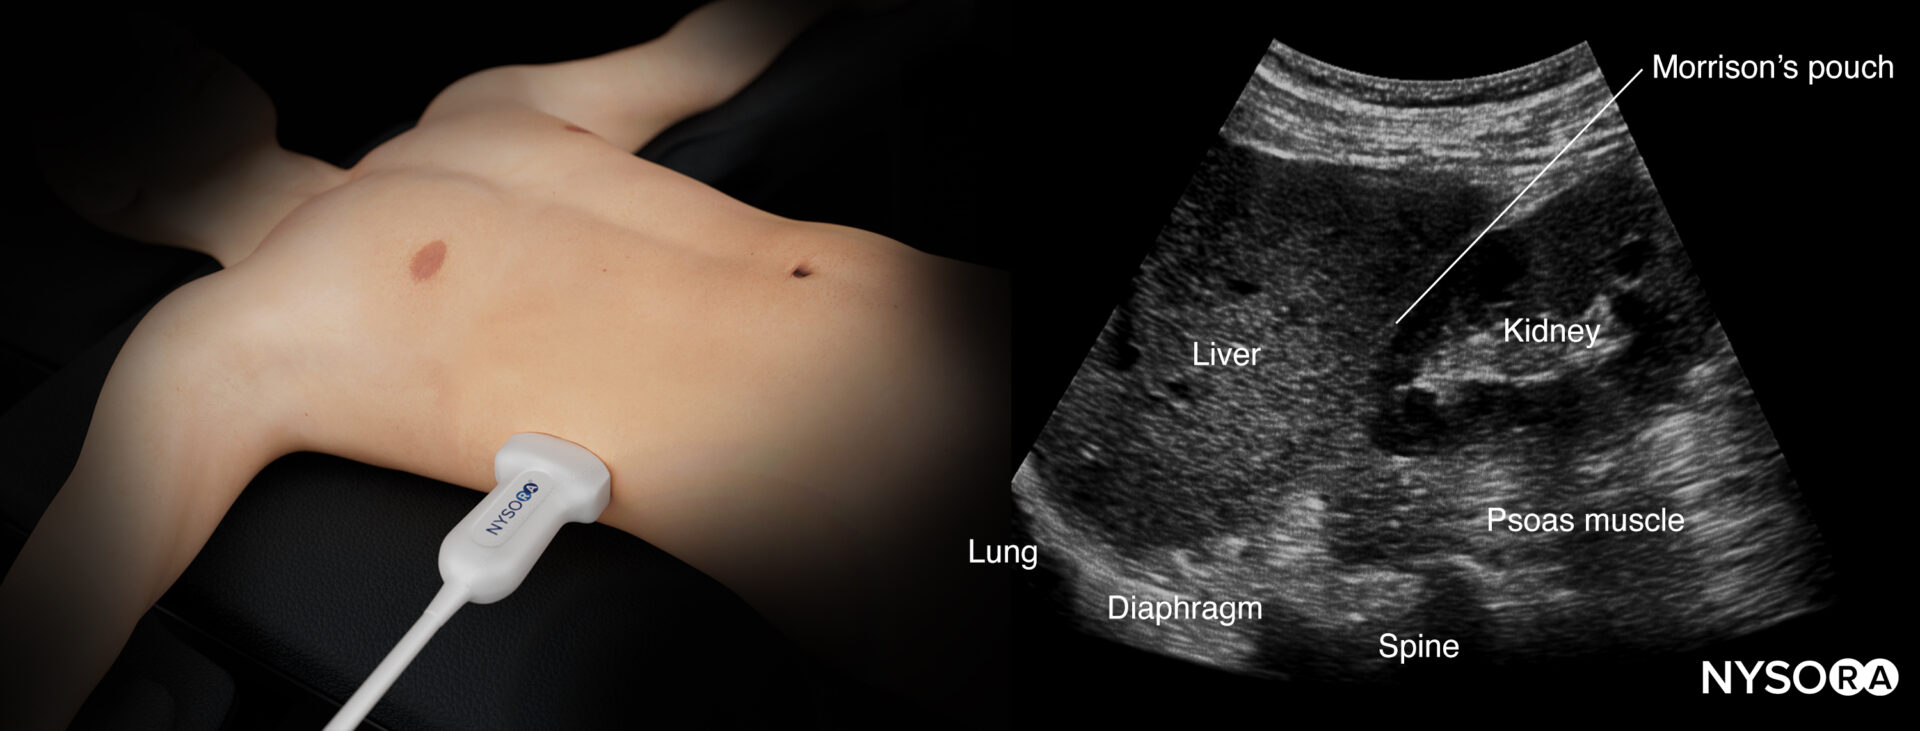
Ultrasound anatomy of the right upper quadrant and relevant anatomical structures.
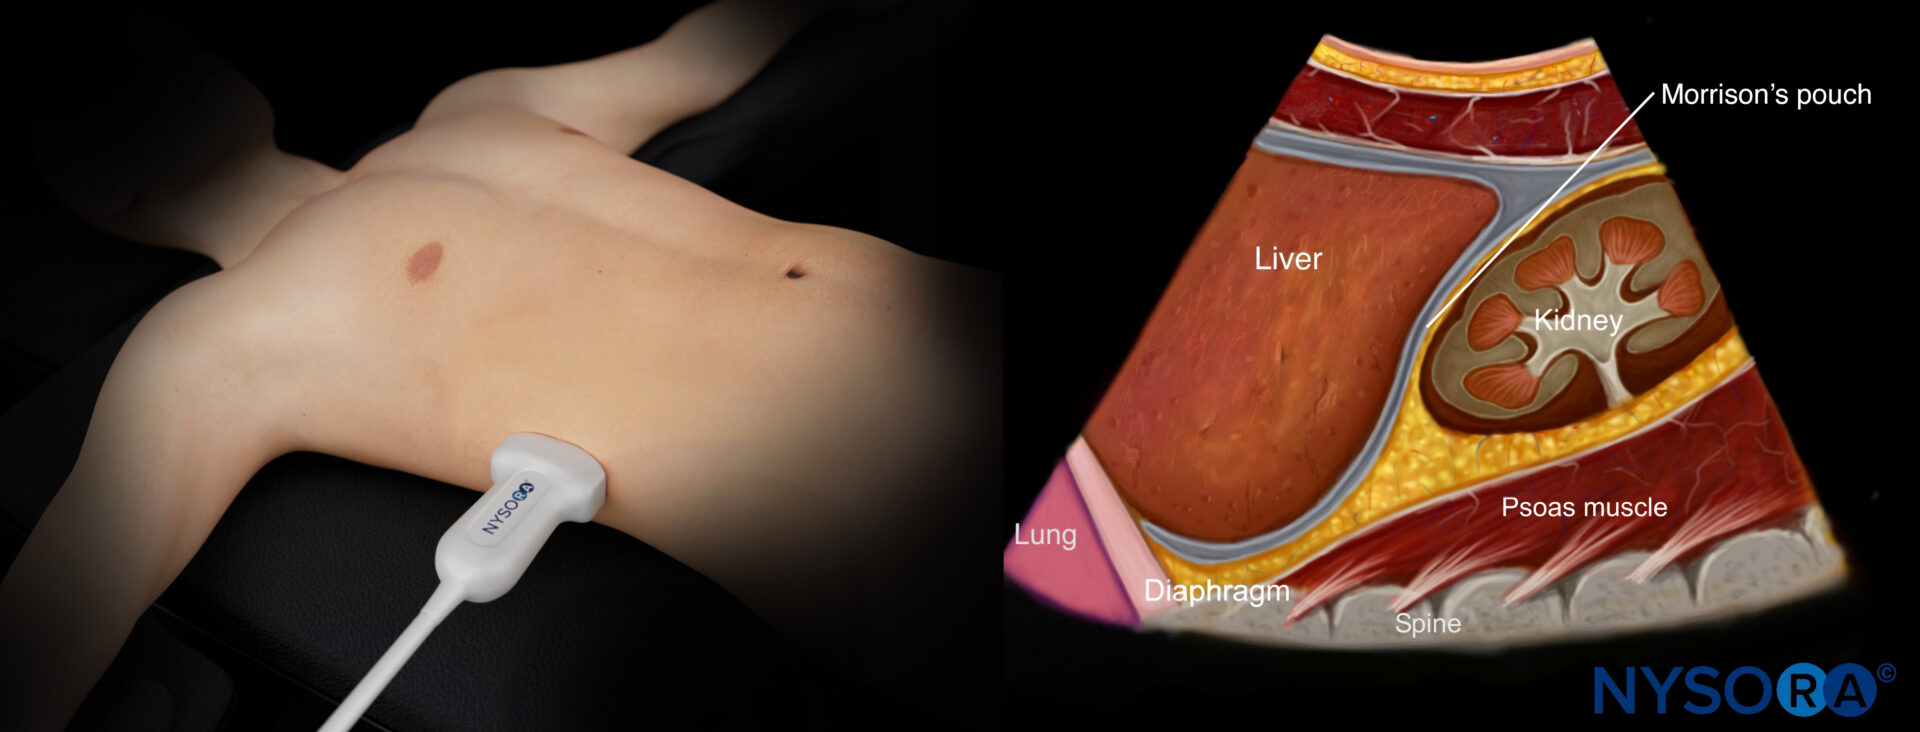
Reverse ultrasound anatomy of the right upper quadrant and relevant anatomical structures.
Free intraperitoneal fluid:
Free right intraperitoneal fluid collects between the liver and the kidney (Morrison’s pouch). If intrathoracic free fluid is present, it can be identified above the diaphragm.
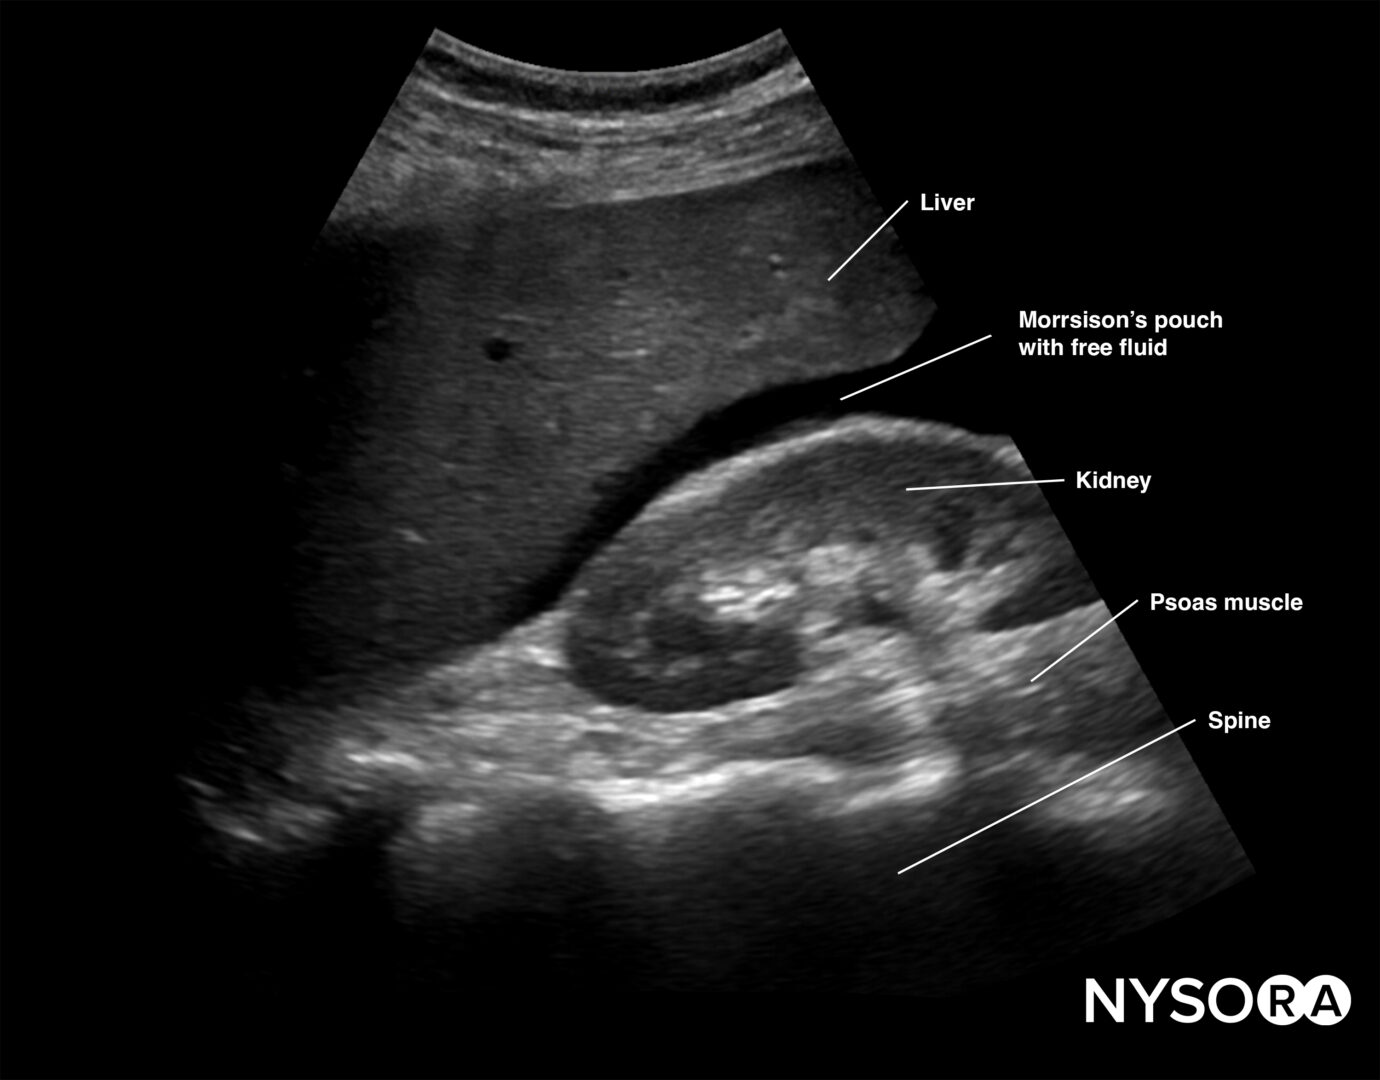
Free intraperitoneal fluid is often found between the liver and the kidney, i.e., Morrison’s pouch.
Note
Always assess the area above the diaphragm for free fluid in the RUQ and LUQ.
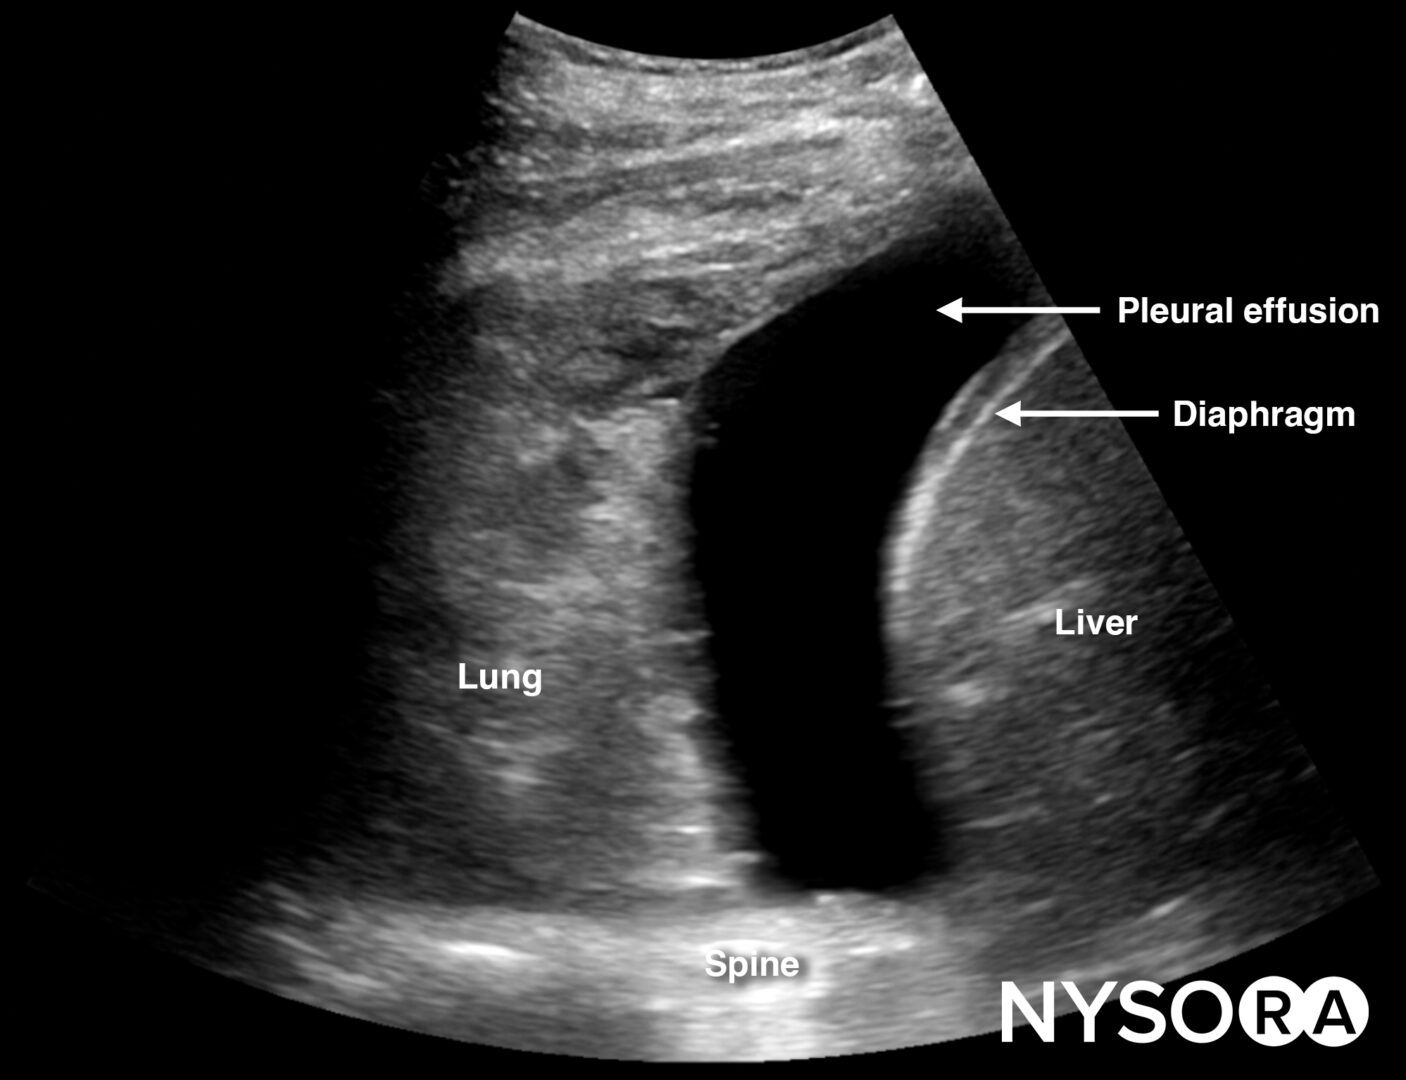
Free fluid or pleural effusion above the diaphragm.
Tips
- Do not confuse the gallbladder with free fluid
- The liver can serve as an acoustic window to other structures.
- In the upper quadrants, inspiration and expiration can compromise ultrasound imaging of the abdominal organs. This, however, indicates a normal lung and is also called the curtain sign.
- In larger patients, dynamic up and down scanning may be required to visualize all the structures of interest
Left upper quadrant (LUQ)
This view allows free fluid assessment in the left thorax and abdomen.
- Position the transducer on the posterior axillary line in the LUQ with the orientation marker toward the head of the patient.
- Start scanning caudally until you visualize the spleen and the kidney.
- Fluid usually accumulates between the spleen and the diaphragm, also called the perisplenic space. Free fluid can also accumulate in other anatomical locations, such as the splenorenal recess.
- Structures of interest: lung, diaphragm, spleen, perisplenic space, kidney
Normal sonoanatomy:
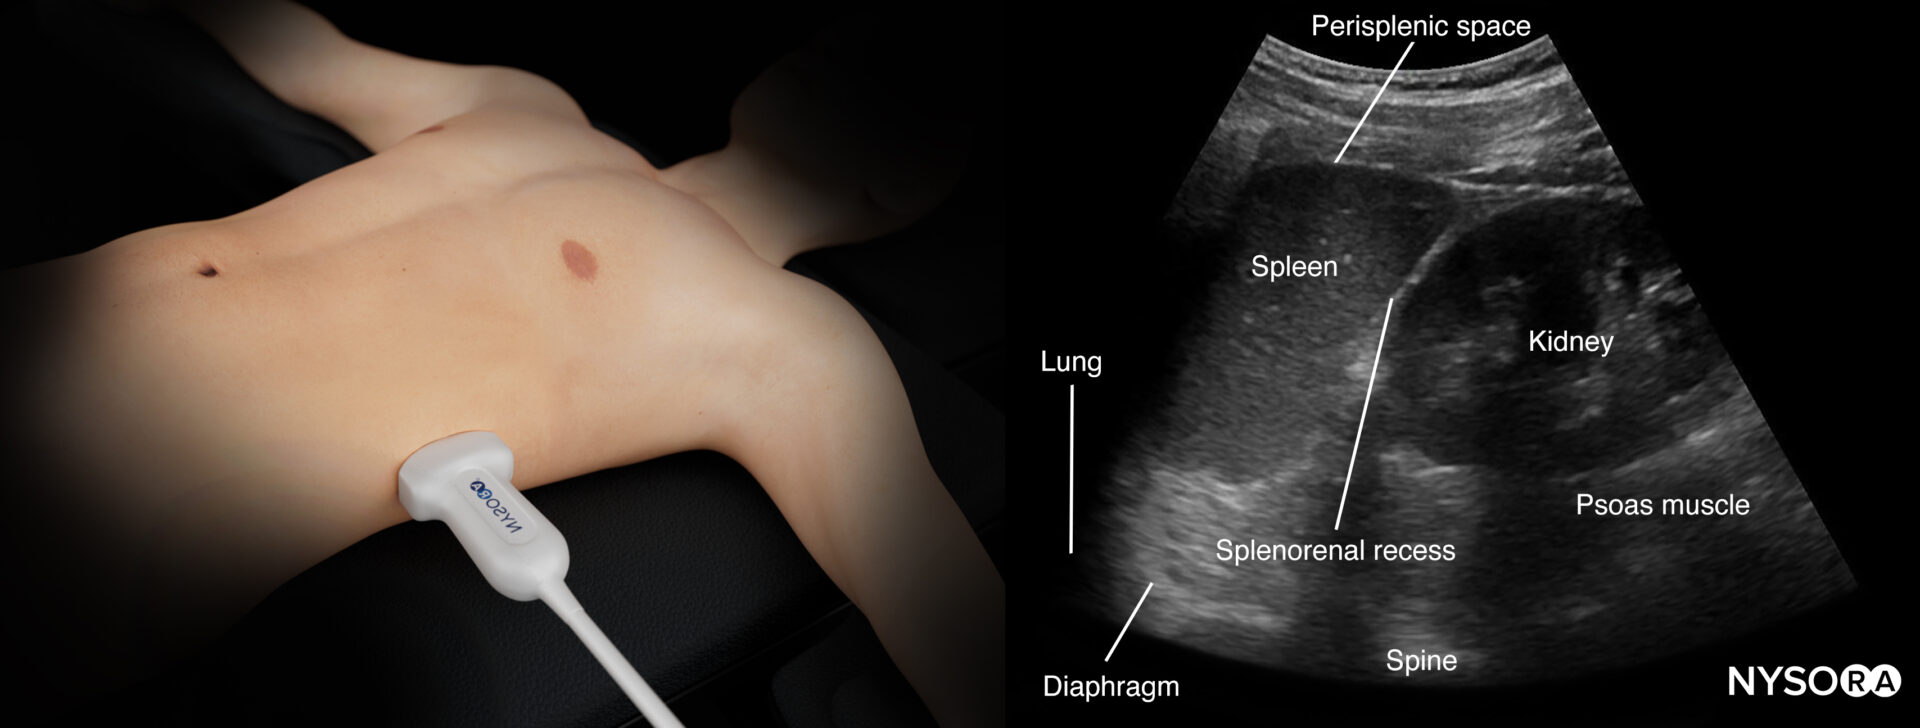
Ultrasound anatomy of the left upper quadrant and relevant anatomical structures.

Reverse Ultrasound Ultrasound anatomy of the left upper quadrant and relevant anatomical structures
Tips
- The position of the spleen is more cranial and posterior, which may make it harder to visualize
- Try directing the ultrasound beam more cranially to improve the image
Free intraperitoneal fluid:
Intraperitoneal fluid often collects between the spleen and the diaphragm (perisplenic space). Fluid may also accumulate in other locations, such as the splenorenal recess. If intrathoracic free fluid is present, it can be identified above the diaphragm.

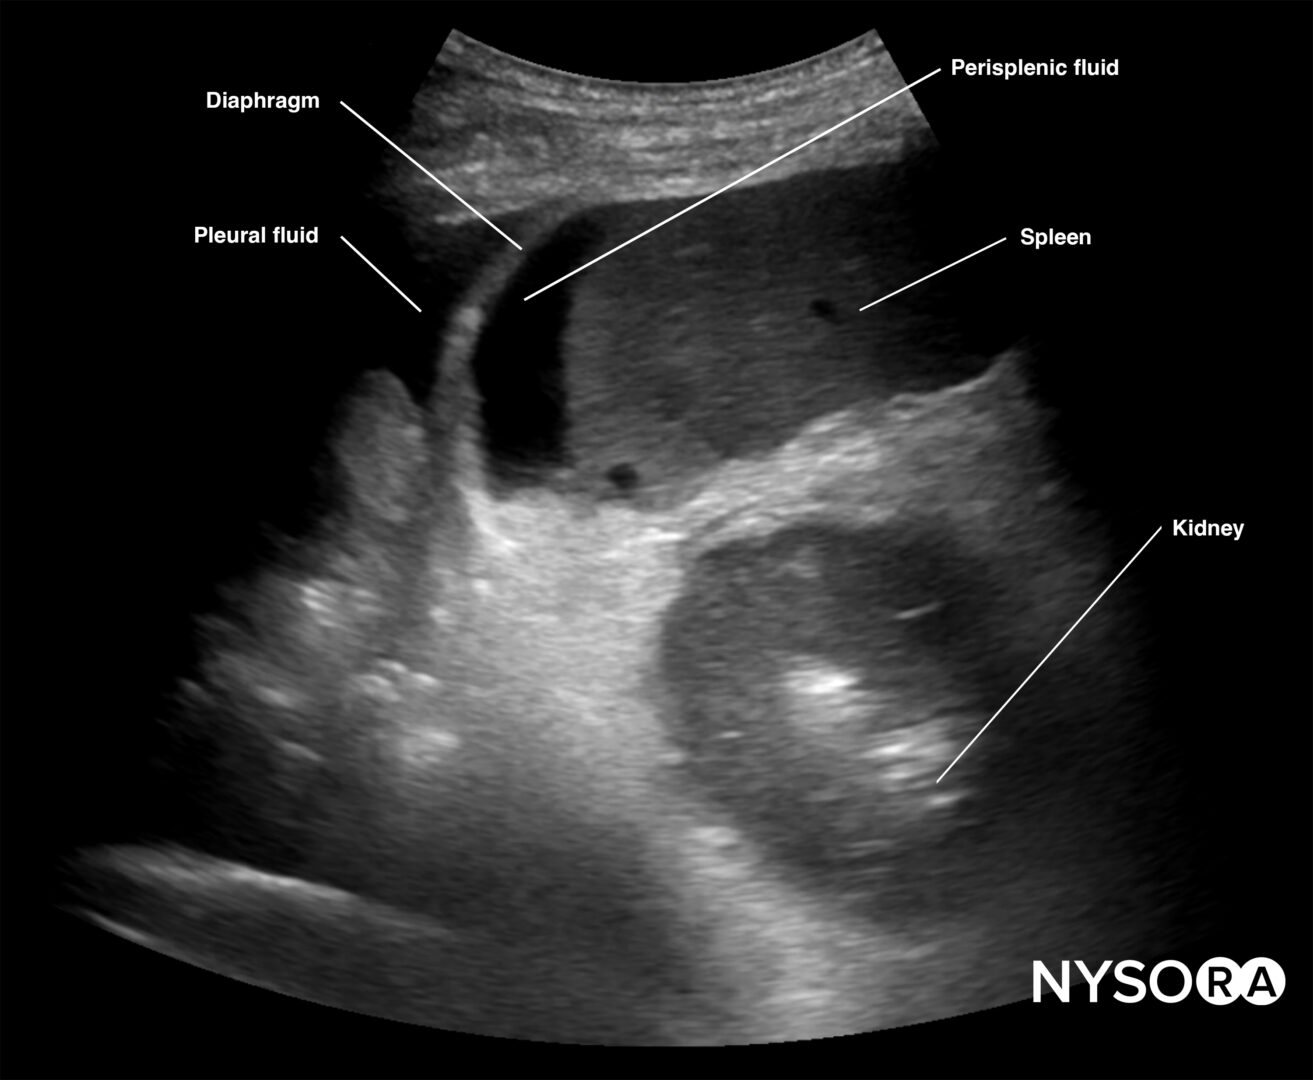
Free intraperitoneal fluid can be located in the perisplenic space.
Note
Always assess the area above the diaphragm for free fluid in the RUQ and LUQ.

Free fluid or pleural effusion above the diaphragm.
Pelvis
This view assesses the presence of free fluid in the pelvis.
- Position the transducer just above the pubic bone in the midline between the umbilicus and the pubic bone.
- The bladder can be used as an internal anatomical landmark to scan the area behind and lateral to the bladder for free fluid (the rectovesical pouch in men and the rectouterine pouch, or pouch of Douglas, in women).
Normal sonoanatomy:
- Step 1: Longitudinal view (orientation marker toward the head)
Sonoanatomy of interest in females:
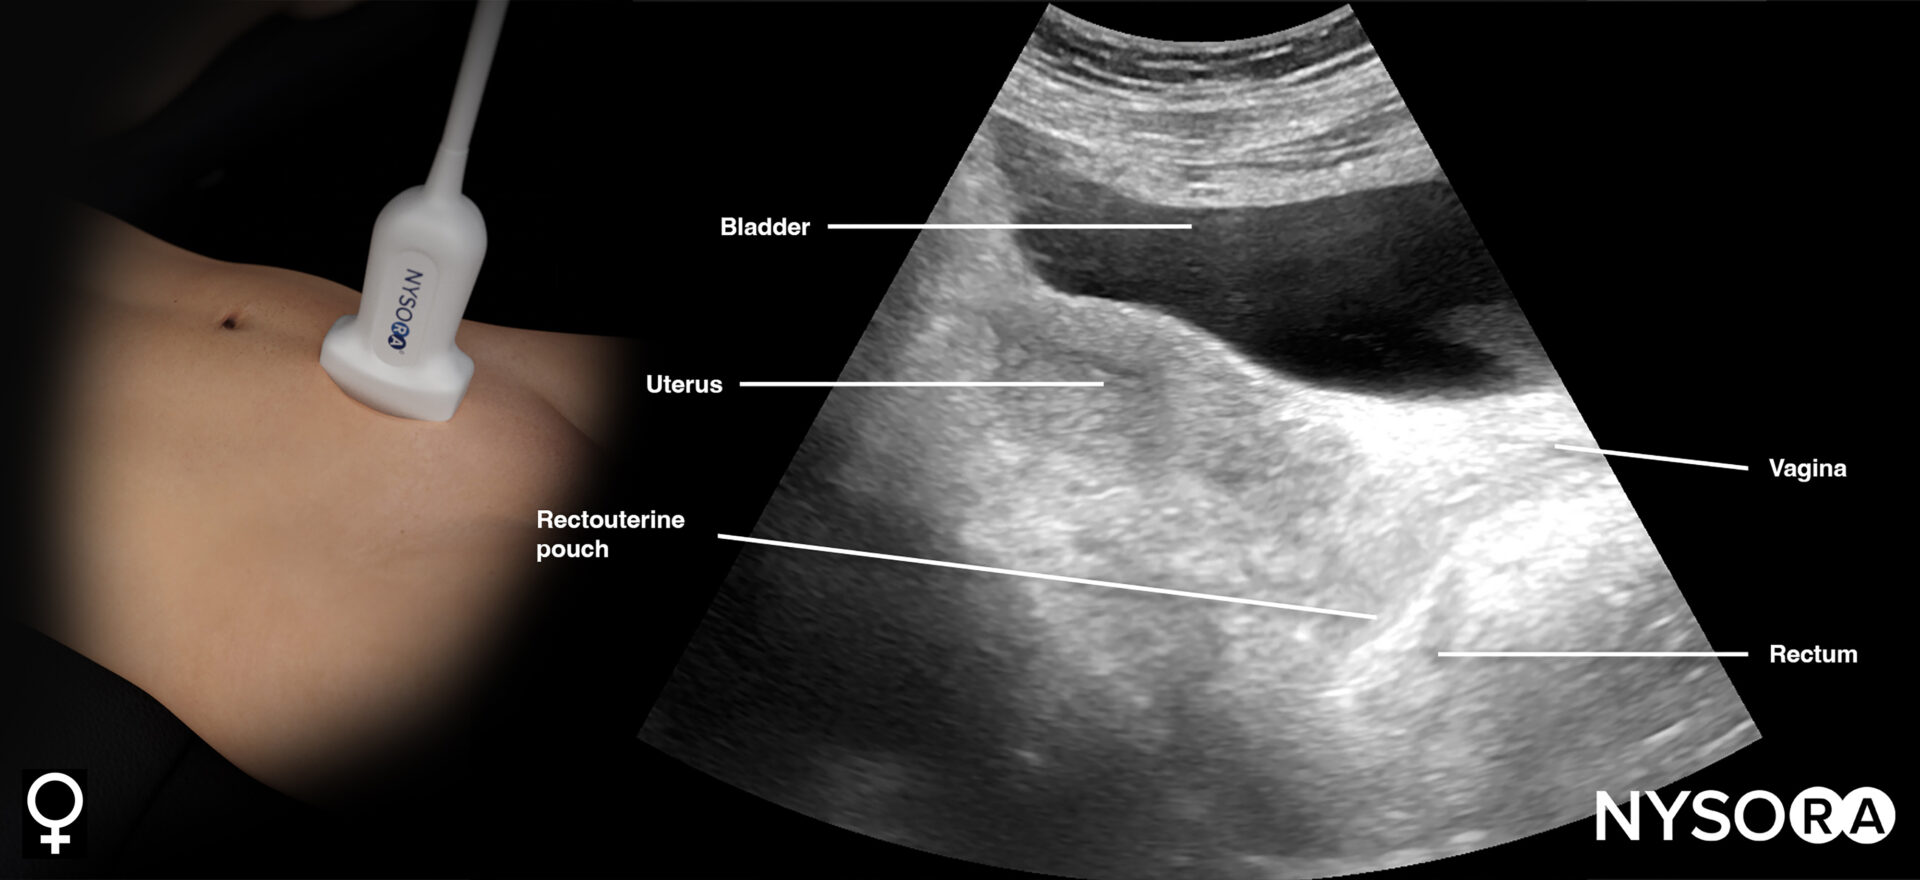
Transducer position and ultrasound anatomy of the female pelvis.
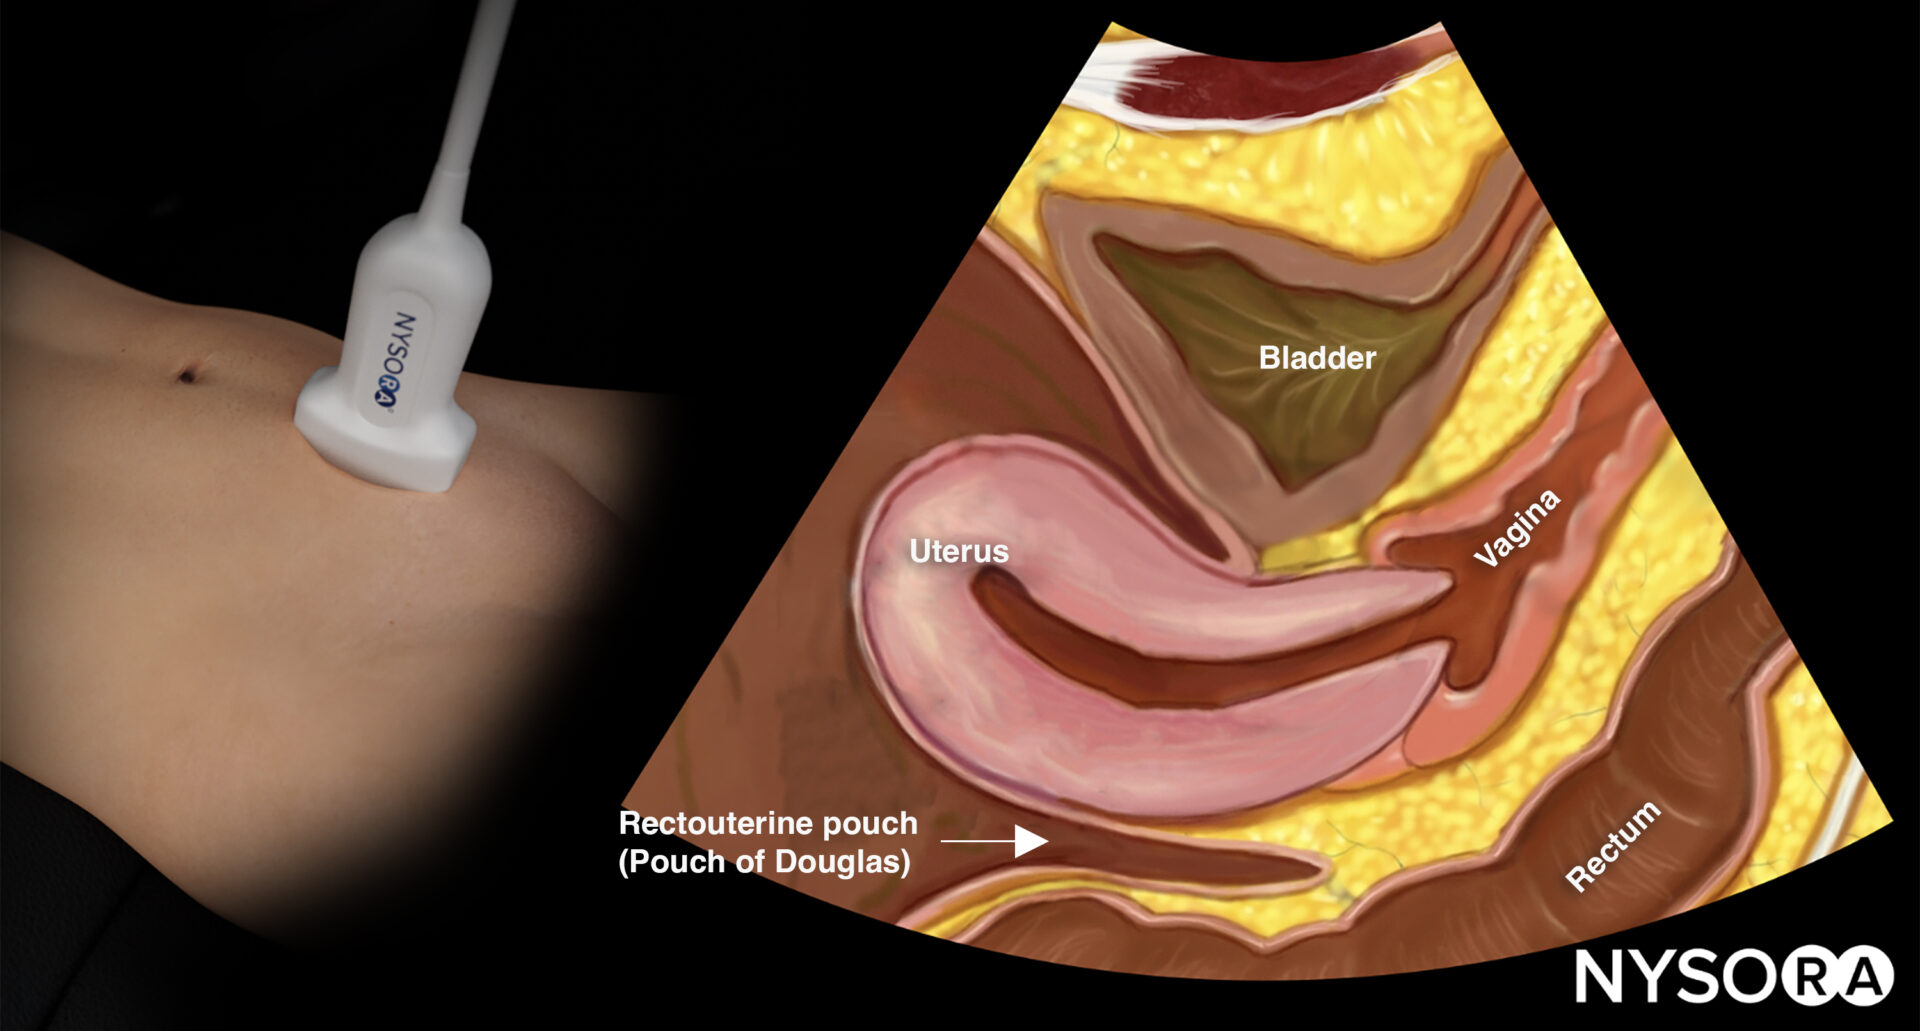
Transducer position and reverse ultrasound anatomy of the female pelvis.
Sonoanatomy of interest in males:

Transducer position and ultrasound anatomy of the male pelvis.
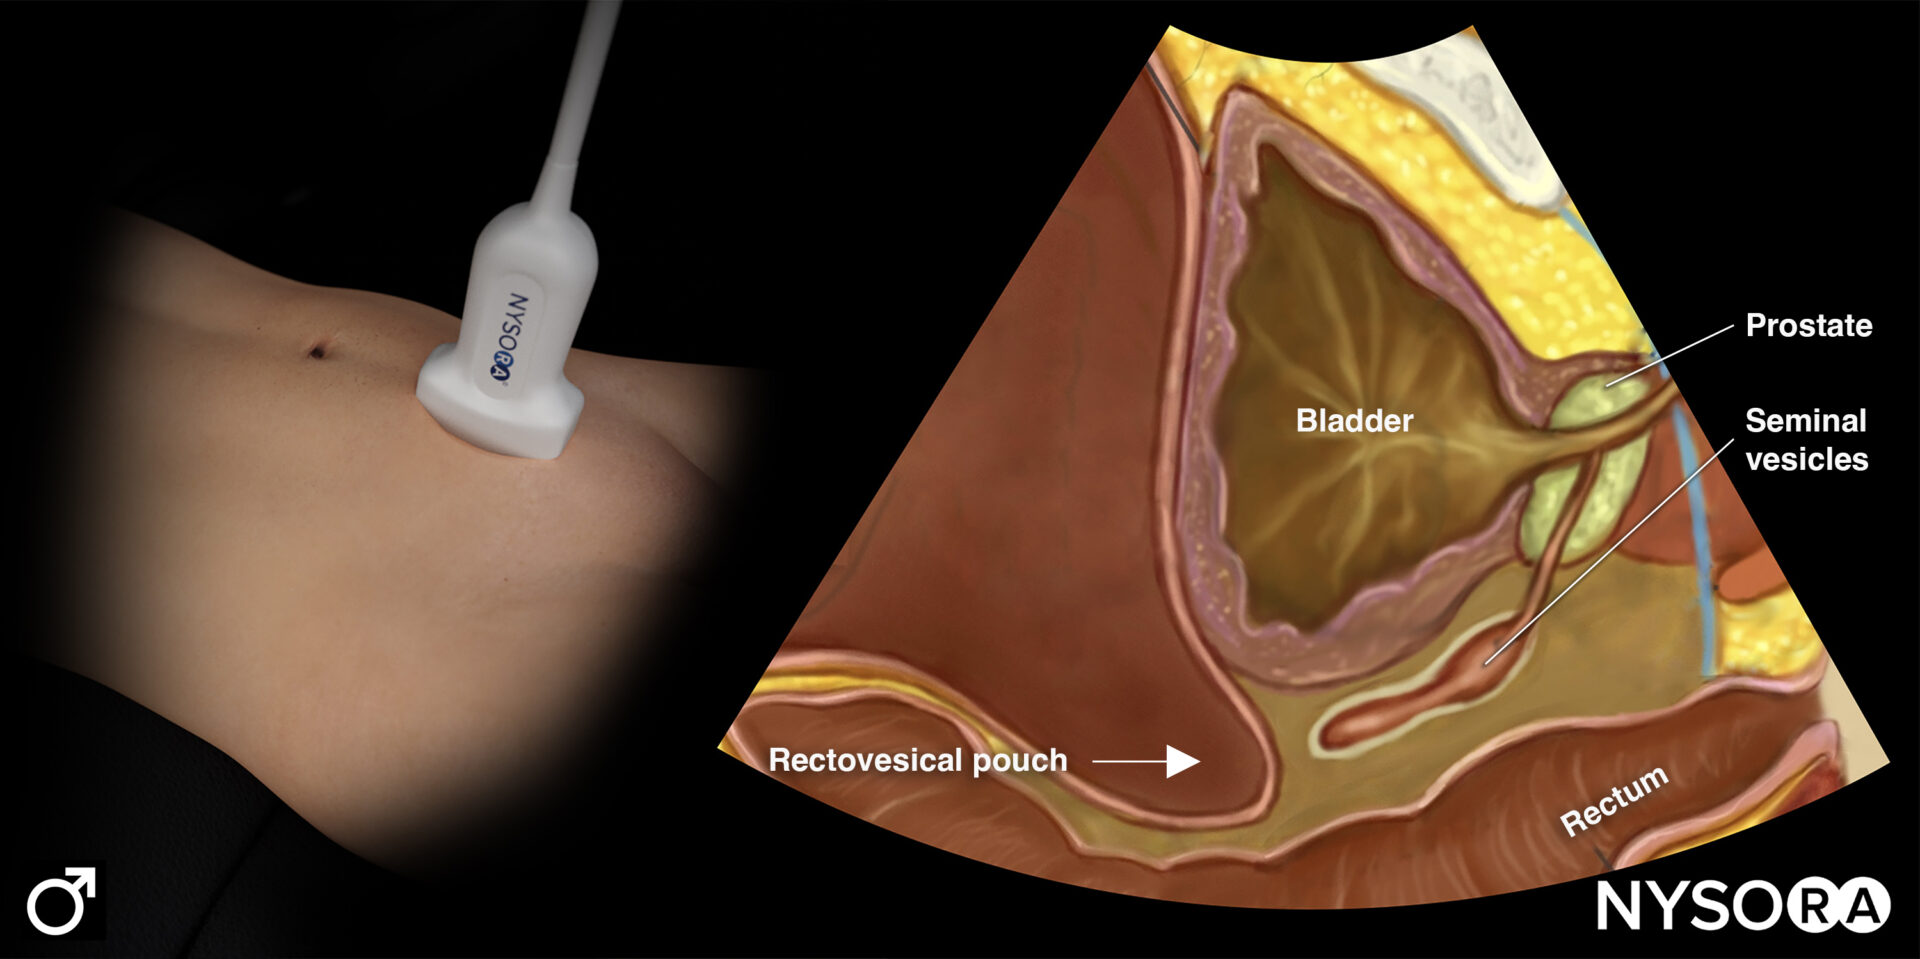
Transducer position and reverse ultrasound anatomy of the male pelvis.
- Step 2: Transverse view (orientation marker toward the patient’s right)
Sonoanatomy of interest in females:
Transducer position and ultrasound anatomy of the female pelvis.
Transducer position and reverse ultrasound anatomy of the female pelvis.
Structures of interest in males:
Transducer position and ultrasound anatomy of the male pelvis.
Transducer position and reverse ultrasound anatomy of the male pelvis.
Free intraperitoneal fluid:
Pelvic free fluid collects behind the bladder or the area lateral to the bladder (rectovesical pouch in men and the rectouterine pouch or pouch of Douglas in women).
Sonoanatomy of interest in females:
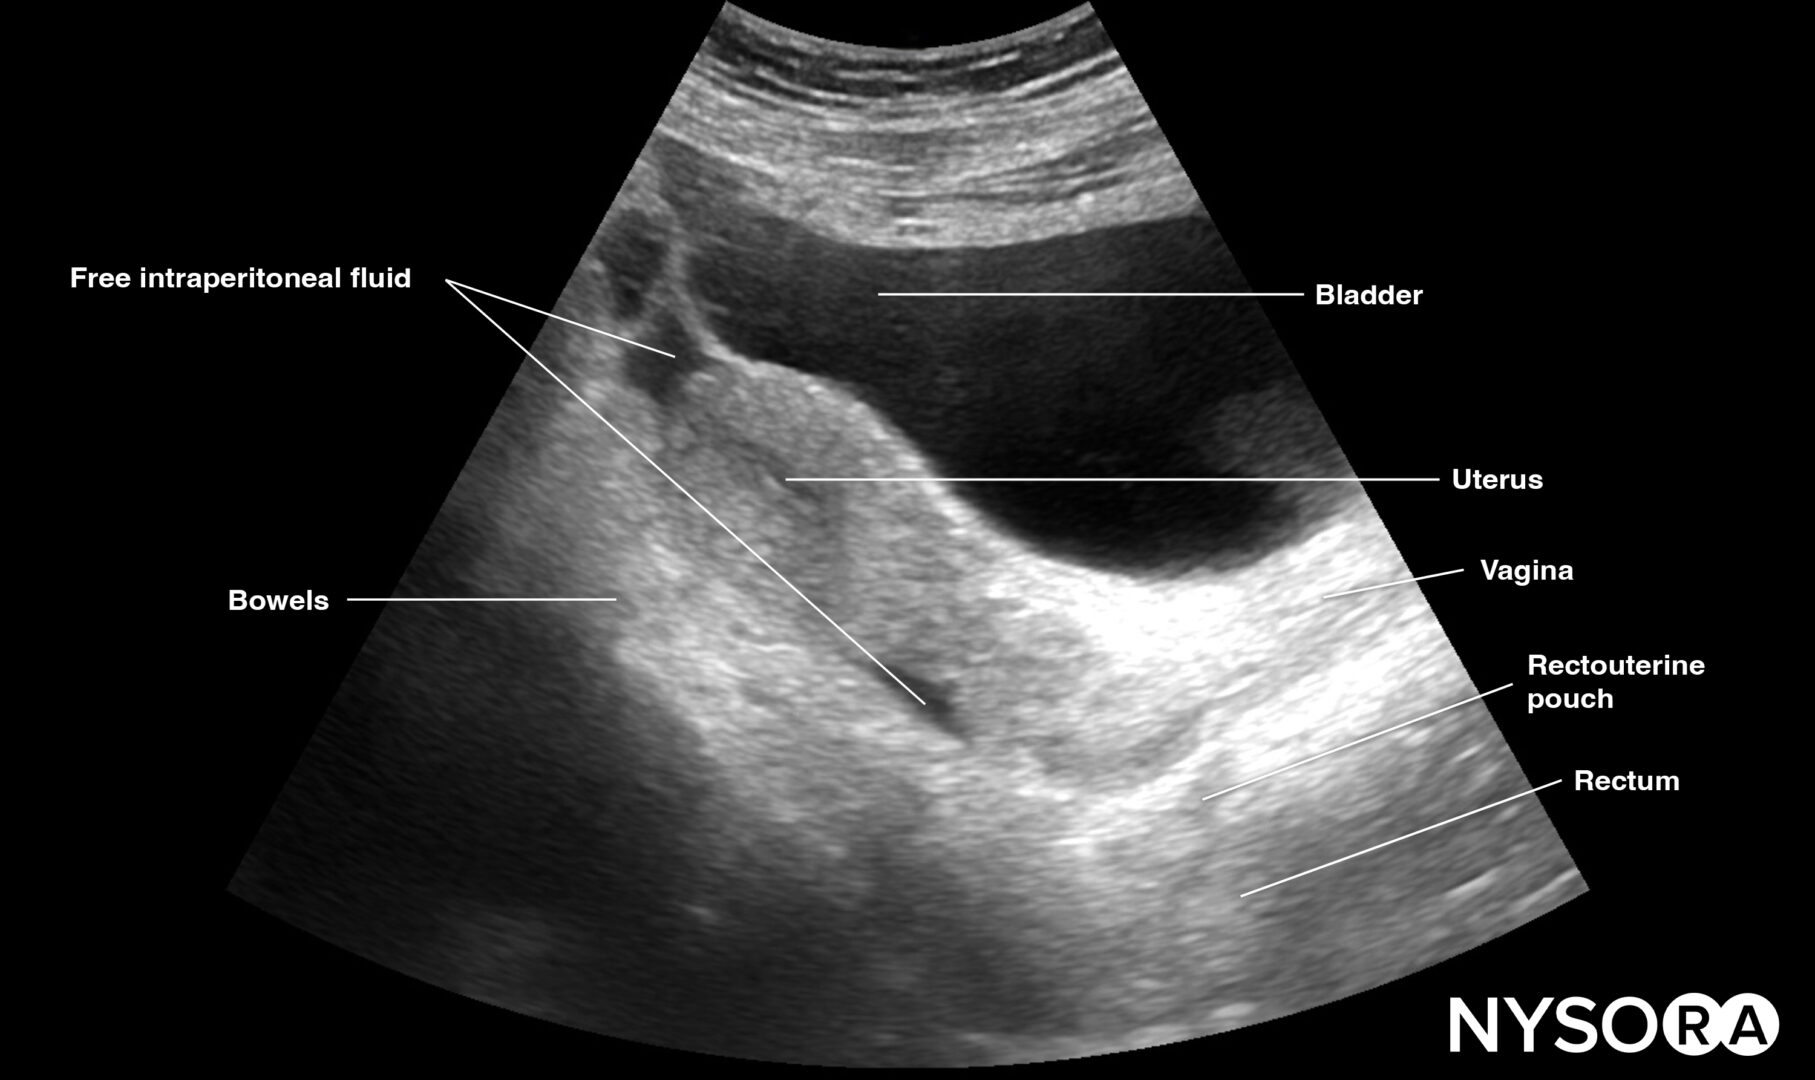
Longitudinal view of the female pelvis with free fluid in the rectouterine pouch.
Transverse view of the female pelvis with free fluid in the rectouterine pouch.
Sonoanatomy of interest in males:
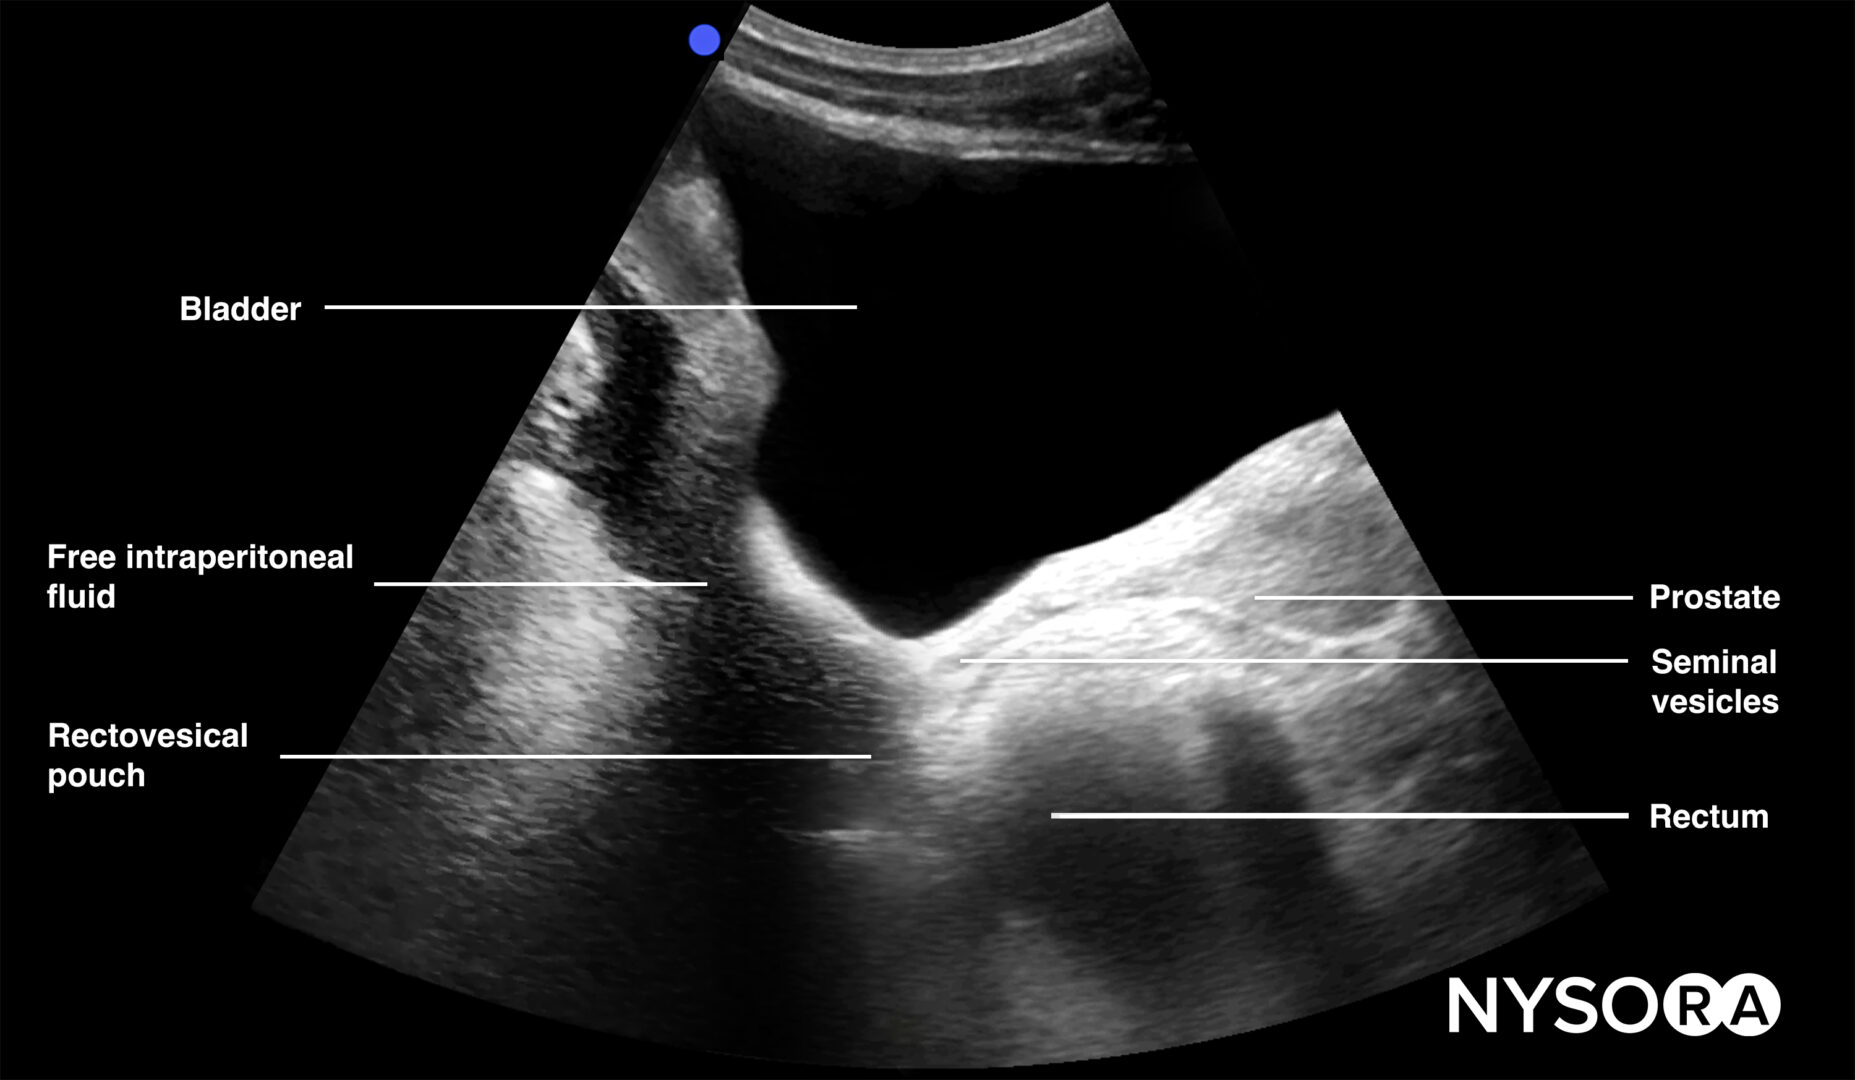
Longitudinal view of the male pelvis with free fluid in the rectovesical pouch after Foley catheter insertion.
Transverse view of the male pelvis with free fluid in the rectovesical pouch after Foley catheter insertion.
Tips
- In men, the seminal vesicles may be mistaken for free fluid. However, the vesicles are usually more triangular in shape and symmetrically spaced from the midline in the transverse view.
- Adjust the gain to atone for the acoustic enhancement of the bladder, which makes it more difficult to observe hypoechoic free fluid posterior to the bladder.
Left & right lung
These views allow assessment of the right and left lung for pneumothorax.
- Position the transducer on the left and right anterior chest wall, just below the clavicle (2nd-3rd intercostal space), and on the midclavicular line with the orientation marker toward the head of the patient.
Normal vs. abnormal sonoanatomy:
While the transducer is in these positions, assess the lungs for the following signs:
- Bat sign = two adjacent ribs with pleura in between.
The bat sign indicates the position of the transducer between two ribs and the ability to image the lung surface as well as deeper structures. This should always be the first step that makes sure you are in the correct position to address the pleura and the underlying lung. It is called the “bat sign” since the ribs resemble the wings and the pleura resembles the body of the bat.
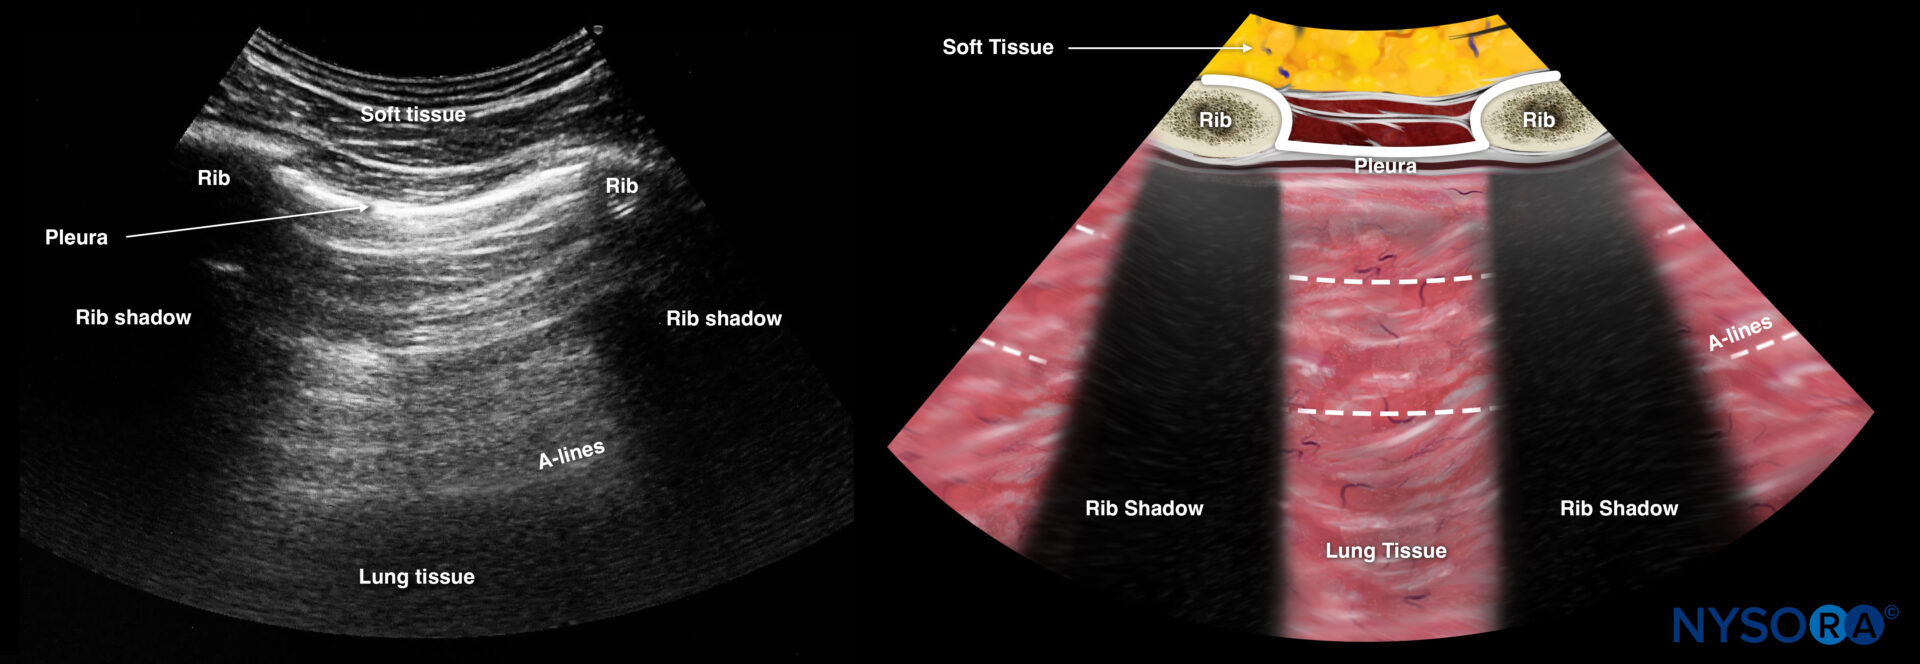
The bat sign is indicated in white: Two adjacent ribs with pleura in between.
- Lung sliding = the two pleural layers sliding over each other, resulting in a shimmering or comet tails.
Notes
- The absence of lung sliding is highly sensitive for pneumothorax.
- Specificity is estimated to be above 80%. Other causes for absent lung sliding:
- Massive atelectasis
- Mainstem intubation
- Pleurodesis
- Apnea
- Pneumonia
Tips
- The presence of lung sliding rules out a pneumothorax (100%).
The presence of the lung pulse has the same value as lung sliding and also rules out a pneumothorax. The lung pulse is the pleural movement caused by cardiac contraction. It is present only when the parietal and visceral pleurae oppose each other.
- M-mode of normal lungs exhibits a seashore sign. M-mode can be used instead of, or to supplement, the B-mode when lung sliding is difficult to demonstrate due to suboptimal images.
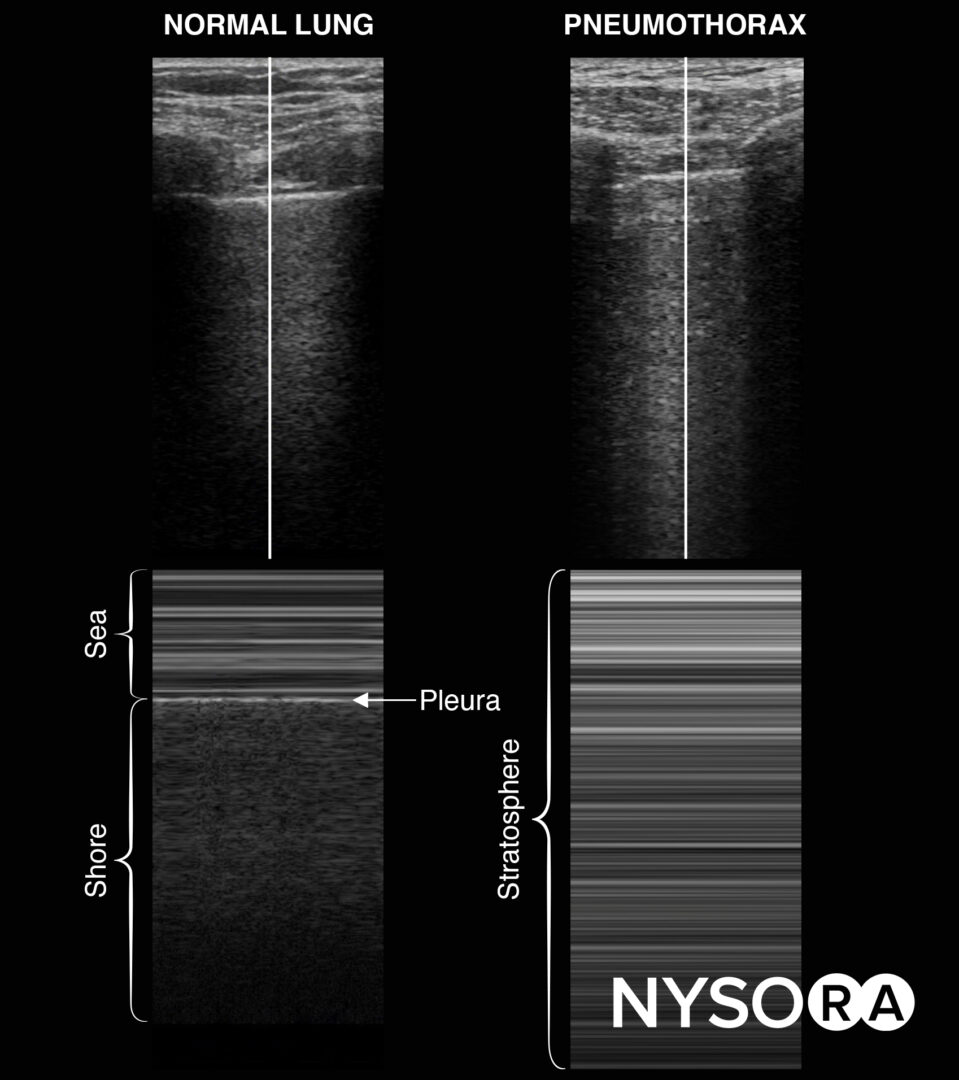
M-mode in normal lungs will show a seashore sign. Imagine the look of a sandy beach with the sea above. A pneumothorax will result in parallel horizontal white lines, also called the stratosphere sign.
- The stratosphere sign is sometimes referred to as the “barcode sign”. This latter may be confusing with the current trend toward complex barcodes (cf. QR codes).
- The presence of B-lines, a vertical line artifact over the full length of the ultrasound beam and obliterating the horizontal A-lines, also rules out a pneumothorax.
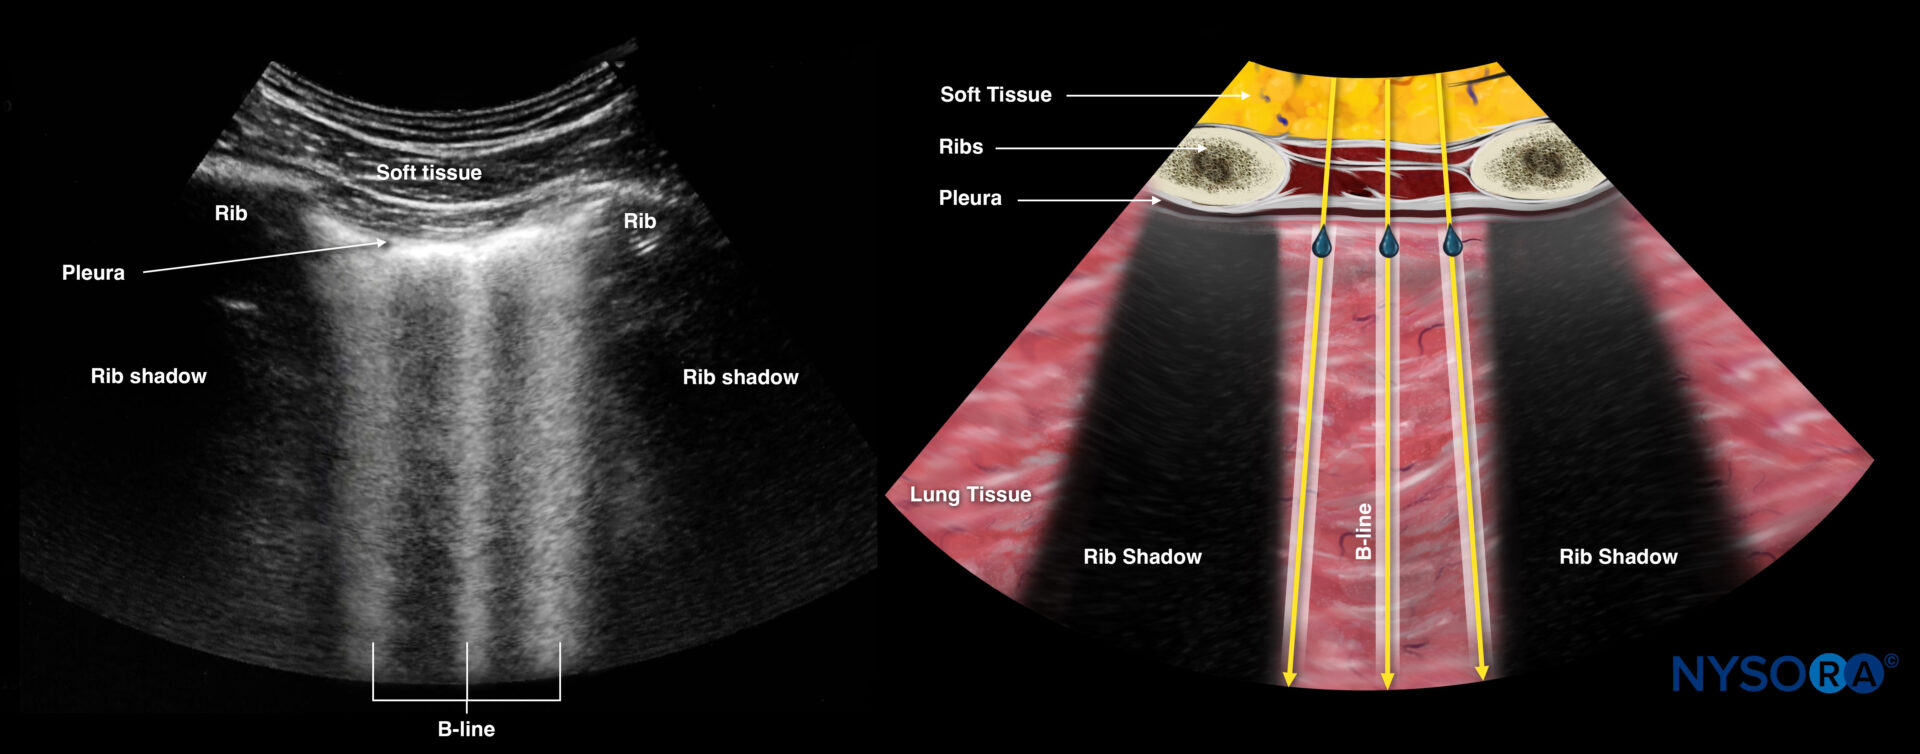
B-lines.
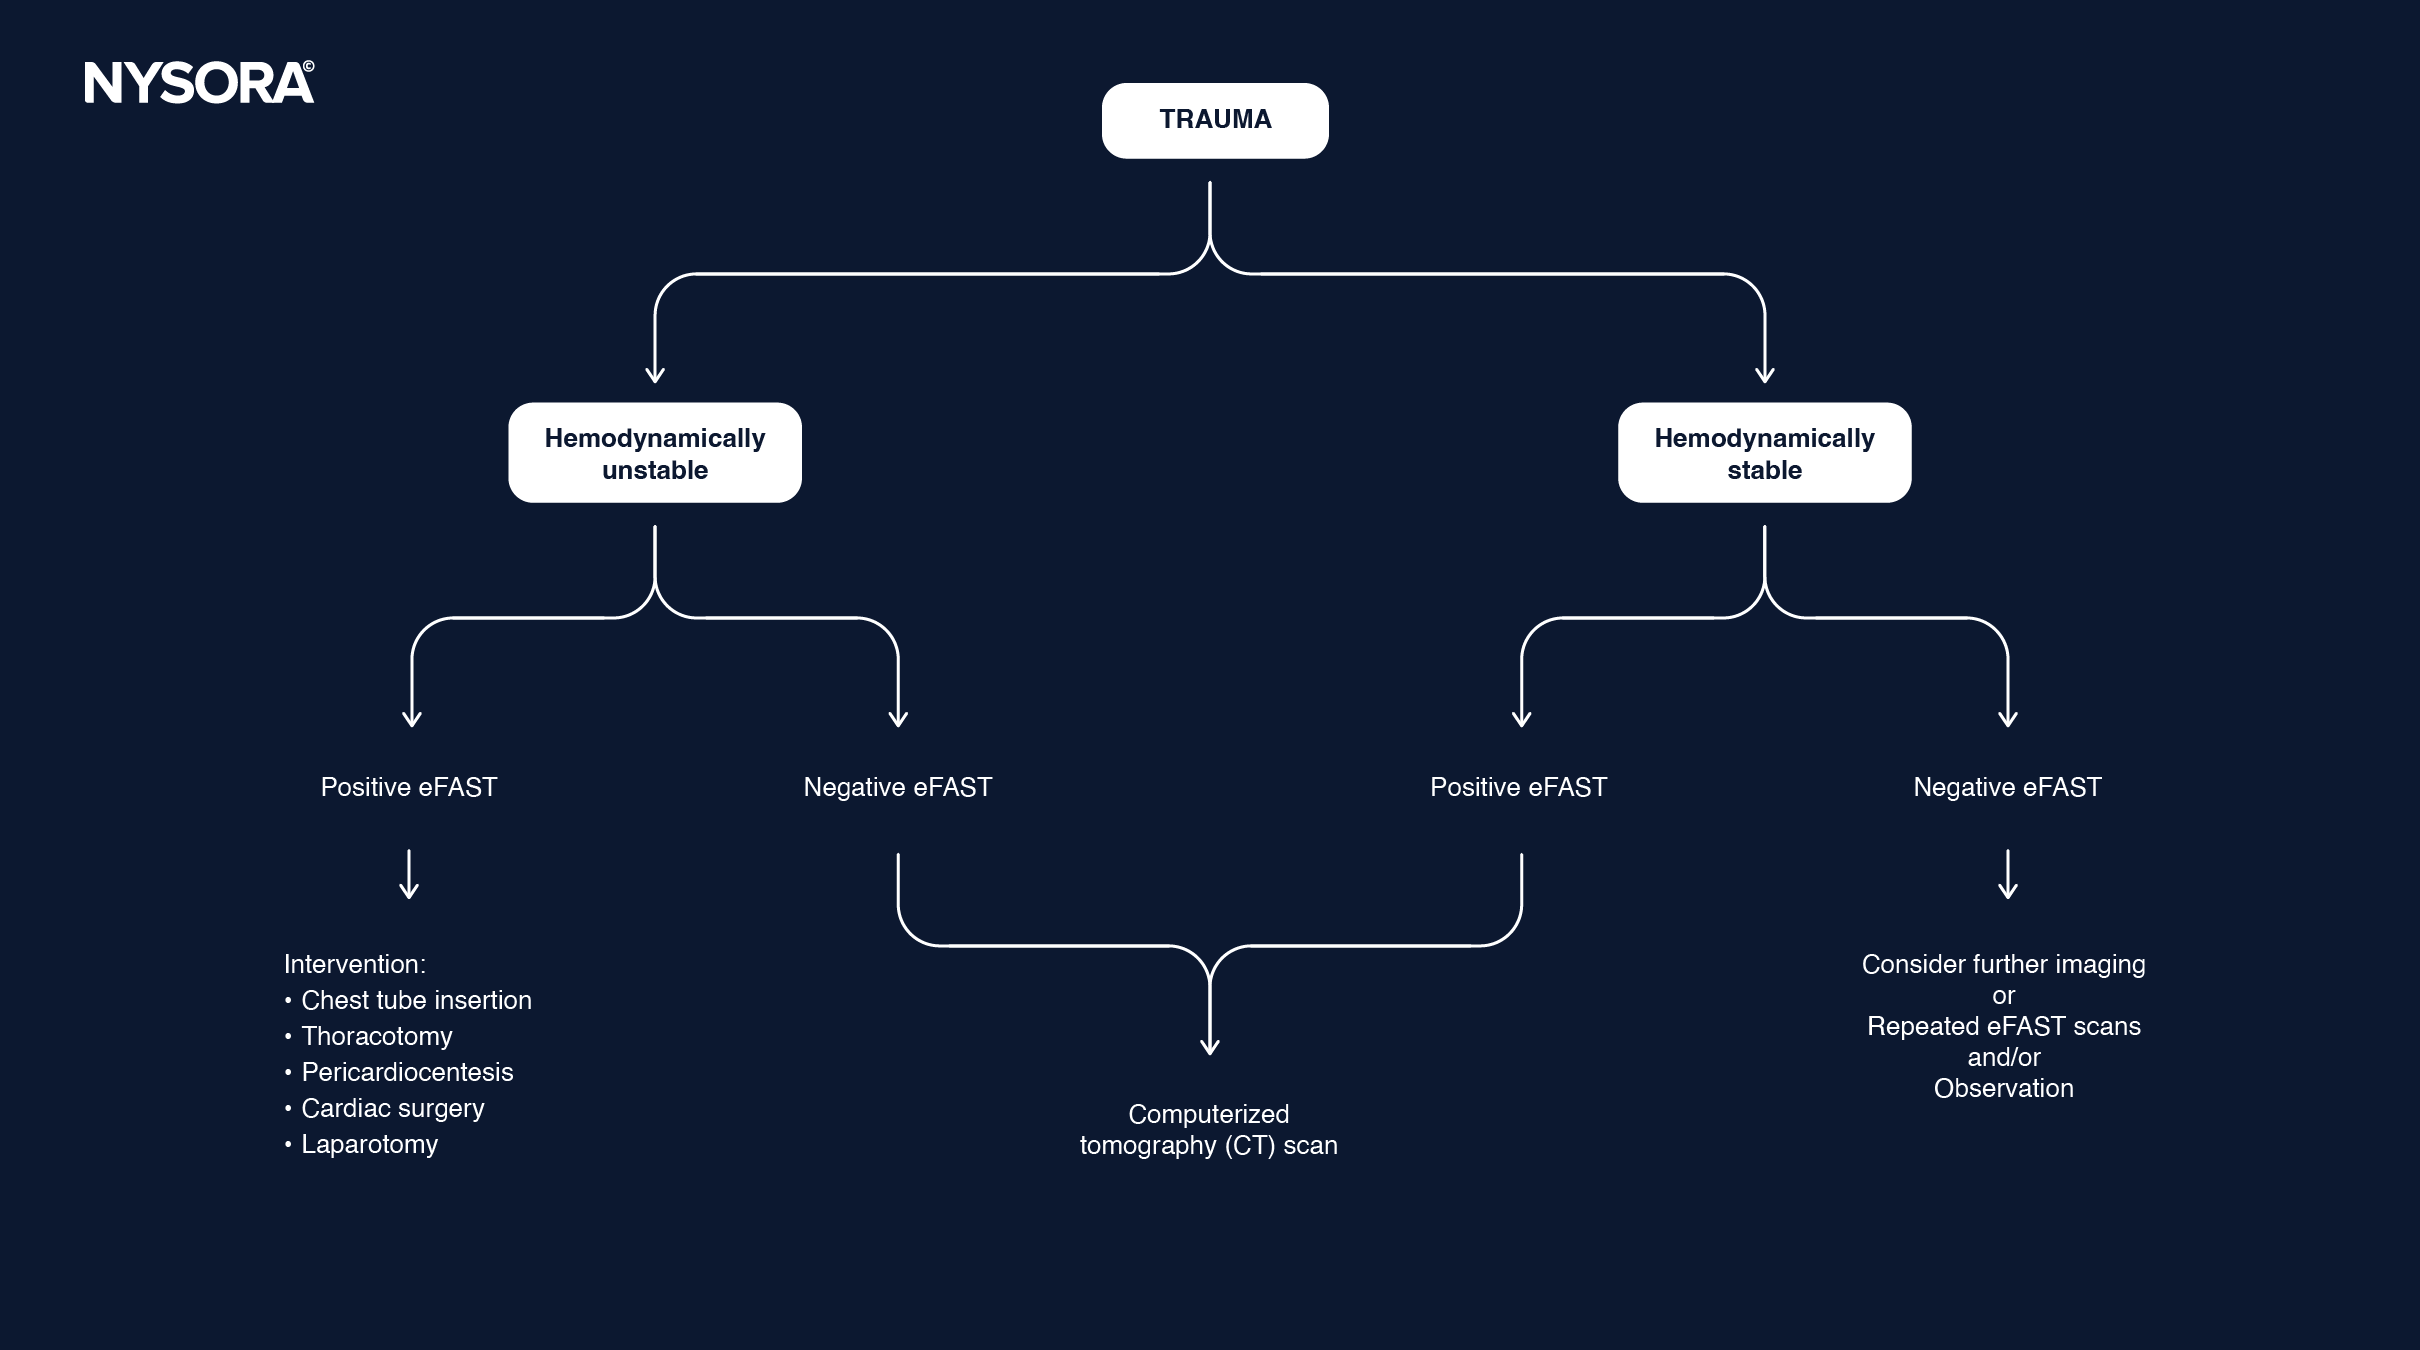
Decision making
Decision-making flowchart:
Clinical updates
- Rocic et al. (BMC Medical Education, 2024) evaluated a two-week, competency-based EFAST curriculum for third-year medical students and found that one year later, 82.4% reported increased likelihood of performing EFAST/POCUS, and 72.2% had performed EFAST at least once during clerkships. Students highly rated the curriculum quality (mean Likert scores 4.41–4.76/5) and reported increased knowledge and confidence in image acquisition and interpretation (means 4.24–4.59/5), with most ultrasound access occurring during Emergency Medicine rotations. Key barriers to clinical EFAST use included limited patient indications, time constraints, machine availability, and supervising physician comfort, highlighting systems-level factors influencing the translation of preclinical ultrasound training into practice.
- Rocic P, Garrison R, Stitle K, Reynolds A, Andrews-Dickert R. Third-year medical students’ perceptions of confidence and readiness to perform EFAST after training. BMC Med Educ. 2024;24(1):1493.