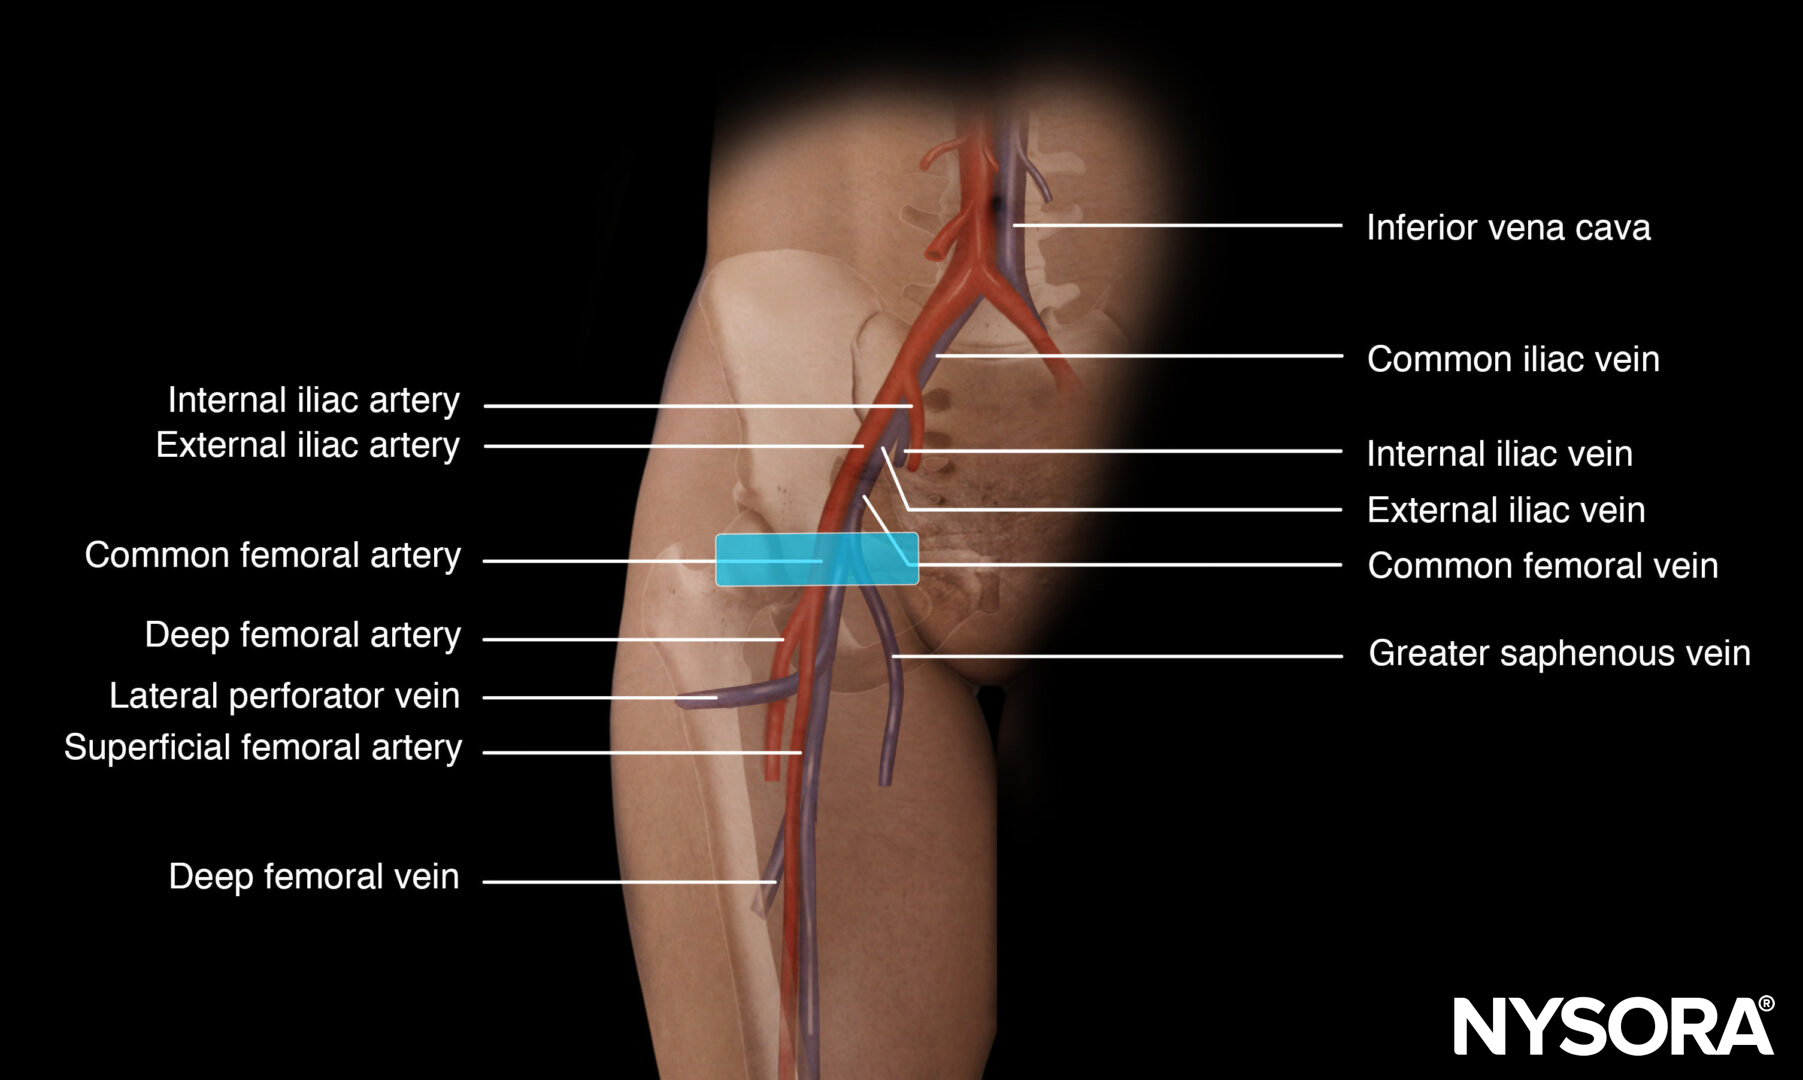
Indications
- Delivery of specific drugs, drug infusions, or long-term therapy
- Fluid resuscitation
- Hemodialysis
- Pulmonary artery catheterization
- Monitoring of central venous pressure
Considerations
- Coagulopathy
- Infection at the insertion site
- Underlying thrombosis
Tip
- Check the patient’s chart with special attention to the laboratory results for coagulation disorders and the chest X-ray for possible previously inserted materials before the start of the procedure (if available)
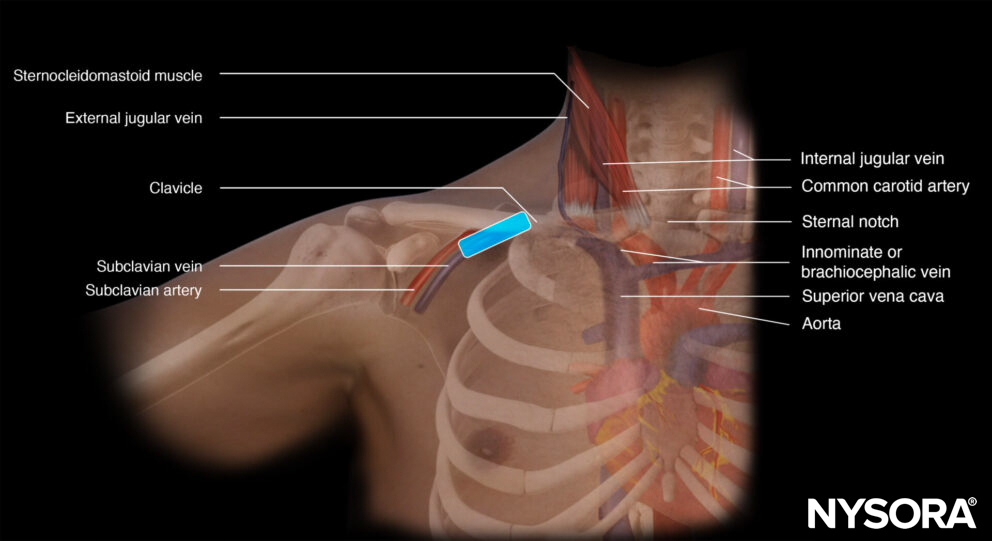
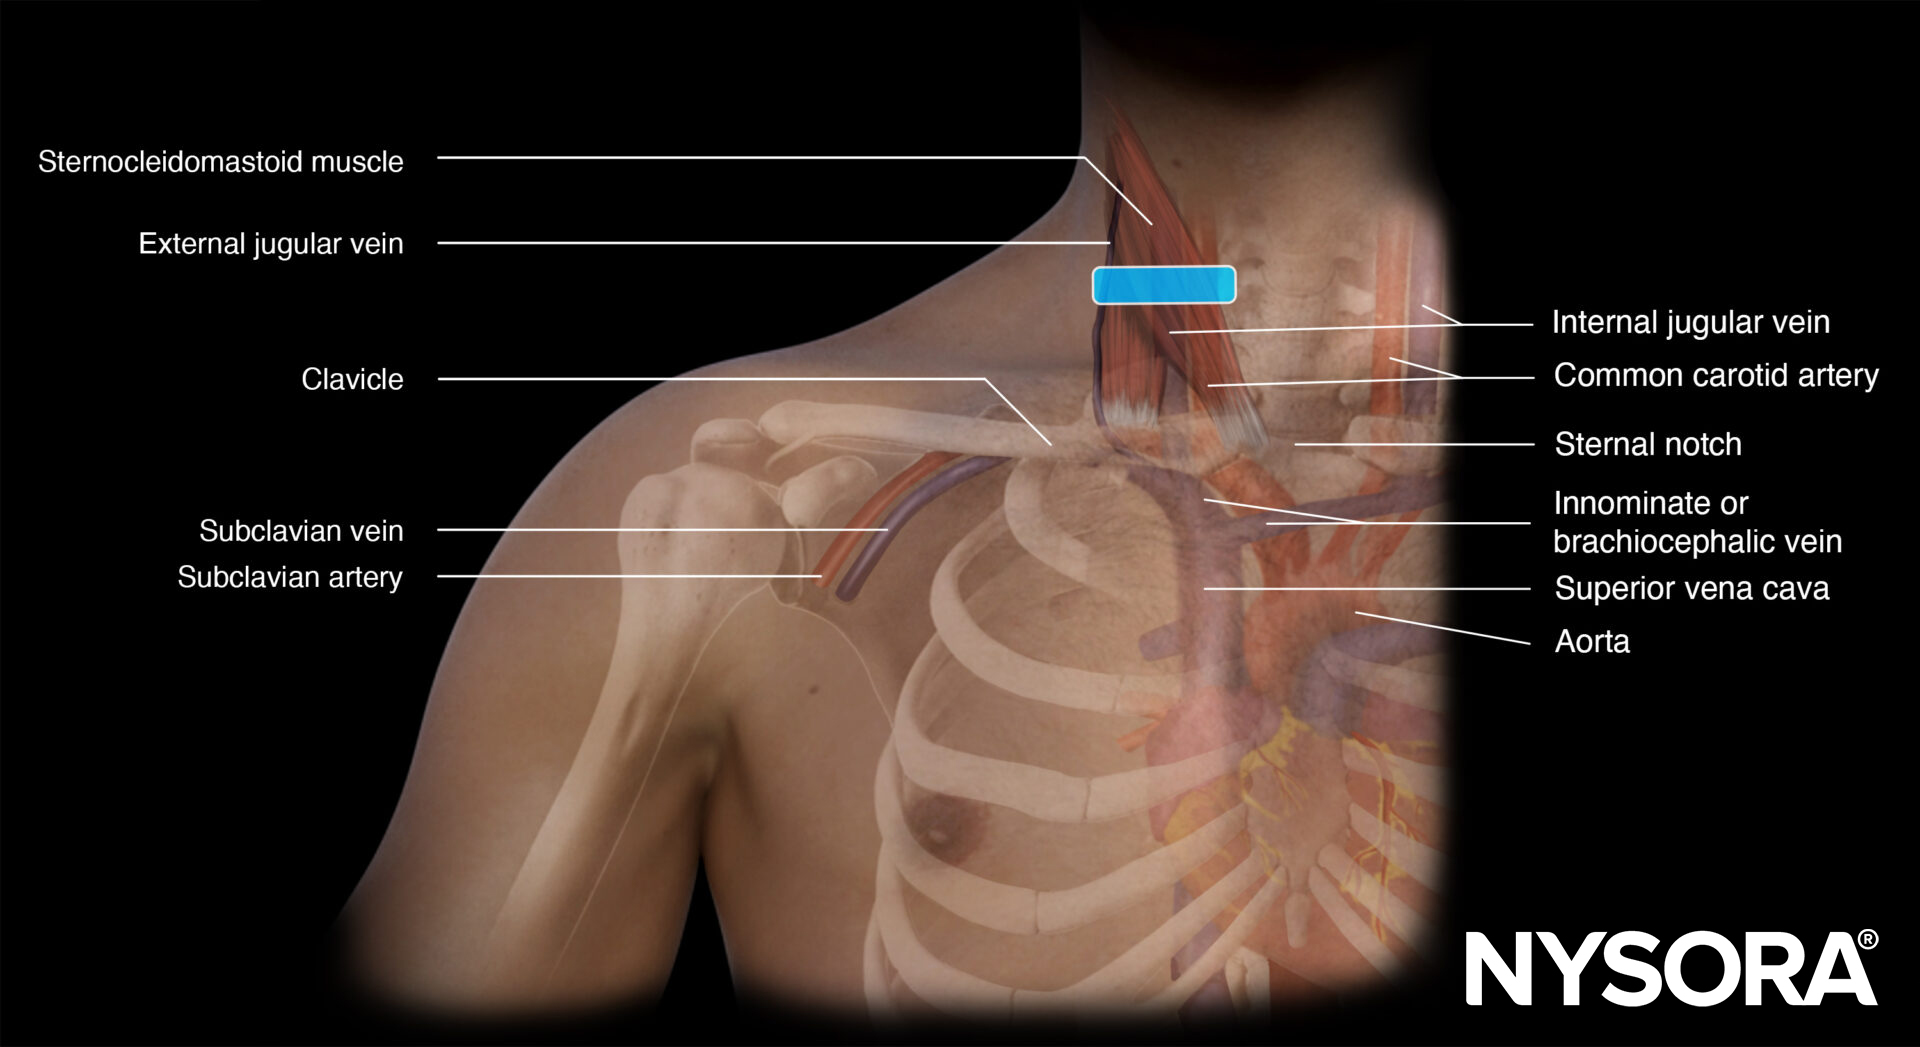
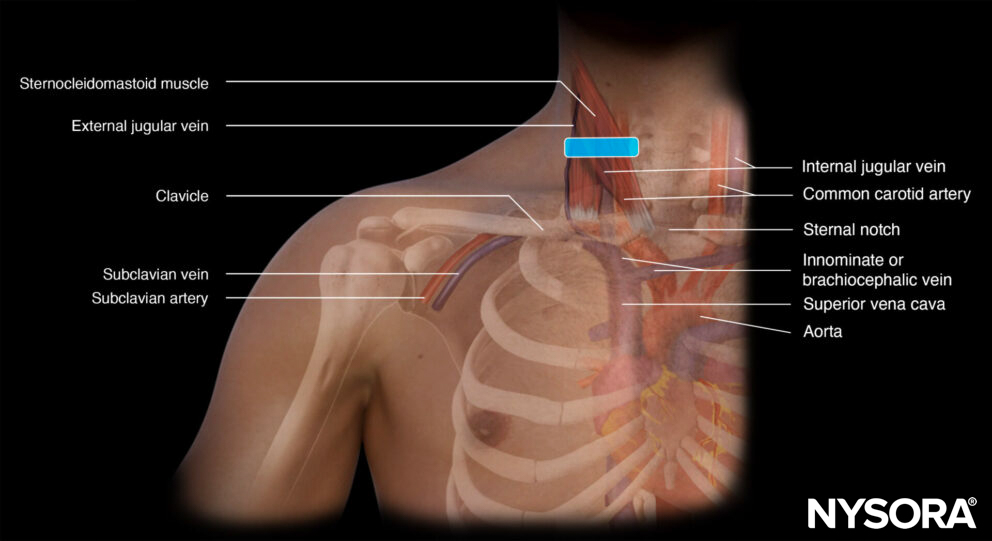
Functional anatomy

Preparation
- Make sure that there is a nurse or physician to assist you with the procedure.
- It is advisable to use a box or a set containing all the necessary materials for central line insertion.
- A central line insertion is a complex procedure that requires a stepwise and systematic approach. This will be described in the ‘Technique’ section.
- Full ASA monitoring should be applied, as clinical information is important and relevant (e.g., desaturation, pulsatile red blood, right ventricular stimulation).
Patient position
Trendelenburg with the head in extension and turned to the contralateral side.
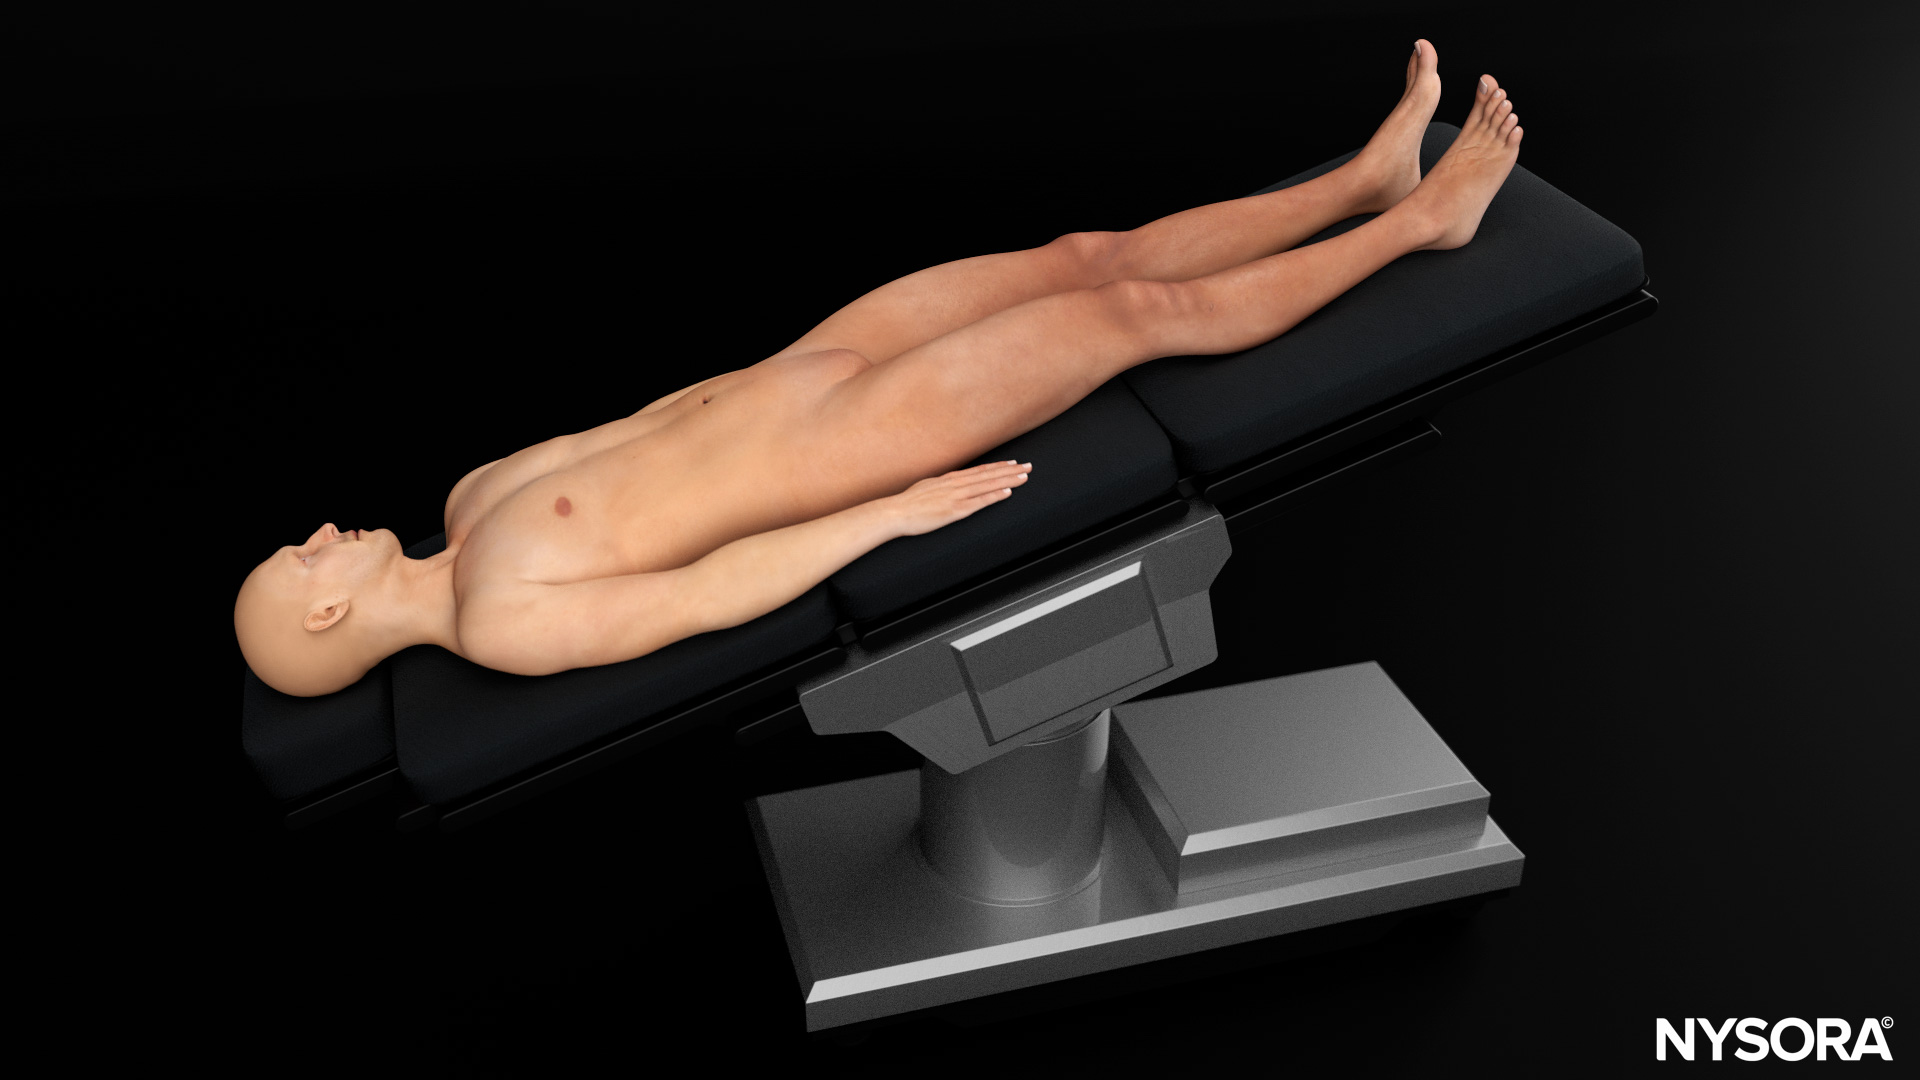
Patient position for an internal jugular vein cannulation.
Note
The reason to position the patient in the Trendelenburg position is not only for internal jugular vein distention, but also to prevent cerebral air emboli.
Technique
General steps for central line placement
- Wear a mask and a surgical hat before starting the procedure
- Scrub
- Wear a sterile gown and sterile gloves
- Disinfect the area of interest (2% chlorhexidine in 70% isopropyl alcohol)
- Use sterile drapes to cover non-sterile areas
- Prepare the central line set (flush all lumens with saline and close all lumens except for the one that threads the guidewire)
- Use a sleeve to cover the ultrasound transducer
- Apply sterile gel to the patient’s skin
- Identify the vein of interest
- Freeze the skin under ultrasound guidance with 5 mL of lidocaine 2% if the patient is awake
- Introduce the needle with ultrasound guidance into the lumen of the internal jugular, femoral, or subclavian vein by using the creep technique
- Thread the guidewire when the needle tip is in the middle of the lumen of the vein
- Hold the guidewire at all times and slide the needle backward over the guidewire
- Confirm the position of the guidewire with ultrasound
- Make a small slip into the skin next to the guidewire with a surgical knife
- Dilate the skin while holding the guidewire
- Thread the catheter over the guidewire and hold the guidewire at all times
- When the catheter is in the right position, pull out the guidewire and check all lumens for positive blood aspiration
- Flush all lumens with saline
- Suture the catheter to the skin
- Apply a sterile dressing
Internal jugular vein cannulation
The transducer is placed in the middle of the anterior neck on top of the sternocleidomastoid muscle. Another possibility is to divide the sternocleidomastoid muscle into three equal parts. Position the transducer at one-third of the clavicle bone.
Transducer position for internal jugular vein cannulation.
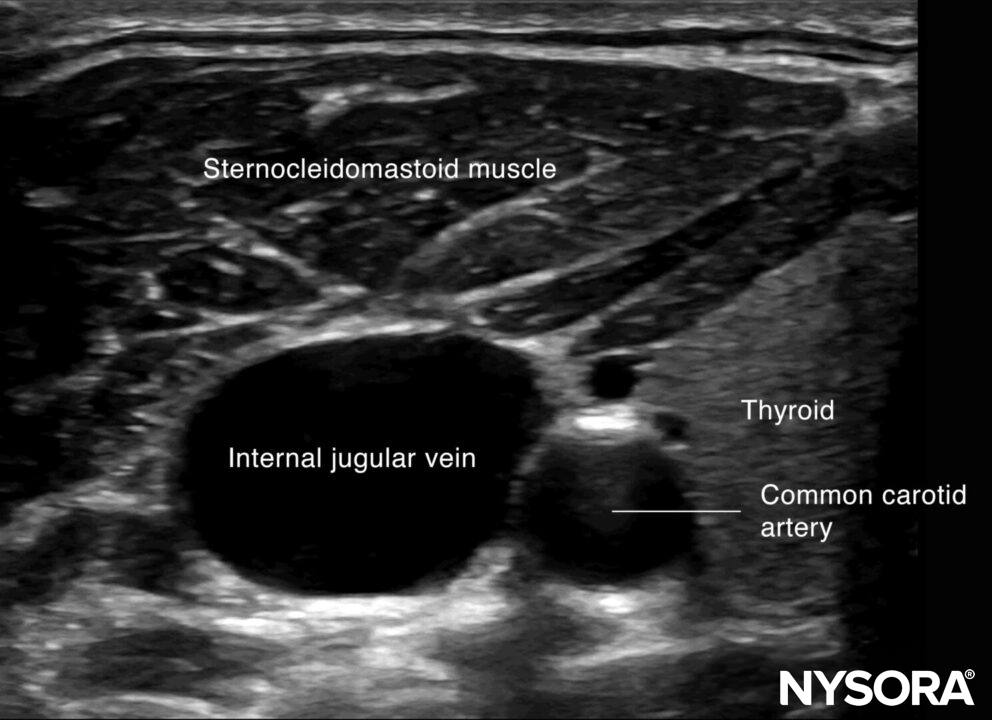
Sonoanatomy for internal jugular vein cannulation.
The internal jugular vein is most frequently approached by the out-of-plane technique. Use the creep technique to keep the needle tip in view at all times.

Out-of-plane needle insertion in the internal jugular vein.
Tips
- Ultrasound-guided internal jugular vein cannulation does not exclude arterial puncture. Therefore, it is advisable to check the guidewire position with ultrasound before dilation to prevent intra-arterial line placement.
- Identify the external jugular vein before the actual puncture to avoid injury.
- A puncture of the internal jugular vein close to the clavicle may increase the risk of pneumothorax.
Tips
- A carotid artery positioned posterior to the internal jugular vein is more likely for accidental arterial puncture by penetration of the posterior wall of the internal jugular vein. This can be optimized by rocking the transducer to position the vein next to the artery rather than underneath.
- Ultrasound-guided central venous access reduces complication rates compared to a blind technique.
- In intubated patients, Valsalva or PEEP can increase venous distention and facilitate the procedure.
Post-procedure evaluation
Lung sliding, together with the rapid atrial swirl sign, can rule out pneumothorax or confirm the position of the catheter after internal jugular or subclavian catheter insertion.
Lung sliding
Lung sliding = the two pleural layers sliding over each other, resulting in a shimmering or comet tails.
Notes
- The absence of lung sliding is highly sensitive for pneumothorax.
- Specificity is estimated to be above 80%. Other causes for absent lung sliding:
- Massive atelectasis
- Mainstem intubation
- Pleurodesis
- Apnea
- Pneumonia
Tips
- The presence of lung sliding rules out a pneumothorax (100%).
- The presence of the lung pulse has the same value as lung sliding and also rules out a pneumothorax. The lung pulse is the pleural movement caused by cardiac contraction. It is present only when the parietal and visceral pleura oppose each other.
M-mode of normal lungs exhibits a seashore sign. M-mode can be used instead of, or to supplement, the B-mode when lung sliding is difficult to demonstrate due to suboptimal images.

M-mode in normal lungs will show a seashore sign. Imagine the look of a sandy beach with the sea above. A pneumothorax will result in parallel horizontal white lines, also called the stratosphere sign.
- The stratosphere sign is sometimes referred to as the “barcode sign”. This latter may be confusing with the current trend towards complex barcodes (cf. QR codes).
- The lung point is the transition of the inflated lung into the pleural air of the pneumothorax. It is 100% accurate for pneumothorax and can be searched in the absence of lung sliding or the presence of a stratosphere sign.
Also, pay attention to the pleural line morphology when assessing lung sliding. A thick or irregular pleural line can be seen in pneumonia.
Rapid atrial swirl sign (RASS)
Following internal jugular vein or subclavian catheter insertion, the catheter’s correct position can be evaluated using the rapid atrial swirl sign (RASS). The tip of a central venous line should be positioned in a central vein between the superior vena cava and the atrium.
For venous catheter position evaluation, the subcostal 4-chamber view needs to be assessed.
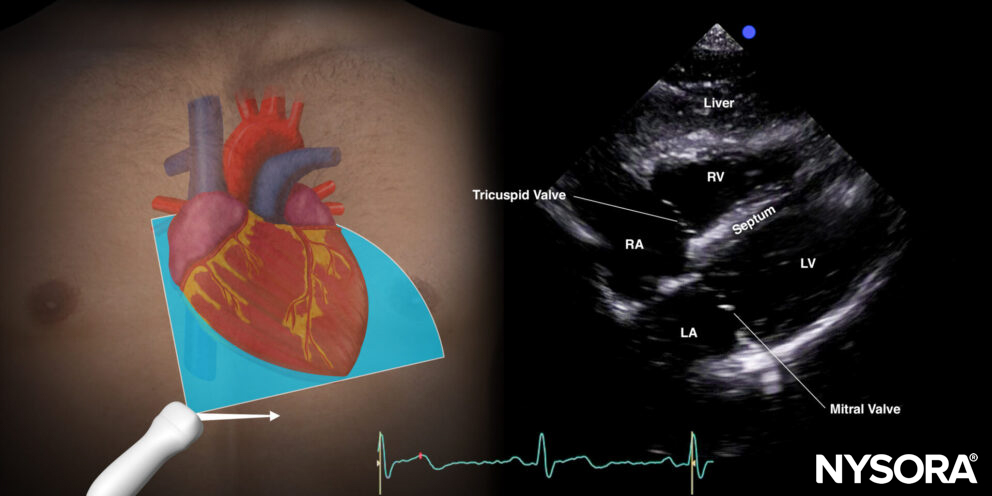
Subcostal 4-chamber view.
9 mL of a saline with 1 mL air mixture (‘shaken’/’agitated’ ) is injected rapidly through the distal port of the central venous line while visualizing the right atrium in the subcostal 4-chamber view.
- Immediate air bubbles: If a transient opacification in the right atrium appears immediately (<2s) following the injection of the mixture, the catheter is in the right position in a large central vein.
- Delayed air bubbles: If the opacification is delayed and appears slower (>2s), the catheter is probably placed at an atypical position in the internal jugular, subclavian, or brachiocephalic vein.
- Absent air bubbles: If the opacification does not appear at all, the catheter is probably malpositioned and may be placed in an artery or extravascular.
Clinical updates
- Arora and Lee (Med Ultrason, 2022) report a catastrophic case of inadvertent carotid artery cannulation despite ultrasound use, highlighting that static/preprocedural ultrasound without real-time needle tip visualization can allow unrecognized posterior wall puncture of the internal jugular vein (IJV), leading to transvenous carotid catheter placement and severe neurologic injury. They emphasize that posterior wall penetration may occur in up to >50% of attempts by less experienced operators and recommend dynamic (real-time) ultrasound guidance with continuous needle tip tracking and guidewire confirmation to prevent this complication.
Arora V, Lee A. Posterior wall puncture of internal jugular vein and inadvertent carotid artery cannulation. Med Ultrason. 2022;24(3):375-376.
- Garcia-Leal et al. (The Journal of Vascular Access, 2023) performed a systematic review and meta-analysis of 22 studies (613 subjects) demonstrating that a >5° Trendelenburg position significantly increases right IJV cross-sectional area (MD 0.38 cm²) and anteroposterior diameter (MD 1.87 mm), with no additional benefit beyond 10° of tilt. The authors conclude that a 5–10° head-down tilt can facilitate IJV cannulation when patient condition permits, particularly where ultrasound guidance is unavailable.
Garcia-Leal M, Guzman-Lopez S, Verdines-Perez AM, et al. Trendelenburg position for internal jugular vein catheterization: A systematic review and meta-analysis. J Vasc Access. 2023;24(2):338-347.