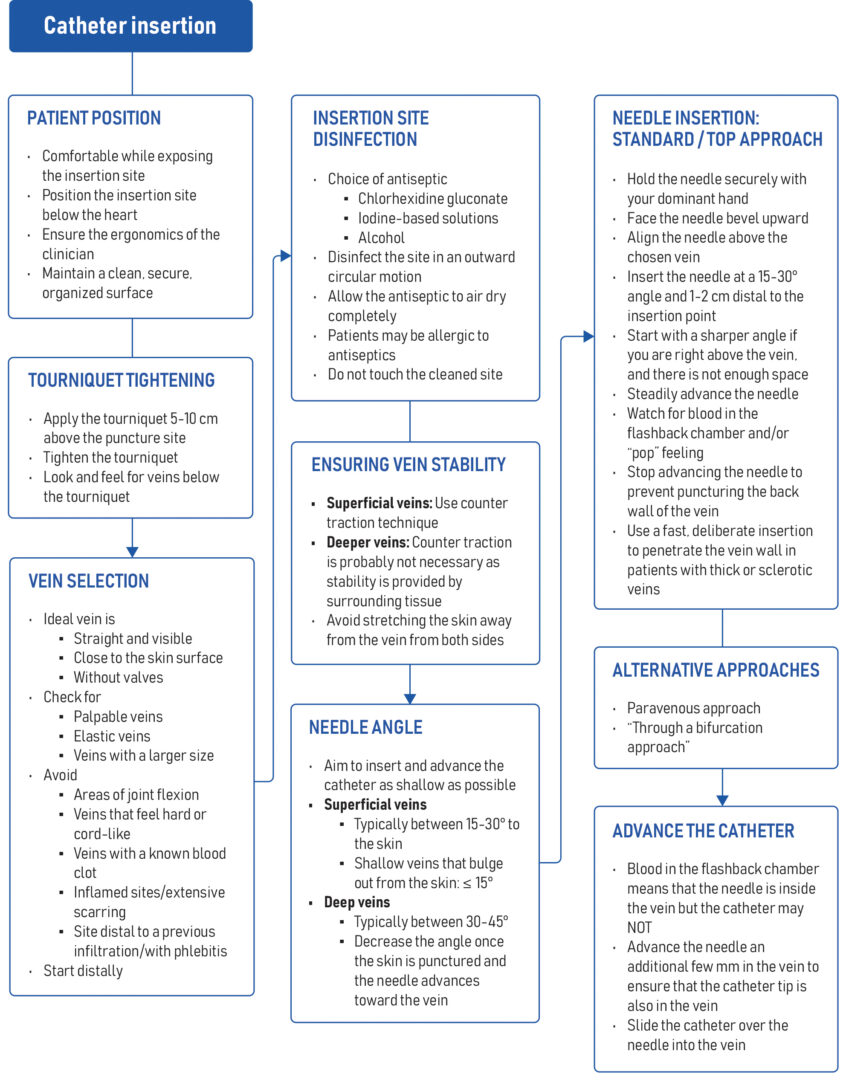
IV catheter insertion is both an art and a technique, reflecting the skill and expertise required to master this procedure. It demands technical proficiency and a nuanced understanding of patient anatomy and vein selection. The development of this skill set is a specialized process, necessitating focused practice and experience to achieve proficiency. This combination of artistry and technique is essential for effectively and efficiently placing IV catheters, a critical component in patient care, as the Germans would say: “Fingerspitzengefühl.” We strongly recommend practicing the skill regularly in a simulator to develop the feel and technique that can be transposed to patient care.
Patient position
While the ideal position varies for different insertion sites, here are a few basics to remember:
- Place the patient in a comfortable position to optimize the exposure of the insertion site.
- Position the extremity being cannulated on a comfortable surface.
- Position the insertion site below the level of the heart to maximize blood pooling and enlarge the veins.
- Make all supplies and equipment easily accessible on a nearby tray.
- Use a clean, organized tray for equipment.
Place the patient in a comfortable position to optimize the exposure of the insertion site.
The technique and fine art of tourniquet tightening
What is a tourniquet?
The use of a tourniquet during venous cannulation serves several important purposes that facilitate the successful placement of a venous catheter:
1.Vein engorgement
The primary purpose of a tourniquet is to temporarily restrict venous blood flow back to the heart without impeding arterial blood flow to the limb. This causes veins to fill with blood and become more engorged, making them easier to visualize and palpate. The increased visibility and prominence of the veins significantly aid in identifying suitable veins for cannulation.
2.Improved accuracy
By making the veins more prominent, a tourniquet reduces the number of attempts needed to successfully cannulate a vein. This is particularly helpful in patients with difficult venous access, such as those with small, fragile, or deeply situated veins.
3.Correct application
Apply the tourniquet snugly enough to engorge the veins but not so tight as to cause pain or completely obstruct arterial blood flow.
4.Time limit
The tourniquet should not be left in place for more than a few minutes to prevent discomfort and potential complications. Prolonged application can lead to patient discomfort, tissue damage, or inaccurate lab results if blood is drawn.
5.Location
It’s typically placed a few inches above the venipuncture site, on the upper arm for forearm veins, or on the forearm for wrist and hand veins.
In summary, a tourniquet is a crucial tool in venous cannulation, serving to enhance vein visibility and palpability, which in turn improves the ease and success of the procedure, reduces patient discomfort, and minimizes the risk of complications.
Apply the tourniquet
- Position the tourniquet around the extremity, approximately 5-10 cm (2-4 inches) above the intended puncture site.
- When accessing veins on the hand, apply the tourniquet either on the arm or the forearm.
- Ensure the tourniquet lays flat against the skin and remains untwisted for optimal performance. A twisted tourniquet is less effective and uncomfortable for the patient.


A) Correct tourniquet application. B) A twisted tourniquet, which is less effective in accomplishing the venostasis and vein enlargement effect.
Video: //youtu.be/xKSoWDIMH4Q
The design of tourniquets used for IV access and phlebotomy influences the technique of application and tightening. While the specific method may vary depending on the tourniquet’s design, there are general guidelines to follow:
- Appropriate tightness: Ensure the tourniquet is applied snugly enough to restrict venous flow without impeding arterial circulation.
- Correct placement: Position the tourniquet close to the venipuncture site but not so close as to interfere with the procedure.
- Knowledge of tourniquet types: Be familiar with the various types of tourniquets available and understand the nuances of each design to optimize venous access and ensure patient comfort and safety.
- Application technique: Grasp one end of the tourniquet and pull the other end using the opposite hand.
- Secure fastening: Tie or fasten the tourniquet securely using a self-adhesive end or buckle if available.
- Vein identification: Look for distended veins below the level of the tourniquet.
- Vein palpation: Gently feel the veins to ensure they are more prominent and filled with blood.
- Patient comfort: Ask the patient if they are experiencing excessive discomfort or pain; a too-tight tourniquet may cause pain or harm underlying tissues.
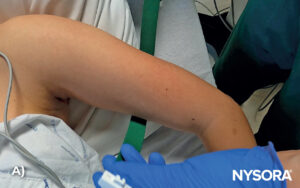
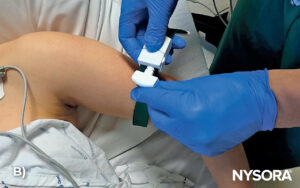

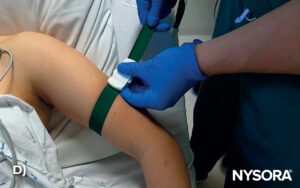
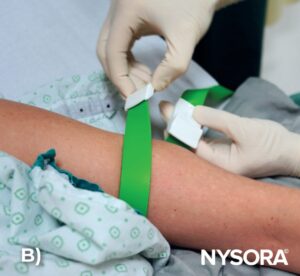
Tourniquet application steps: A) Expose the arm WITHOUT elevating it (elevation empties the blood from the extremity). B) Secure the tourniquet. C) and D) Tighten to the patient’s tolerance.
TIPS
- Be patient: Give the veins time to properly fill when using a tourniquet, especially in dehydrated patients (a few minutes).
VIDEO: https://youtu.be/wT0ARI36cZc
- Consider using multiple tourniquets: Use a second or third tourniquet to help the veins fill with blood in patients with difficult access.
VIDEO: https://youtu.be/KHWJ6b7Wx2c
- Patients can also help: Ask the patient to open and close the hand repeatedly (making a fist). This activates the muscle pump and draws more blood into the veins, facilitating vein recognition and IV access.
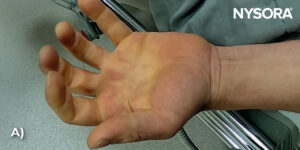
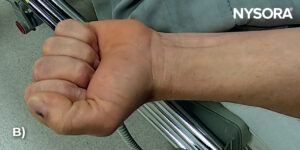
Ask the patient to open (A) and close (B) the hand repeatedly to encourage blood flow into the veins and to facilitate vein recognition.
VIDEO: https://youtu.be/4f-su1UHKwY


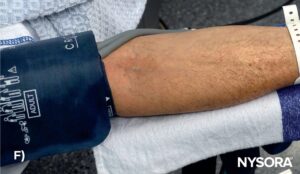

Several tourniquet designs are available. A) A tourniquet with a buckle system. B) A tourniquet with a magnetic closing. C) A rubber band used as a tourniquet. D) The use of two parallel rubber tourniquets to encourage blood flow to the superficial veins. E) A rubber band (Esmarch, 10-15 cm or 4-6 inches in width) wrapped around the upper arm and forearm to encourage blood flow to the superficial veins. F) Using a blood pressure cuff as a tourniquet during venipuncture. G) Smaller more distensible tourniquets are available for pediatric patients to prevent blocking the arterial blood flow.
VIDEO: https://youtu.be/0eBhCV7Vs78
Choose the perfect spot: guide to vein selection
Selecting the ideal vein for IV insertion is a skill that healthcare professionals develop with experience. Whether you opt for upper or lower extremity vein cannulation, it’s essential to follow these fundamental guidelines:
- Straight veins are the best: Select a straight vein to facilitate easier needle entry, whenever possible.
- Superficial veins are easier than deeper veins: Choose veins closer to the skin’s surface for easier access.
- Avoid branching veins: Choose veins that do not branch out to avoid complications near venous valves, which are often located near these branches.

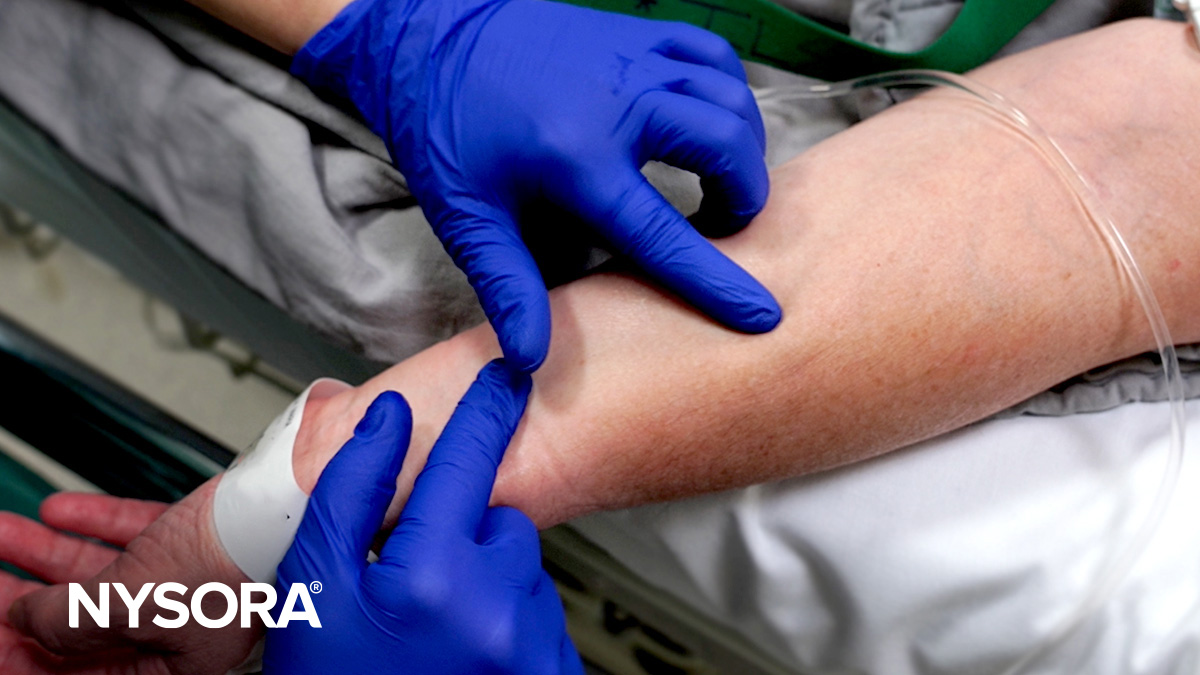
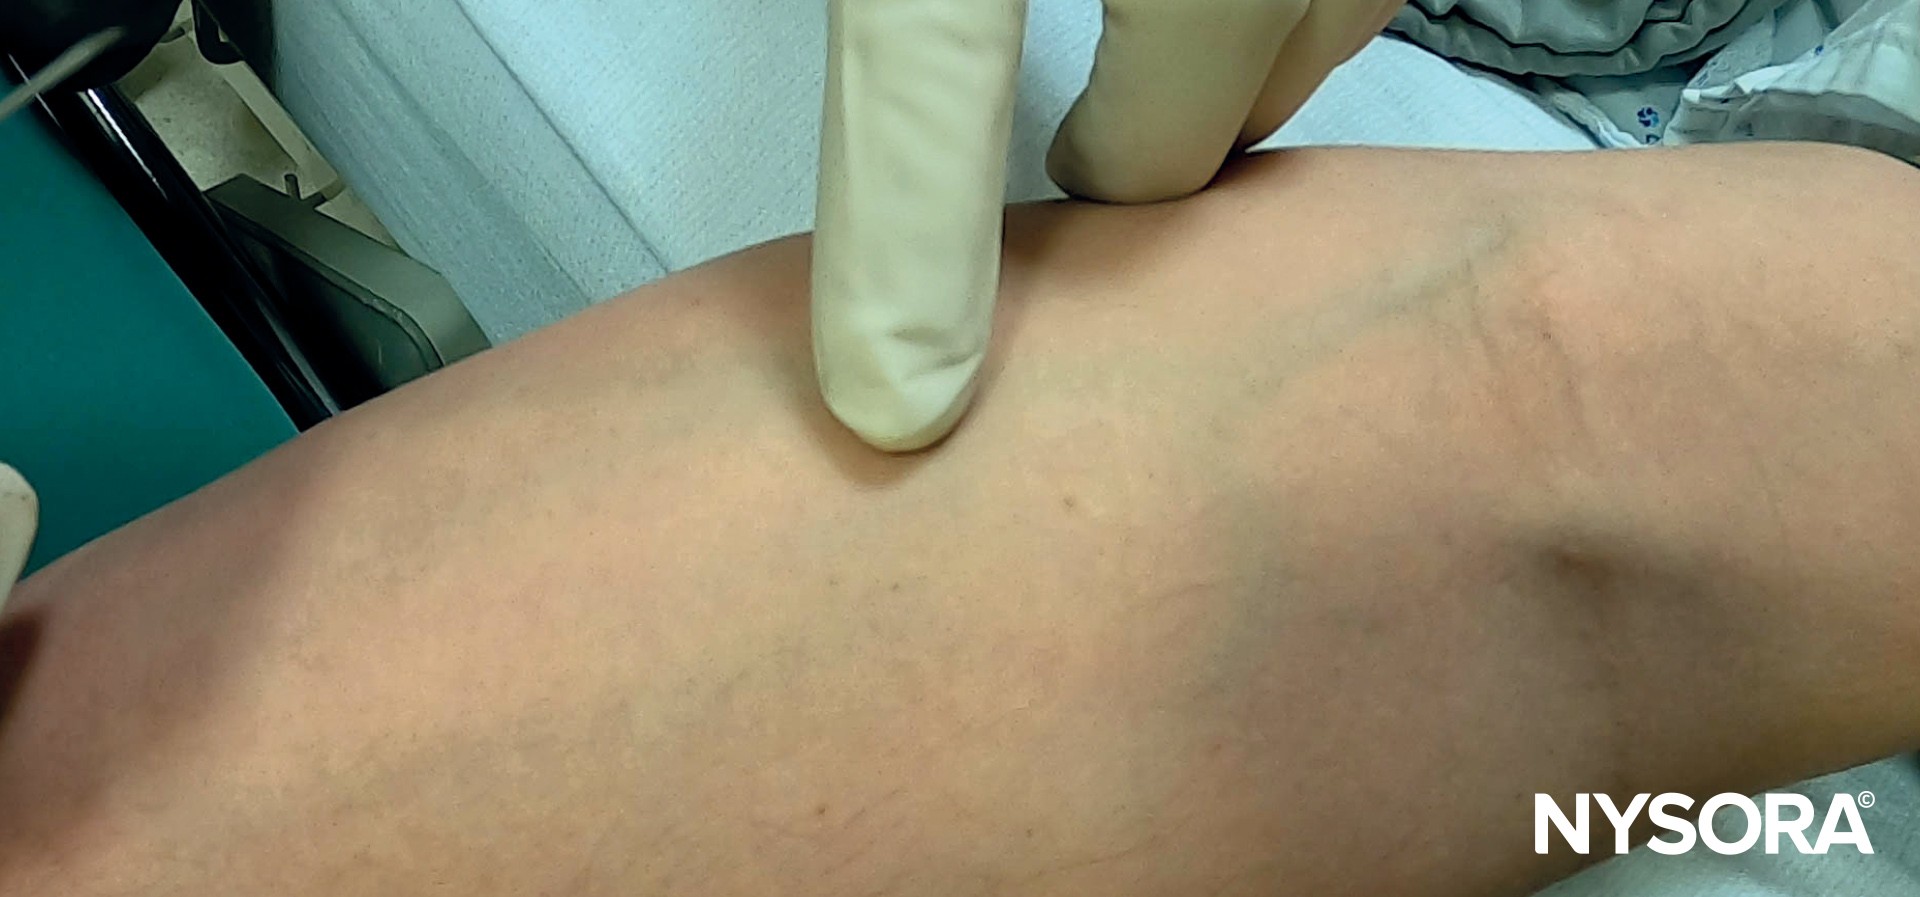
Vein selection. Healthy veins feel bouncy and refill when depressed.
- Visibility: Look for blue or darkened lines under the skin. Veins may appear more prominently in fair-skinned individuals.
- Palpability: Gently feel the veins using the index or middle finger. This is important, especially for patients in whom veins are not be visible.
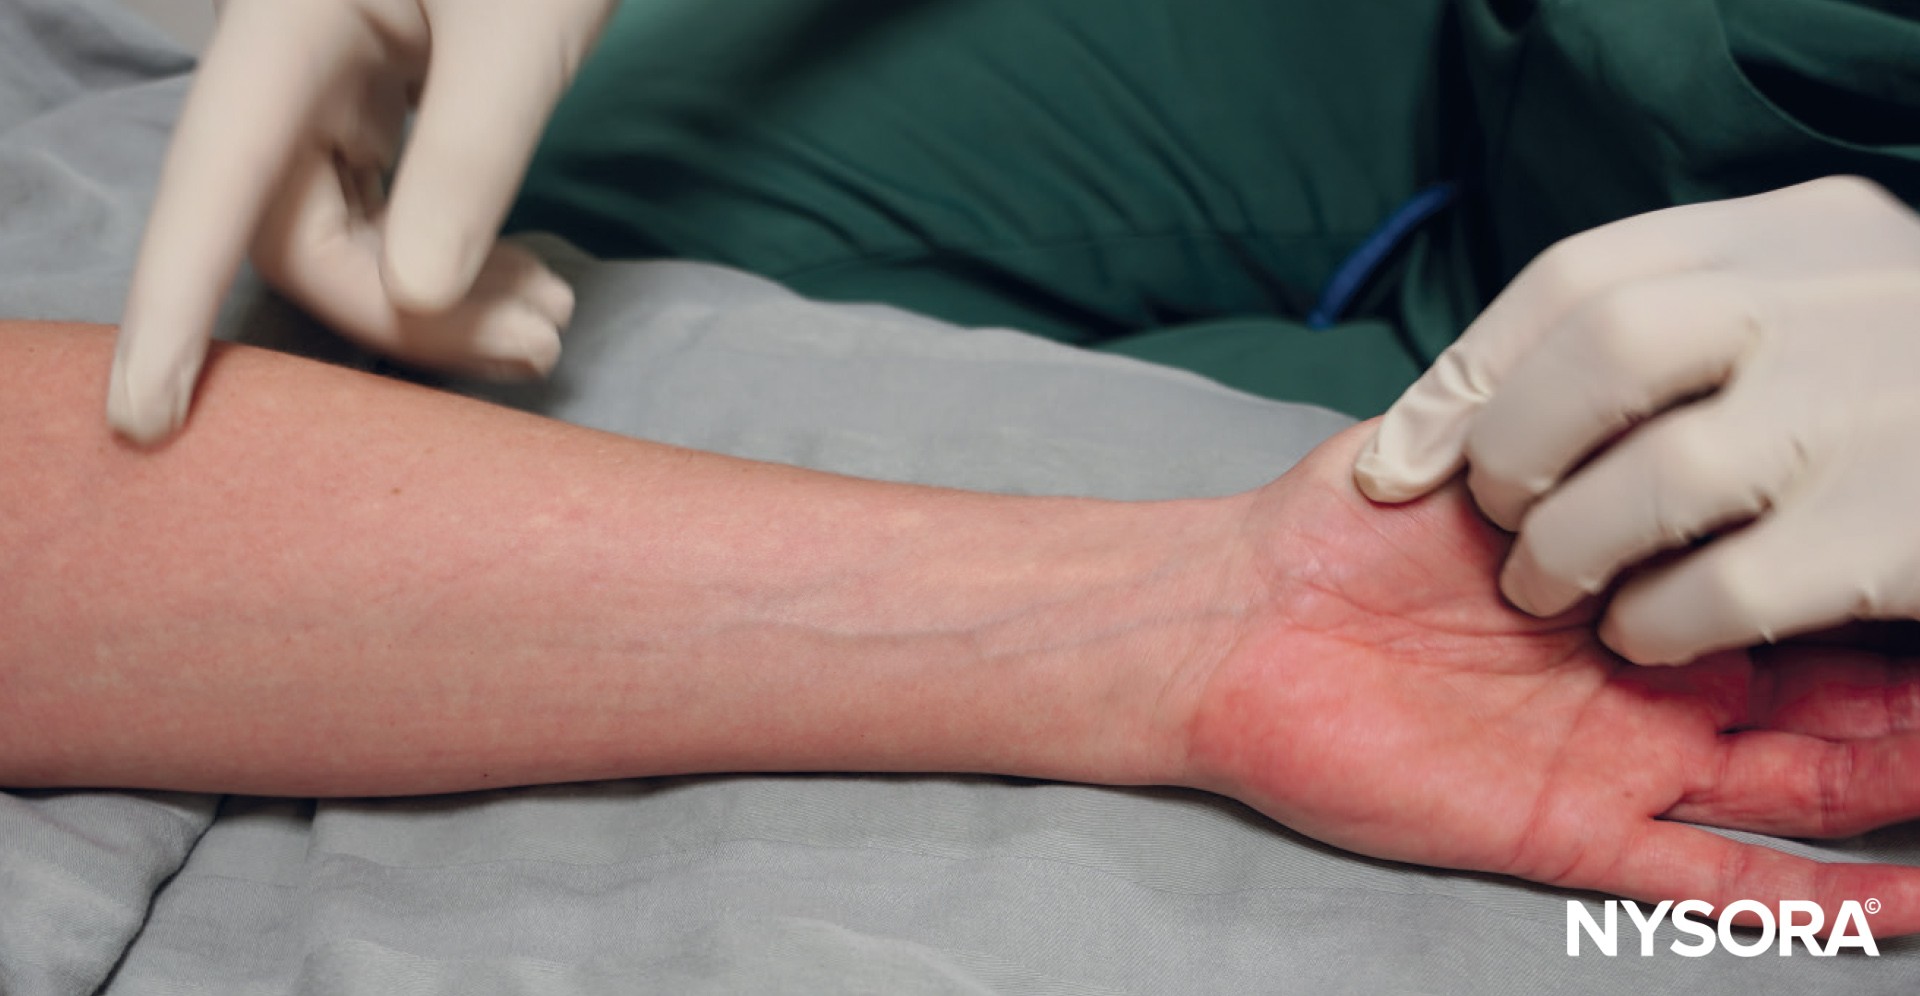
Palpating the veins of the forearm to select the perfect vein. If a vein feels round and springy, even if not visible, it is likely suitable for cannulation.
VIDEO: https://youtu.be/U84_qo7M3B8
- Turgor and elasticity: Healthy veins feel bouncy and quickly refill when depressed. These are generally good choices for IV placement.
VIDEO: https://youtu.be/N7q_bkZpNwI
- Size: Larger veins can hold larger catheters and are less likely to collapse during IV insertion.
- Start distally: Start at the dorsal metacarpal veins and work proximally (i.e., cephalic, basilic, radial, and median cubital veins) if needed.
Avoid:
- Areas of joint flexion as they can increase the risk of the catheter becoming dislodged or kinked.
- Veins that feel hard or cord-like (they may be thrombosed).
- Veins in an extremity with a known blood clot, an AV fistula or graft, mastectomy, or lymph node dissection.
- Sites that are inflamed, infected, or have extensive scarring.
- Inserting an IV distal to a previous infiltration or phlebitis site.
VIDEO: https://youtu.be/QOtE4K6pbQI
TIPS
- Trust the feel: If a vein feels round and springy, even if not visible, it is likely suitable for cannulation. However, veins that feel hard do not appear to empty when pressed and are likely thrombosed and unsuitable for cannulation.
- Use alcohol wipes: This helps enlarge veins and can change the skin’s reflection, making veins more noticeable. This technique may be useful, especially in patients with darker skin.
Use alcohol wipes to visualize the veins more easily.
The application of alcohol on the skin can enhance the visibility of veins aiding in venous cannulation.
Here are some mechanisms:
- Vasodilation
Alcohol causes peripheral vasodilation, where blood vessels near the surface of the skin engorge. This increases blood flow to the area, making the veins more prominent and easier to identify and access. The cooling effect of alcohol as it evaporates from the skin can also stimulate reflex vasodilation as the body attempts to regulate temperature.
- Skin disinfection and contrast
Alcohol acts as a disinfectant, cleaning the skin’s surface, which can improve the contrast between the skin and the veins beneath it. By removing dirt, oils, and natural skin flora, the skin becomes more apparent and the veins can appear more defined against the skin’s surface.
- Tightening of the skin
The astringent properties of alcohol can cause the skin to tighten slightly, reducing surface area and potentially making underlying structures like veins appear more superficial. This effect can help in making the veins more palpable and easier to access with a needle.
Proper insertion site disinfection
Maintaining an aseptic technique and proper hygiene is essential to minimize the infection risk.
Choice of antiseptic
- Alcohol: Probably the most common disinfectant used for IV cannulation. Often used in combination with other antiseptics, alcohol is effective against many bacteria and viruses.
- Chlorhexidine gluconate (CHG): This antiseptic provides rapid and persistent antimicrobial action and is effective against a broad spectrum of microorganisms.
- Iodine-based solutions (povidone-iodine): Another commonly used antiseptic, especially if there’s a contraindication for CHG.

Different antiseptic solutions to disinfect the insertion site.

Alcohol wipes are used to disinfect the insertion site before IV cannulation.
Asepsis
- Before catheter insertion, ensure the skin is clean and free from debris. Use an antiseptic, applying it in a circular motion beginning at the insertion point and moving outward. This effectively disinfects the area.
- Let the antiseptic airdry completely before inserting the catheter to eliminate bacteria and prevent antiseptic residue from entering the skin (painful).
- Always check for patient allergies to specific antiseptics before using them.
- Once the site is disinfected, avoid touching it. If there’s a need to re-examine the vein’s position, remember that any contact requires re-disinfection.
- After insertion, maintain cleanliness at the site.

Disinfection of the insertion site. You can use either prepared alcohol wipes, povidone-iodine, or multiuse antiseptic.
VIDEO: https://youtu.be/KHSxNex9nLE
Hold it steady: ensuring vein stability
During IV catheter insertion, stabilizing (“fixing”) the vein is vital for a successful venipuncture and to minimize trauma to the vein and surrounding tissue by repeated failed attempts. Here’s an overview of techniques and considerations to ensure vein stability during venipuncture or IV cannulation:
- Superficial veins: These veins are not firmly anchored by the connective tissue and tend to roll away. After investing time in identifying and selecting the most suitable vein, it would be frustrating to see it shift (“roll”) just as you begin the IV insertion. To prevent this, using “counter traction” during insertion can be a game-changer.
- Deeper veins: In contrast, deeper veins benefit from the stability provided by the surrounding connective tissue. Test the vein’s stability by nudging it from side to side. If it stands firm without moving, counter traction might not be necessary.
Identified a suitable superficial vein for insertion?
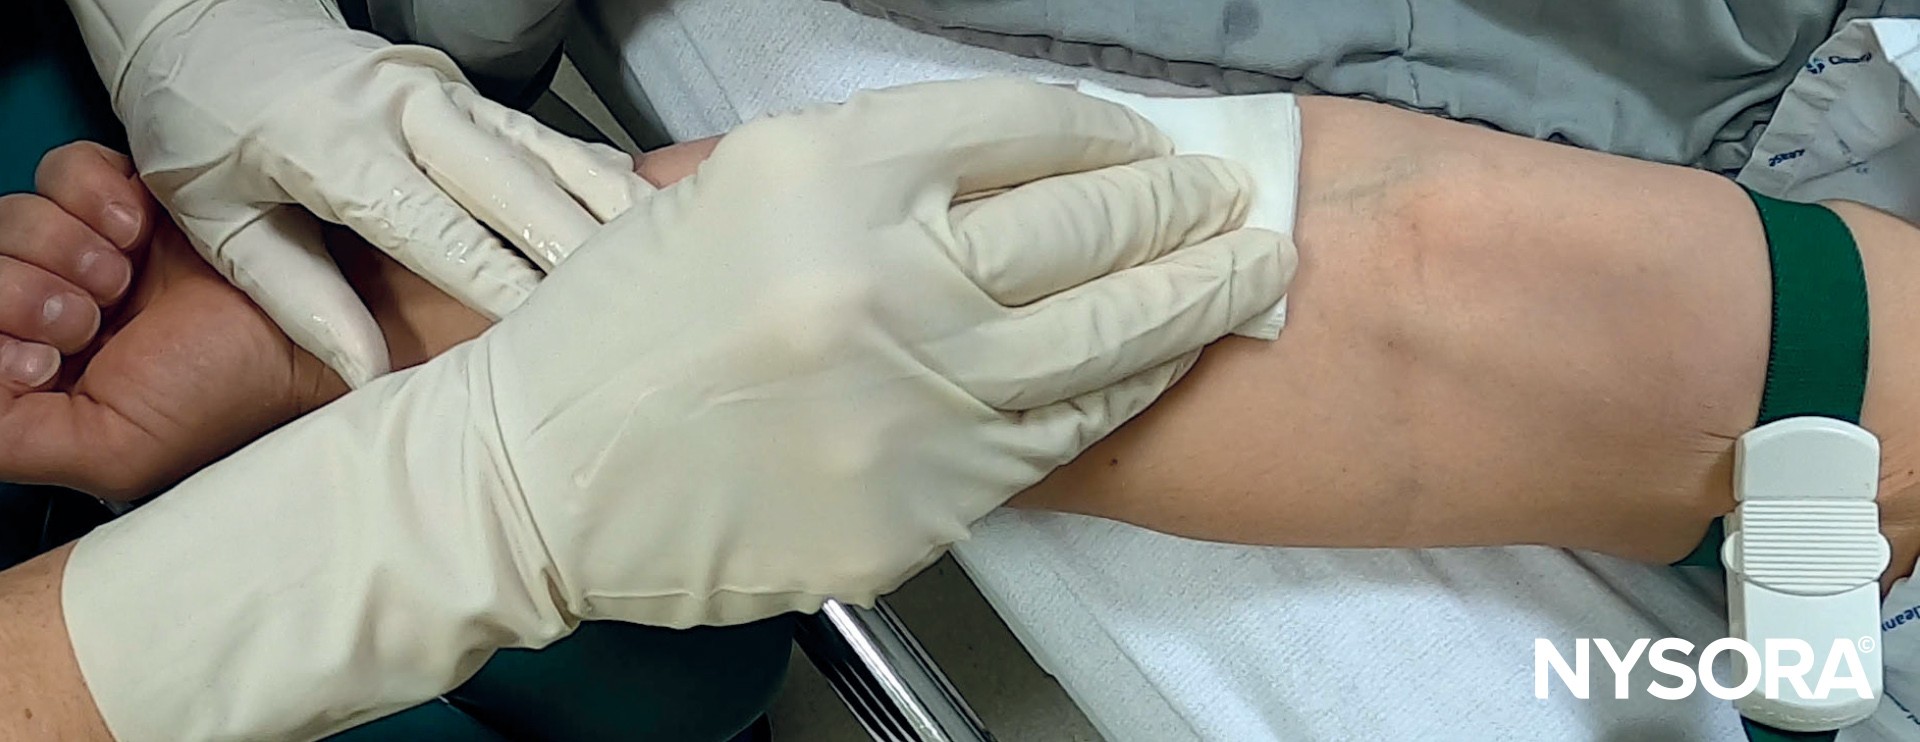
- Use the counter traction technique to stabilize the vein: Place the thumb of the non-dominant hand a short distance below the selected insertion spot. Then, pull the skin gently distally.
- Avoid this common mistake: Stretching the skin away from the vein from both sides. It can also flatten it, reducing its size, palpability, and visibility, and making it more difficult to cannulate.


Examples of vein stabilization before the cannulation.
VIDEO:https://youtu.be/FQ1517v4XIk
Use a low angle
When performing IV cannulation, be aware of the depth and position of the targeted vein to determine the needle insertion angle. Visualize the needle trajectory to ensure optimal needle angle direction. The objective is to insert and advance the catheter with the minimal angle necessary to reach the vein. Starting with a large angle to puncture the vein (common mistake), followed by re-adjustment of the angle, carries a risk of going through both walls of the vein and the subsequent failure.
Superficial veins
- Insert the needle at a shallow angle, typically between 10 to 30 degrees relative to the skin.
- Shallow veins that bulge out from the skin and travel across bones (i.e., dorsal veins of the hands, cephalic vein) require a very shallow angle of 15 degrees or less.

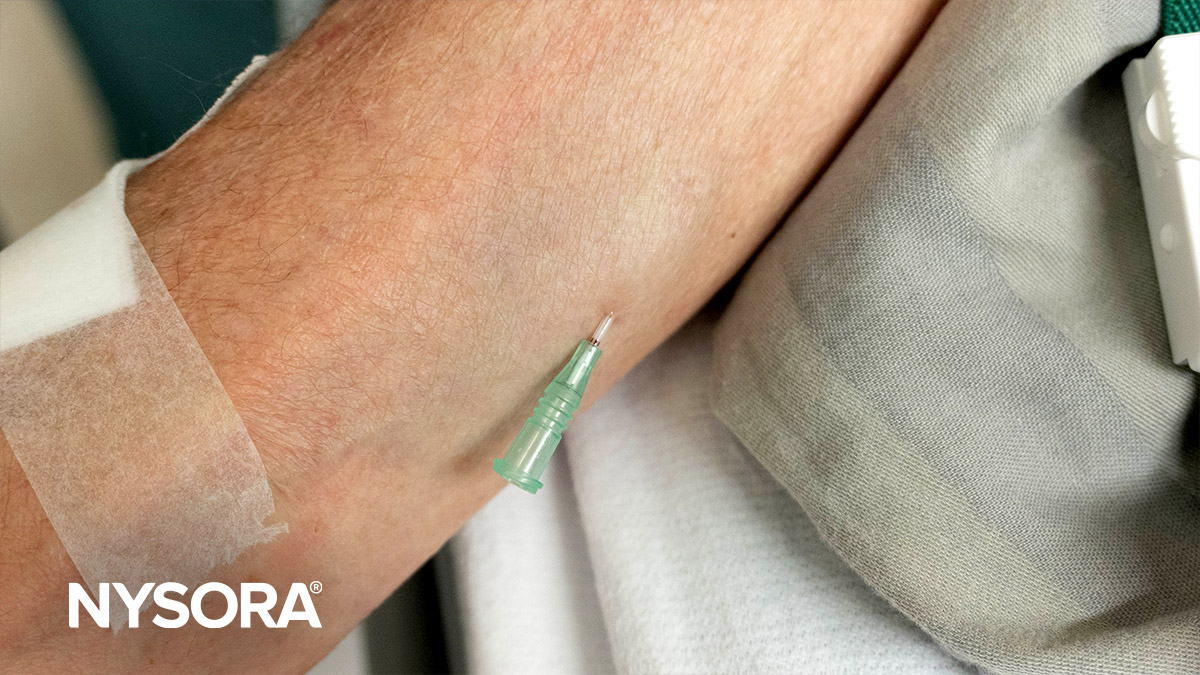
Needle insertion for superficial veins should be at a shallow angle of 10 to 30 degrees relative to the skin to avoid going through the posterior wall.
VIDEO: https://youtu.be/5zMgUexEzYs
Deep veins
- Deeper veins (i.e., antecubital vein) require a slightly greater angle, (30-45 degrees).
- Once the skin is punctured, decrease the angle as the needle advances toward the vein.
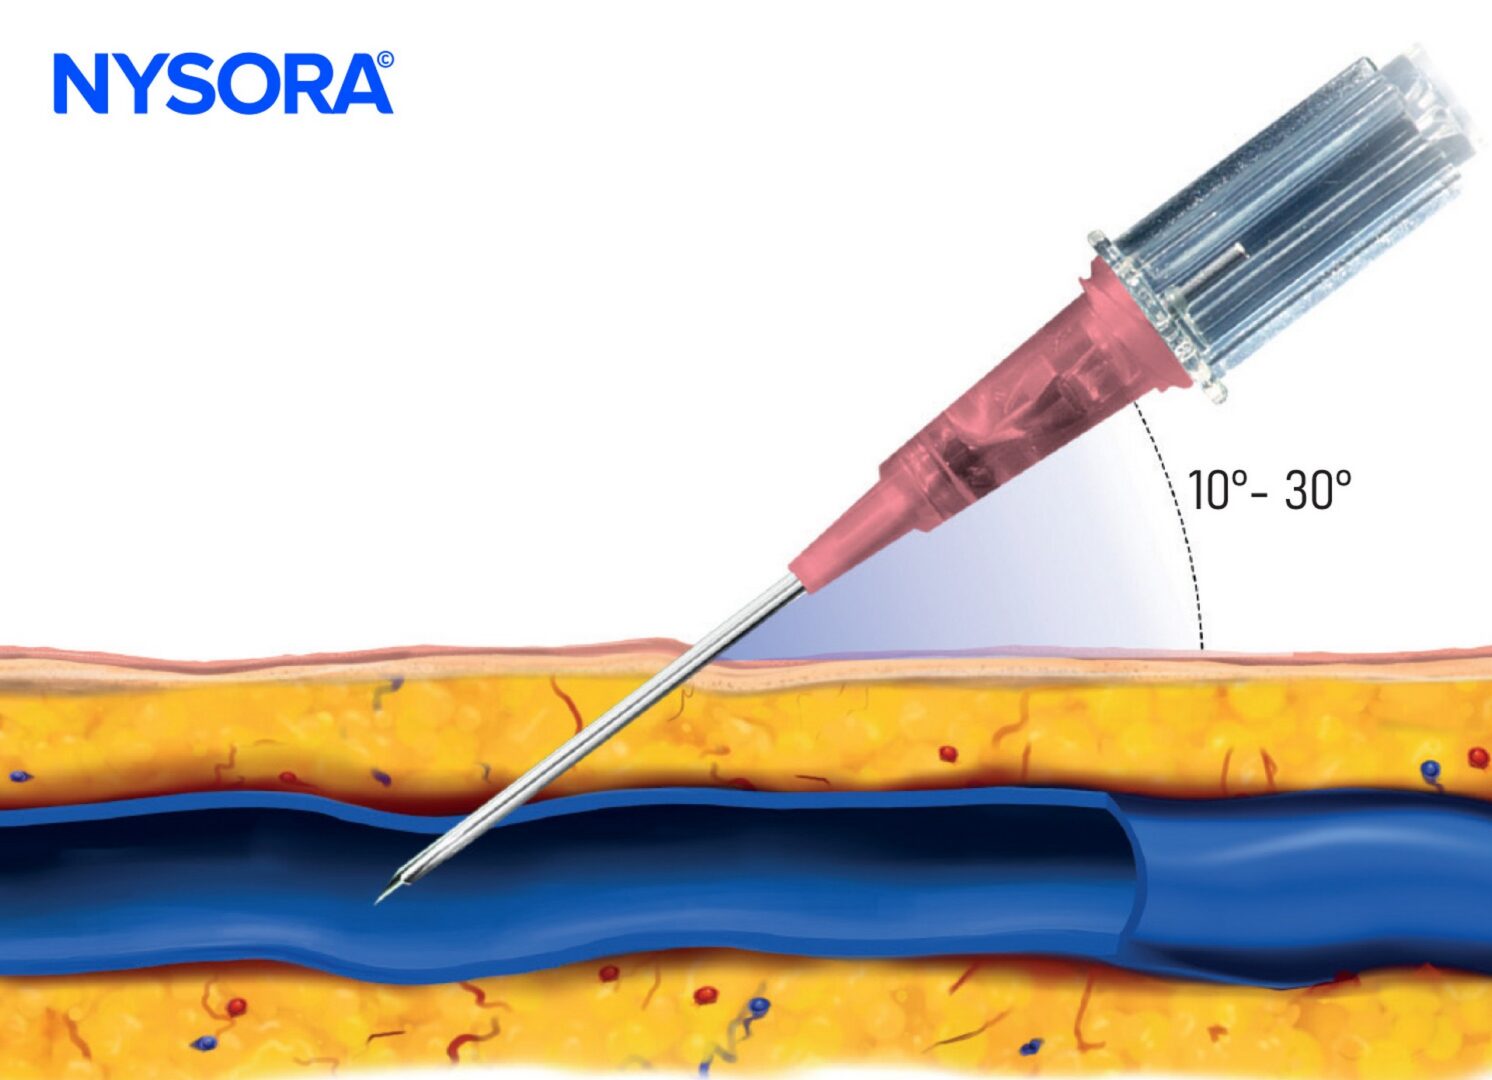
Angle of needle insertion for superficial veins.

Decrease the angle. A too-steep angle will lead to puncturing the vein’s back wall.
VIDEO: ihttps://youtu.be/NvOGsnidETA
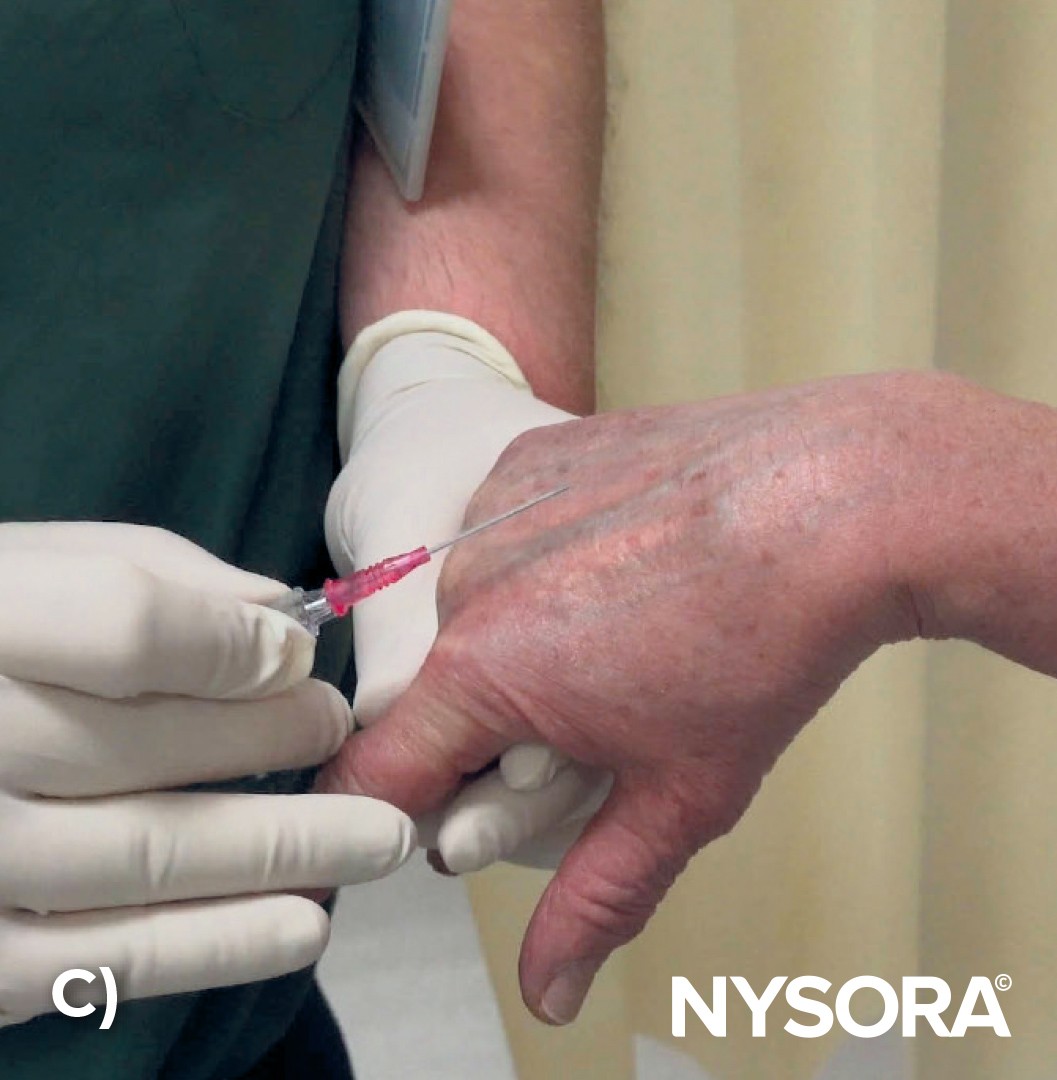
Nailing the needle insertion
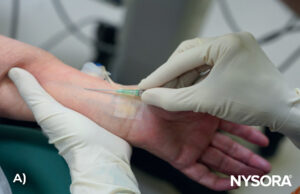
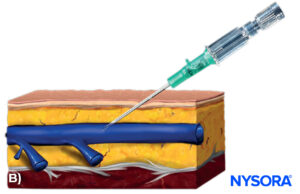
A) Needle insertion. B) Illustration of the needle insertion.
When inserting an IV catheter, here’s a breakdown of the essential steps:
- Hold the needle securely with the dominant hand, either at the hub or using the grip pads.
- Make sure the needle bevel faces upward to facilitate the ease of vein entry and reduce the risk of skimming over the vein.
- Align the needle direction with the direction of the chosen vein.
- Let the patient know: “You might feel a little pinch when I start the IV.”
- Insert the needle at a 10-30 degree angle to the skin about 1 to 2 cm (0.3-0.8 inches) distal to the intended point of vein entry.
- When there’s limited space, and the IV needs to go right above the vein, start with a steeper angle for quick vein entry and then flatten the angle afterward.
- Steadily advance the needle.
- Anticipate a small “pop” or a loss of resistance, often felt as the needle enters the vein.
- The appearance of blood in the flashback chamber indicates the IV needle tip position.
- Advance the needle into the vein for approximately another 0.5-1 cm to ensure the catheter is also inside the vein, not just the needle tip.
- Stop advancing the needle-catheter system once sufficiently inside the vein, as going too deep can lead to the needle tip puncturing the vein’s back wall and/or hematoma.
- Remember that in patients with thick-walled or sclerotic veins, a fast, deliberate insertion is helpful to penetrate the vein wall instead of pushing (“rolling”) the vein away.

Insert the needle with the bevel facing upward to allow for smoother penetration into the vein.
VIDEO: https://youtu.be/0AXWK3rf_dU
What should it feel like?
The secret of IV professionals is that they can feel the vein without seeing it, and they acquire a “feel” for when the needle enters the vein. While inserting the IV, resistance will be felt at two points. The initial resistance is met as the needle pierces through the patient’s skin. The larger the needle, the greater the resistance. More force might be needed, especially in some (male) patients with thicker skin. Once the needle has passed through the skin, it enters the subcutaneous tissue with little to no resistance.
A subtle pop or moment of resistance will be felt, indicating entry into the vein. The blood flashback should be noticeable in the flashback chamber. The “pop” or “give” will be more perceptible in larger, healthy, or thick veins. This perception of entry into the vein is often the only clinical clue when inserting an IV in the dorsum of the hand in small children with difficult veins. The “pop” may be absent in small, delicate veins with thin walls.
Alternative approaches to vein cannulation
The most common or standard approach is the TOP approach, in which the needle is positioned and advanced directly over (above) the vein. However, a paravenous approach may sometimes be more appropriate.
Paravenous approach
- Position the needle at the vein’s side, aiming along its path.
- Push the needle through the skin toward the vein.
- Keep the angle of the needle to the vein small to reduce the risk of puncturing the vein’s opposite wall.
- Use this approach if the needle is accidentally inserted into the side of a vein or if the vein moves after insertion from the top.
- Once inside the vein, re-correct the angle of the needle to assume a parallell course to the vein.


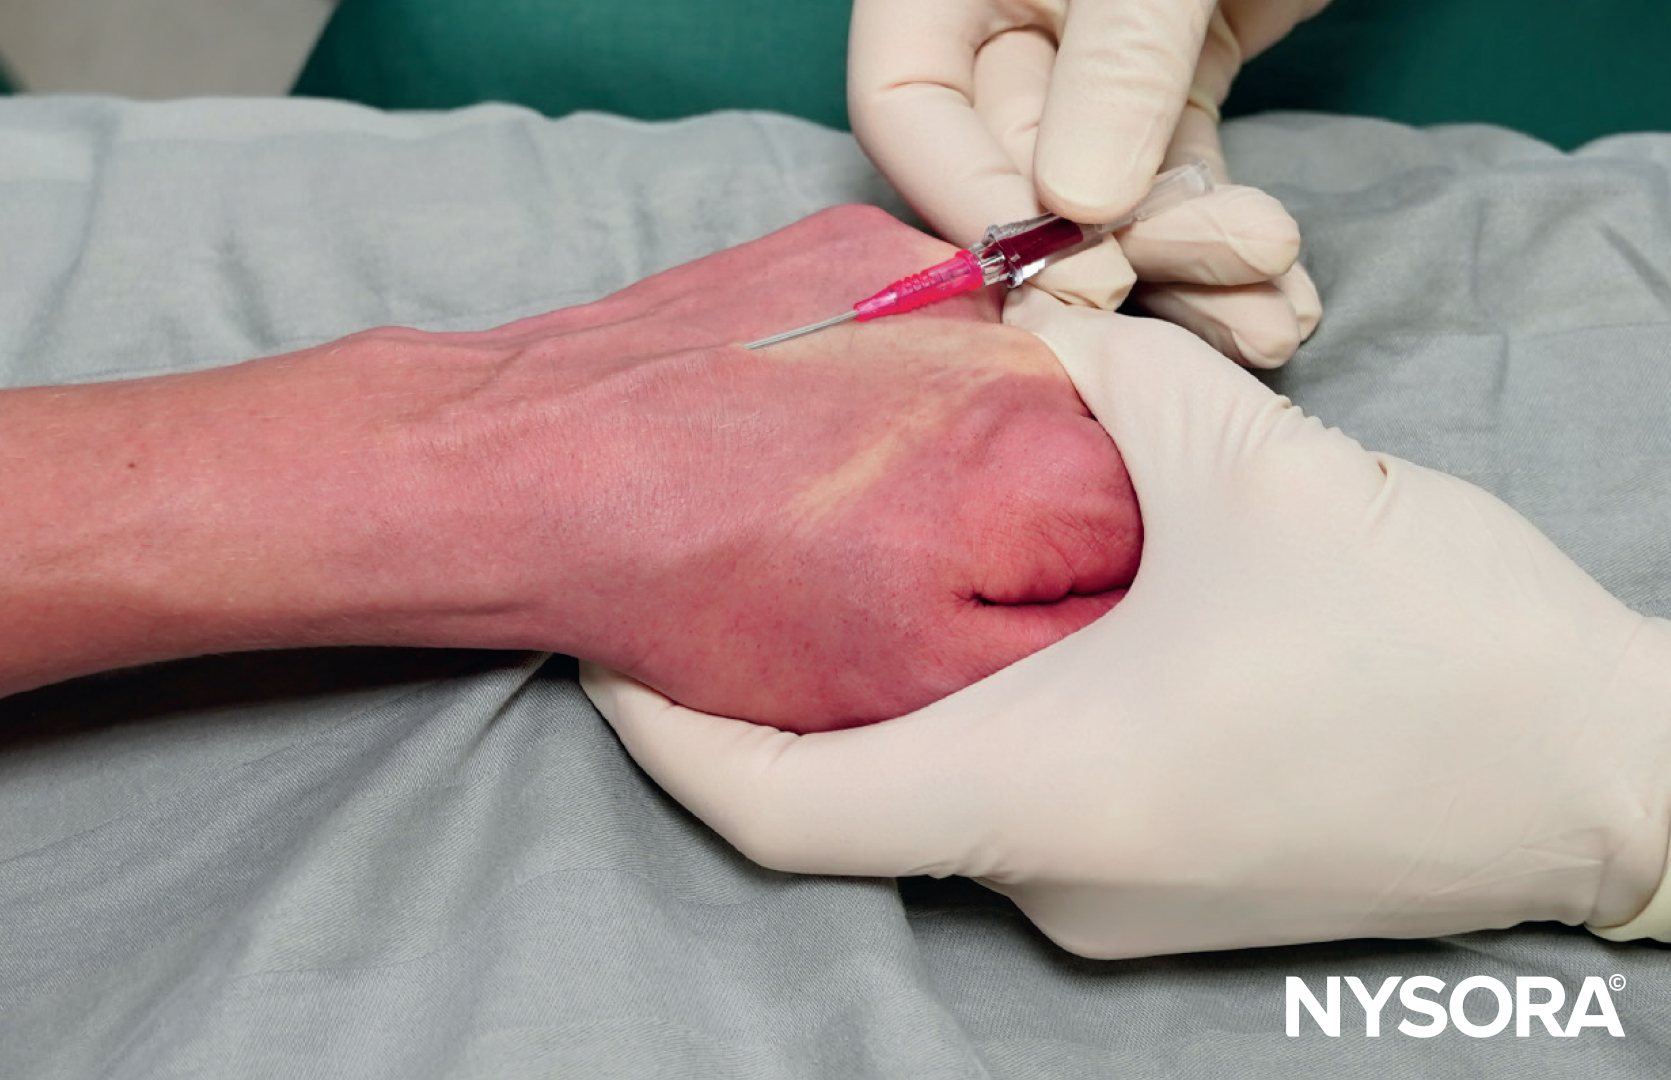
Paravenous insertion of the needle in a dorsal hand vein while maintaining a low angle to reduce the risk of puncturing the vein’s opposite wall.
VIDEO: https://youtu.be/P4BCx5wQAOM
Insertion through a bifurcation
This approach may be appropriate to prevent vein rolling, and the bifurcation stabilizes the vein to be cannulated.
- Insert the needle from the top above the bifurcation, aiming for needle entry slightly proximal to the bifurcation.
- If the space allows, first insert the needle 1 cm below the bifurcation (better) and advance through the subcutaneous tissue into the vein through the bifurcation.
- Another option is to insert the needle directly into the bifurcation. This can be advantageous in “rolling” veins, where the bifurcation stabilizes the vein at the point of entry.

Example of a vein bifurcation and needle insertion strategies.
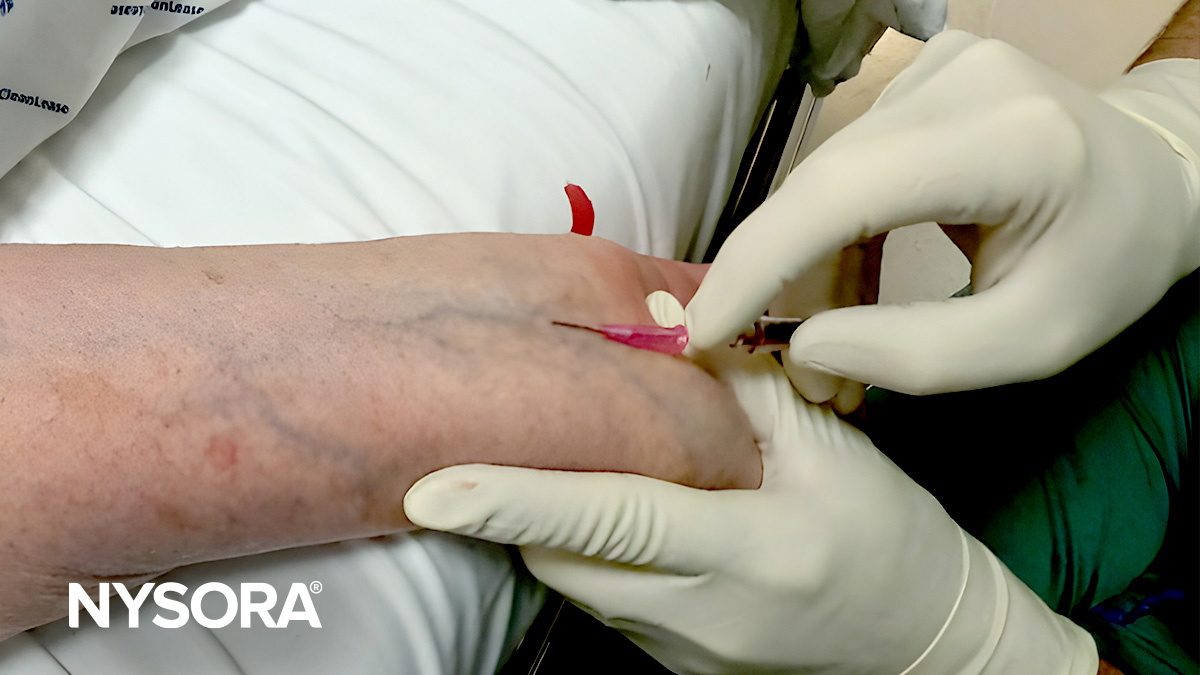
Look out for the blood flashback and advance the catheter
Blood appearing in the flashback chamber confirms the needle is inside the vein. However, this does not necessarily mean that the catheter is also in the vein, as the needle tip slightly precedes the catheter tip. Upon seeing the blood flashback, lower the angle so the needle becomes almost parallel to the body’s surface, and advance another 0.5-1 cm to ensure both the needle and catheter are in the vein. Failing to adjust the angle may lead to a puncture of the vein’s opposite wall when the needle is pushed further.
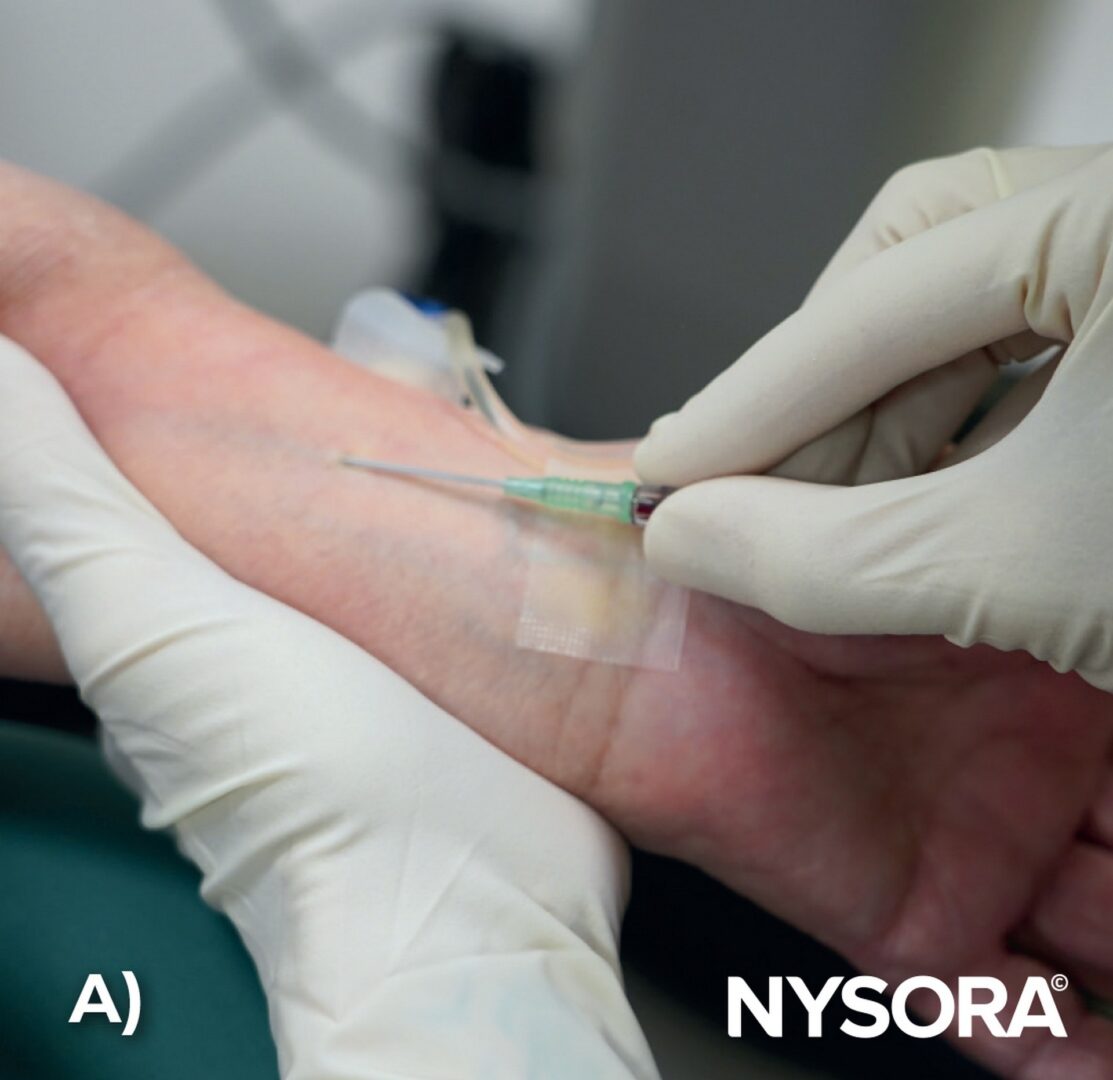

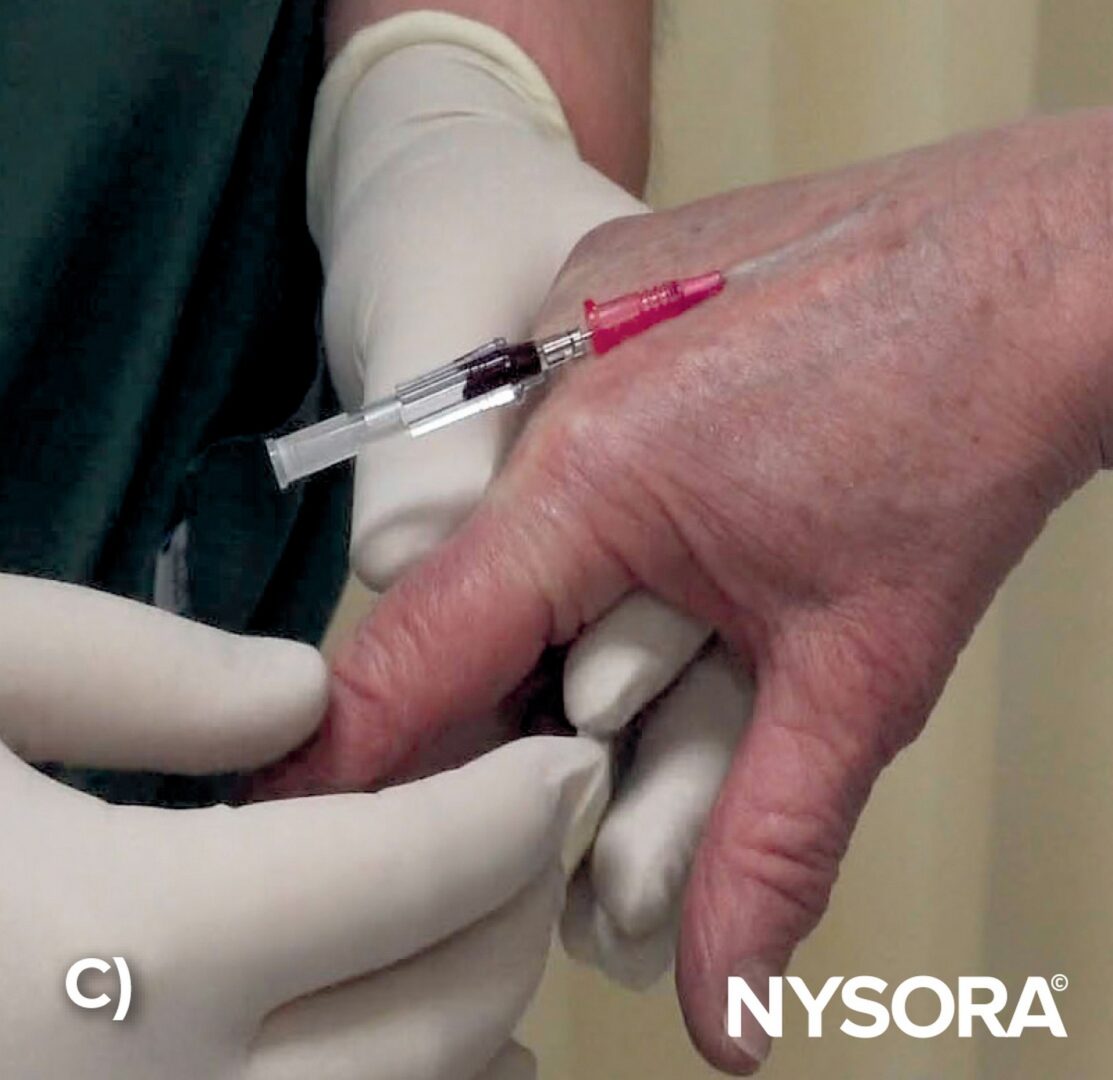
After observing blood in the flashback chamber (A), lower the angle of the needle and advance another 0.5-1 cm to ensure both needle and catheter are in the vein (B,C).

Illustration of blood in the flashback chamber, indicating that the needle has entered the vein.
After a blood flashback, advance the needle-catheter system an additional few millimeters to ensure the catheter is in the vein. Next, slide the catheter over the needle to its hub. The patient typically does not feel any discomfort during catheter advancement. If the patient complains of pain during the catheter sliding maneuver or if resistance is felt, the catheter may not be located in the vein.
TIPS
Larger catheters have more space between the needle tip and the catheter tip than smaller needles. This affects the depth at which the needle-catheter system needs to be advanced into the vein after obtaining the blood flashback.
- 18G catheter: Advance another 1-2 cm.
- 22G and smaller catheters: Advance another 0.5-1 cm.

Thread the catheter over the needle into the vein.
VIDEO: https://youtu.be/iotvtmACd24