Notions of the physical properties of ultrasound are not indispensable for the user (as we wrote in our 1992, 2002, 2005, 2010, and 2011 editions). Interested readers will find them in any ultrasound textbook. We will discuss here the notions useful for understanding critical ultrasound. Every maneuver which favors simplicity will be exploited. Space will be used for explaining why only one setting is used; why, at the lung or venous area, only one probe orientation is favored; and how to easily improve the image quality.
1. PRELIMINARY NOTE ON KNOBOLOGY. WHICH SETTING FOR THE BLUE-PROTOCOL? WHICH SETTING FOR THE OTHER PROTOCOLS (FALLS, SESAME, ETC.) AND WHOLE BODY CRITICAL ULTRASOUND?
An ultrasound machine includes a various num- ber of buttons, cursors, functions, etc. In our routine, we use only three functions:
- The gain
- The depth
- The B/M-mode
The sole use of these three buttons converts any complex unit into a simple stethoscope (since 1982).
The setting is a basic point. Our setting is not “Lung”, but “Critical Ultrasound.” This concept, which initiates the SESAME-protocol, allows us to see the heart, veins, and belly (and lung) with a single approach, a single probe. Our setting is, briefly, always the same. No filter, no facility. The next chapter will develop this point.
Some revolutionary machines use this concept with electronic control (basic/expert level), which is fine, but we did the same for a lesser cost, with a simple piece of cardboard (or thick plastic) and a cutter for making holes and hiding those scary, useless buttons, respectively. Since 1982, these machines were suddenly transformed into user- friendly units. A genuine stethoscope, making novice users at ease.
We quite never touch the countless preand post-processing possibilities nor all modern facil- ities, mainly harmonics. Annotations are useless when the examination is not made by a radiologist (or technician) for a doctor: the spirit of critical ultrasound.
The B/M mode seems insignificant. Technical misconceptions can contribute in losing lives, especially for diagnosing pneumothorax in difficult conditions (i.e., the most critical ones precisely).
2. STEP 1: THE IMAGE ACQUISITION
Whatever the unit (even with pocket machines), the mastery of the spatial dimension is probably the major difficult point of ultrasound. When the probe is moved, significant changes appear on the screen – very unsettling at the beginning. How to understand what happens on the screen should be mastered in priority. We travel through the third dimension. These changes will be integrated and become automatic with practice. The other step (interpreting the image) is much easier. The spatial control also makes the superiority of ultrasound, i.e., the possibility, by a slight change, of answering the clinical question. Even if we assume that in the current times physicians have all access to basic programs which explain this delicate step, the aim of CEURF is to simplify this step too.
For achieving this simplification, we will suppress movements we never do. Tilting the probe for instance. For anterolateral lung venous (belly, optic nerve, etc.) ultrasound, our probe is always perpendicular to the skin (Fig. 1). The two exceptions are (1) the heart, subcostal and apical views, (2) the posterior aspect of the lung in ventilated patients, where the probe tries to be as perpendicular as possible. Being quite always perpendicular suppresses other movements, i.e., simplifies ultrasound (and is what we daily do).
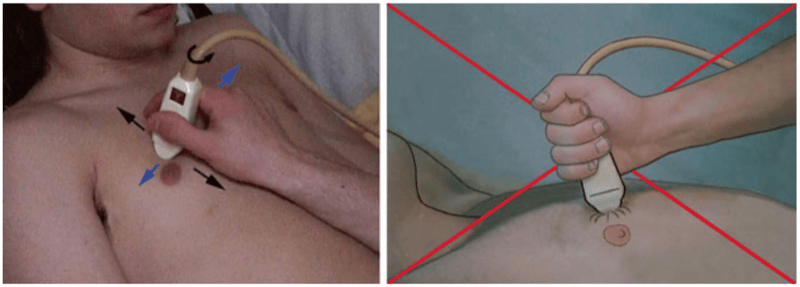
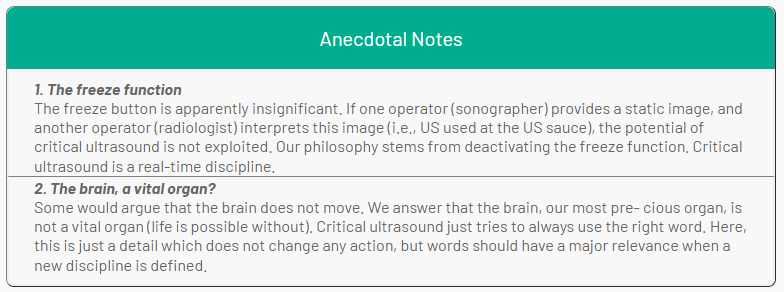
Fig. 1 How we hold the probe, how we don’t. Left: Like with a fountain pen, the operator can stay hours without any fatigue, and the image is stable on the screen. The probe is applied at zero pressure, which is comfortable for the patient and mandatory for any venous analysis as well as the optic nerve. The probe is (reversibly) stable on the skin, not slippery using Ecolight, which decreases the energy needed for keeping it stable. The probe is perpendicular to the skin. It is applied longitudinally. Three main movements are arrowed. These blue arrows indicate the Carmen maneuver (this movement is done from left to right in this scan moving the skin on the underskin). If the probe was transversally applied, the Carmen maneuver would be from head to feet. The turning arrow indicates rotation of the probe (like screwdriving). The black arrows indicate a scanning looking like changing gears of an automobile (of major importance to the trainee for reaching the good position). Right: The pressure is not controlled (a very bad habit in venous ultrasound), and this position will generate fatigue. More severe, the hand is not stable; this will disturb the practice of a discipline based on the analysis of dynamics
Our microconvex probe has a sectorial scanning, displaying a trapezoidal image, the probe head being on top.
We assume that what is at the left, the right, the superficy, and the depth of the image is integrated. Note that for lung ultrasound, we adopted the radiological convention, head to the left, feet to the right, unlike the echocardiographists (roughly the only element that we took from the radiologic culture). Critical ultrasound should be homogenized: lung with head left, heart with head right makes no sense.
The operator must apply the probe on the skin, then search for the best image. For that, a good acoustic window must be found. This is really easy, never a problem for the lung, ironically. First, any perpendicular scan at any point of the chest wall provides the same basic image: the lung is “everywhere,” just below the skin. Second, the gas is not a hindrance here. This completely changes the traditional rules of ultrasound. At the heart, the abdomen, etc., we admit that this step is challenging (although countless tricks are available).
Once a structure is detected more or less, subtle movements of the probe will optimize the image.
3. HOW WE HOLD THE PROBE BASICALLY
Critical ultrasound analyzes vital structures, i.e., permanent movements. The operator’s hand must be standstill: the dynamic should be generated by the patient alone (never the operator’s hand). Uncontrolled movements of the probe create dynamics which bring nothing. Ecolight®, our contact product, allows to save energy usually lost for stabilizing a slippery probe. We find critical to hold the (microconvex) probe like a fountain pen between the thumb and index fingers (+/− medium etc.), with the operator’s hand quietly applied on the patient’s skin. For many parts, we work at “Zero pressure”: the probe is applied to the skin until an image appears on the screen. This minimal pressure warrants absence of pain (or cardiac trouble when working onto the eyelid), absence of fatigue (in prolonged examinations), and absence of errors (too much initial energy will result in squashing veins).
Some beginners hold the probe too tight. This probe must be withdrawn without effort from the operator’s hand by another person. One secret is the suppleness of the hand. Often, the young user is discouraged since he got a suboptimal image, whereas the experienced user comes nonchalantly after and obtains a much nicer image. Yet the difference is often due to minimal changes. Whereas the probe keeps its mark on the young user’s hand (like, almost always, the joystick of a first flight – a sign of intense crispation), the experienced user holds it slightly and is not afraid to move it liberally. The Carmen maneuver (see just below) is to our knowledge the best way to dramatically improve an image.
4. THE ELEMENTARY MOVEMENTS
One secret for a steep learning curve is to study them one by one. Associating rotating and scanning movements would be challenging at the debuts. We use three elementary movements. Instead of complex words (pivoting, translating), we use familiar comparisons.
- Changing a gear (from 1st to 2nd speed). Sliding a longitudinal probe in a craniocaudal axis, from a rib to the lower intercostal space, positions the pleural line between the two ribs.
- Screwdriving. Rotation on its main axis: the study of a vessel on its short axis (for DVT detection) then on its long axis (for cannulation).
- Painting a wall. All probes (apart from cardiac) can be assimilated to brushes, with 2 axes. The Carmen maneuver is a simple movement that we permanently make. It is like using a large brush, but with the probe nearly standstill, just using the gliding of the skin over the underskin (making a centimetric amplitude to each side). Our contact product helps in “sticking,” reversibly, the probe to the skin. This subtle maneuver allows us to have immediate control of the image: it helps in optimizing the image quality when scanning an intercostal space or any other area. It shows immediately a vascular couple that was not obvious on a static view, making Doppler far less useful, at least for helping locating the vessels.
5. THE SECOND HAND IN CRITICAL ULTRASOUND
At CEURF, critical ultrasound is performed with both hands. The second hand is permanently used for countless uses. It helps for slightly turning the patient’s back for prompting a posterior lung analysis. It makes the venous compression possible in reputed noncompressible areas. It helps the probe’s hand to push the gas in an abdominal scan. It takes the compress soaked with our contact product, making the operator ready to extend the field of investigation with no loss of time.
This is why we do not share the general enthusiasm generated by the pocket machines, where the spots always show smiling faces holding the machine in one hand, the probe in another.
6. LONGITUDINAL OR TRANSVERSAL SCANS?
Ultrasound can be made easy or difficult. Choosing longitudinal or transversal scans is part of this policy. Note that, strictly speaking, longitudinal and transversal are terms which refer to the craniocaudal and left-right locations of the human being. Axial and cross-sectional scans refer to structures with one long axis and one short axis (vessels, heart, kidneys, intestines, gallbladder, etc.).
The BLUE-protocol advises to scan the lung always longitudinally, the veins always in their short axis. By considering only one axis per structure, the difficulty is divided by two.
Most veins are roughly parallel to the longitudinal and transversal axes. For studying a vein, the choice of an axial approach is a bit similar to the violin practice, the cross-sectional approach to the guitar (Fig. 2). Violin is more demanding than guitar, where the pitch is self-adjusted. Studying a vessel through its cross-sectional scan is easy: once the probe is applied, the vascular couple is immediately recognized. If not, the Carmen maneuver makes it. Even if the hand of the operator moves, using this maneuver, the vessel remains stable in the gunsight. Making an axial approach requires millimetric precision. Some operators even halt breathing. At the lung area, the practice of transversal/oblique scans (in the rib axis) would make ultrasound a difficult exercise.
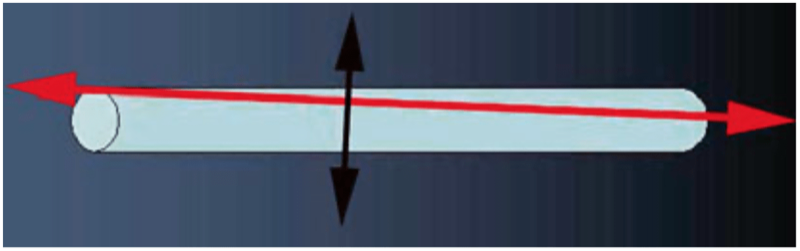
Fig. 2 Long vs. short axis. Cross-sectional vs. axial scan. This figure shows these two incidences for approaching a tubular structure – with a slight drift. Whereas the cross-sectional scan (black, 3°) is roughly insensitive to this drift, the axial scan (red, just 2°) is much more affected. Slight movements can make the vein disappear out of plane, at worst simulating a positive compression maneuver, and all in all make ultrasound a more difficult discipline. Cross-sectional scans are easy like guitar (long axis difficult like violin): the vein is always promptly visible on the screen (one is free to prefer violin anyway)
7. STEP 2: UNDERSTANDING THE COMPOSITION OF THE IMAGE
We assume the readers have enough experience for knowing what are the white, gray, and black components of the images. We assume they master the words echoic, hypoechoic, hyperechoic, and acoustic window. An acoustic window can be physiological (bladder for the analysis of the uterus) or pathological (pleural effusion used to study the thoracic aorta).
8. GAIN
Optimal control of gain is obtained with experience. At the lung, this step can be standardized. Radiologists have long defined the best gain as giving a gray (healthy) liver and a black (healthy) gallbladder content. We can do the same with lung ultrasound: the best gain gives black shadows of ribs, grey parietal tissues, and white pleural line (Fig. 3). In the units we use, the proximal, distal, and global gains can be adjusted. That said, we modify only the global gain, from time to time, and quite never the proximal and distal gains.
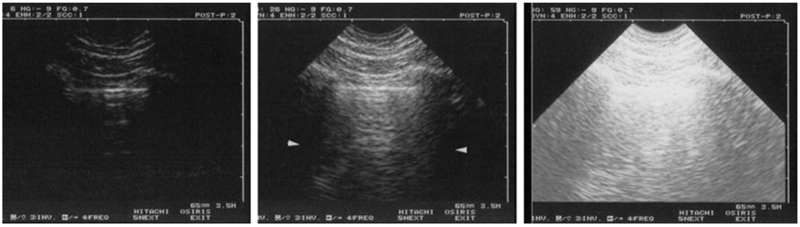
Fig. 3 Standardized gain for lung ultrasound. Longitudinal scan of the lung. Left: The gain is too low. Details are lost. Middle: The gain is optimal, clearly showing the pleural line. Right: The gain is too high: superficial areas are saturated
We very quickly remind the components of the echogenicity:
- Parenchyma, venous thrombosis, lung consolidation, hematoma, and gallbladder sludge are echoic.
- Abscess and necrosis are less echoic.
- Pure fluid collection or circulating blood is anechoic. Some artifacts are anechoic (acoustic shadow of bones).
- Some artifacts are hyperechoic (repetitions of air mainly).
- Interface, surface of ribs, gas, and cardiac valve appear white.
Deep fat is hyperechoic such as mesenteric fat (allowing us to perfectly locate the mesenteric artery). We did not invest a lot in this field, but, for those interested, commercial oil is anechoic, and commercial butter has a tissular, liver-like pattern.
9. ARTIFACTS: ONE BASIS OF LUNG ULTRASOUND
The analysis of artifacts (traditionally a hindrance in the ultrasound’s world, a foe to eradicate with no mercy) is the basis of critical ultrasound.
Artifacts are created by the principle of propagation of the ultrasound beam. The beam is stopped by air and bones. How to recognize an artifact is the easiest part: these are images with regular, straight, and geometric shape, usually vertical or horizontal, more precisely converging to the head of the probe (the top of the screen) like parallels or meridians. This is the common point to nearly all artifacts. Real images have totally different shape: anatomic, never fully regular, and suitable for measurements (e.g., lung consolidation).
Some words should be familiar.
Reverberation or repetition artifacts. They are the basis of lung ultrasound, generating the A-lines and B-lines, mainly. The profiles of the BLUE-protocol with artifacts (A, A’, B, B’ profiles) create a complete acoustic barrier below the pleural line: they obliterate any information located deeper.
Acoustic shadows. They are anechoic barriers, arising behind bone structures, also hiding deeper information. The rib shadows are basic landmarks of lung ultrasound.
In thoracic ultrasound, a longitudinal view makes an alternance of artifacts: acoustic shadows behind the ribs, reverberation artifacts behind the pleural line, either horizontal (A-lines) or vertical (B-lines), again shadow of the rib, etc. This is (probably) a main factor which originated the dogma of the unfeasibility of lung ultrasound [2].
The acoustic enhancement is a popular artifact which we quite never use. Never in LUCI, exceptionally for venous scanning, just before compressing apparently empty veins. Therefore, no figure is provided. It indicates the fluid nature of a mass in traditional ultrasound (the liver parenchyma is more echoic behind the gallbladder than lateral to it).
10. DYNAMICS: THE OTHER BASIS OF LUNG ULTRASOUND
Critical ultrasound scans vital organs: lungs, heart, vessels, and bowel mainly. A common feature to any vital structure is a permanent dynamic, from birth to death. The brain? A vital structure that does not move is dead or dying. The M-mode button allows demonstration of any dynamic on a frozen picture. Almost all diagnoses at the lung area consider the dynamic dimension: pulmonary edema, pneumothorax, pneumonia, pleural effusion, complete atelectasis, among others. This textbook shows examples of pathological dynamics in pneumoperitoneum, mesenteric infarction, and floating thrombosis.
11. DIMENSIONS
Dimensions can be accurately measured by freezing the image and adjusting electronic calipers. Yet in critical ultrasound, there is not so much time, nor need, for measurements (see through this book).
12. STEP 3: IMAGE INTERPRETATION
Only the operator’s familiarity with the field, enriched by reading the literature and personal experience, will indicate which conclusions can be drawn. For instance, a lung consolidation at the anterior chest wall will have a specific meaning. Previously, this operator has carefully learned to choose an appropriate machine, an appropriate probe, switch on the ultrasound unit, check for the proper gain, by-pass useless modes, hold the probe correctly, locate the lung surface, and recognize this consolidation through its specific sign (the fractal sign).
13. IMPEDIMENTS TO ULTRASOUND EXAMINATION
First have in mind that the most sophisticated machines, as well as the most flashy pocket machines, are unable to cross the bones, dressings, and air.
At the Lung Area
Air at the lung level was traditionally considered an absolute obstacle; now all doctors know that this dogma was wrong. What is true is that the air immediately visible at the lung surface prevents us to see deeper. This is one of the paradoxes of LUCI: not a big issue.
The real obstacles are really few. Huge dressings that cannot be withdrawn easily are the main one. Subcutaneous emphysema is a hindrance for beginners (and for experts in advanced stages). Images are more easy to define when the BLUE-points are followed, and the scapula is not put by mistake on strategic areas. Only in exceptional cases, an image remains difficult to interpret.
Lung Apart
In the rest of the body, mainly the abdomen, there are so many organs that, we agree, ultrasound may appear an esoteric fog for the beginner’s eyes.
Gas and ribs interrupt the image. This drawback of ultrasound, one of the rare, is not found with radiography, CT or MRI.
Bowel gas is, per se, an inescapable obstacle. However, a gas can move, like a cloud previously hiding the sun. Before concluding that the examination is impossible, the approaches must be diversified: one must sometimes wait and try again. Both operator’s hands may be able to shift the gas. For getting rid of the gas, our maneuver is slight expiratory pressure, maintaining the pressure during next inspiration, then exert a slightly superior pressure, and so on – with patience and method – this is the most pacific and efficient way.
Thick bones are absolute obstacles. Fine bones (maxillary bones, scapula) are transparent to the ultrasound beam. Using these windows, ultrasound extends its territory throughout the entire body.
Subcostal organs (liver and spleen) can be entirely hidden by the ribs and cannot be analyzed using the abdominal approach. Our universal probe scans through the intercostal spaces, creating an incomplete vision – but fully adapted to the information required in the critically ill.
Obese (currently, the elegant term is “challenging”) patients are traditionally not candidates for ultrasound (nor CT nor any imaging modality).
Extensive dressings, devices, G-suits, cervical collars, etc., are real hindrances.
In daily practice, a really non contributive examination is rare. All in all, ultrasound answers a clinical question with a clear analysis in 80–90 % of cases. At superficial areas (lung, veins, optic nerve, etc.), the answer is quite always possible.