 Nerve Blocks App
 Pain Medicine Assistant App
 POCUS App
 IV Access App
 MSK Knee App
 VetRA App
 Nerve Block Manual
 Regional Anesthesia Updates
 Anesthesiology Manual
 Anesthesiology Review
 Anesthesia Updates 2025
 Anesthesia Updates 2026
 Pediatric Anesthesia Updates
 Airway Management Updates
 US Interventional Pain Manual
 Pain Medicine Updates
 Mastering Difficult IV Access
 PACU Nursing Manual
 RA Veterinary Manual
 About
About
For the Anesthesia of Rotator Cuff Repair, you will find the information here useful for both patients and anesthesia providers, and for students of anesthesia. Dr. Hadzic, a seasoned anesthesiologist and the director of NYSORA, will be sharing his personal experience with rotator cuff surgery under interscalene block, but through a patient’s perspective. Whether you’re a student or patient preparing for surgery, this video will offer lots of useful information.
Your patient is scheduled for shoulder surgery, and it’s a rotator cuff tear. Patients are naturally apprehensive about surgery and recovery, but in Dr. Hadzic’s experience, many patients seem to be more apprehensive about anesthesia than the surgery itself. So what is the best anesthesia option for shoulder surgery? The rotator cuff surgery itself is only an hour or two, but recovery from the severe pain after surgery takes at least three days. Considering this, the choice of anesthesia that can control the postoperative pain effectively may even be more important than the choice of anesthesia for the surgery itself.
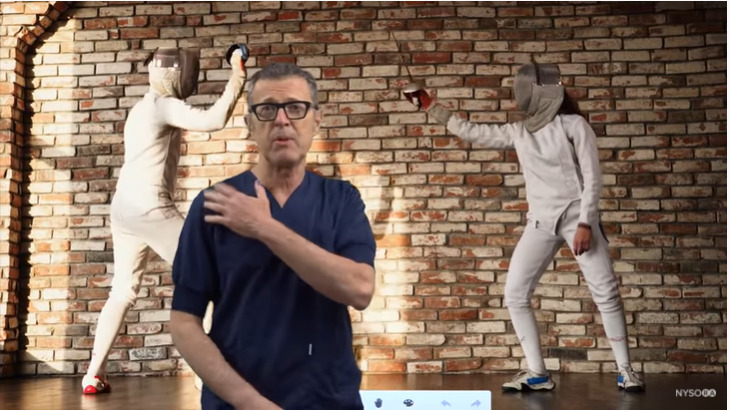
Dr. Hadzic’s operation took place at St Luke’s Roosevelt Hospital, New York, Upper West side, where he worked as an anesthesiologist. The Doctor was in the midst of a fencing competition when he tore his rotator cuff, during which he felt a snap as he extended his arm to attack the opponent. Immediately losing the ability to externally rotate his arm, he had to stop competing shortly.
Thereafter, he began experiencing night pains that woke him, and over the next two weeks, he developed a severe disability. He found himself unable to open doors or fasten his seatbelt – pain and weakness prevented him from completing these actions.
A rotator cuff tear is a tear in the connective tissue between muscles and bones or tendons around the shoulder joint. The most common symptoms of a rotator cuff tear include pain at rest, pain at night (particularly if lying on the affected shoulder), and pain present when lifting and lowering the arm or in other specific movements, such as external rotation. One can also expect a crackling sensation when moving the shoulder.
There are two kinds of rotator cuff tears:
- A partial tear, in which one of the muscles that form the rotator cuff is frayed or damaged.
- A complete tear that goes all the way through the tendon or pulls the tendon off the bone completely.

Dr. Hadzic speaking on the different types of rotator cuff tears
Now, the orthopedic surgeon at St Luke’s hospital, Dr. Paul Hobeka, diagnosed the tear immediately during the examination and confirmed it by MRI. Dr. Hadzic was then scheduled for the surgery the very next day. As an anesthesiologist, he had insight into all anesthetic options and was given the choice of any anesthesia technique he wanted.
Overall, there are two choices for this operation – general anesthesia or local, regional anesthesia. General anesthesia is oftentimes erroneously called going to sleep. In fact this is a misrepresentation of general anesthesia. General anesthesia consists of administering medications and/or anesthetic gases, sometimes in combination, that switches the brain off. Considering that while under general anesthesia, you lose the ability to breathe independently, the anesthesiologist will insert some form of a breathing device to provide ventilation and oxygenation to the patient who is anesthetized. The medications being administered are switched after the operation and the patient comes to, at which point the breathing tube is removed. Upon taking a patient off of general anesthesia, immediate pain from the surgery can be expected because they no longer have substantial means to immediately block it from reaching the brain and causing acute severe postoperative pain.
Instead, local regional anesthesia interrupts the pain pathways from the shoulder to the brain by using a targeted, usually ultrasound-guided, application of local anesthetics to the nerves that transmit the pain or inflammation of pain from the shoulder to the brain. In other words, the brain never perceives the pain as the pain pathways from the shoulder to the brain are blocked. This has many potential benefits. Firstly, it avoids the need for general anesthesia, intubation, mechanical ventilation or a breathing tube and a breathing machine, and it’s just a much more natural and physiologic way to accomplish anesthesia for the shoulder, since you anesthetize your shoulder and not the brain or the whole body.
Moreover, the residual anesthesia after the nerve block continues to provide the pain for hours or days after operation. You can also place a catheter or inject even longer-acting medications, which can prolong the pain relief up to a few days after surgery. There is mounting evidence that the prevention of pain present at the surgical site to your brain by using a nerve block may prevent the development of chronic pain after surgery.
Dr. Hadzic chose the local regional anesthesia called interscalene brachial plexus block as the main anesthesia for his own operation. Moreover, he also chose to have a catheter placed, so after the operation he could control his own pain by using an injection pump that gives him as much of a local or numbing medicine to the nerves as he needs. That is because he did not have to have general anesthesia for this operation, and the catheter after the operation could provide him with pain relief for a few days based on his needs.
Nowadays, you don’t even have to use the catheter because of the new FDA-approved medication for injection into the interscalene brachial plexus block called EXPAREL, which can provide pain relief for up to 72 hours, sometimes even longer. We would typically mix EXPAREL medication with bupivacaine to produce an immediate onset for surgery by bupivacaine, and extended duration by slow release of the local anesthetic from the preparation called EXPAREL, or liposome bupivacaine.
See in the below image how we insert the interscalene catheter for this particular operation. This is a typical positioning for shoulder surgery. Patients are typically awake, mildly sedated or in a light sleep. They can choose not to be awake during the operation, but they do not need to necessarily get complete anesthesia, be on a breathing machine and have a breathing tube.
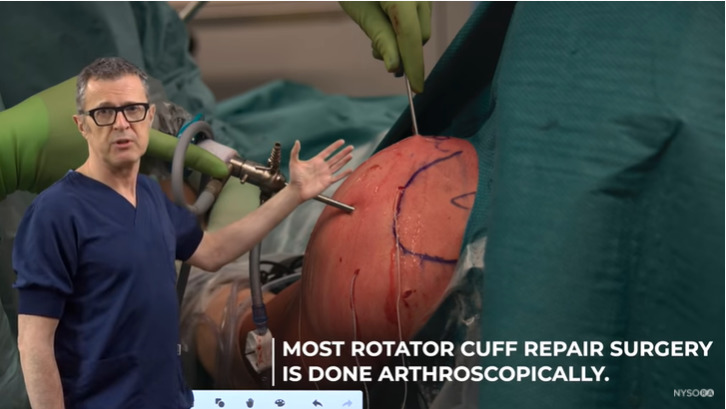
Image of rotator cuff repair surgery taking place
The disability caused by a rotator cuff tear can prove significant. It can range from minor pain to an inability to lift the arm up or perform external rotation. The inability to do the external rotation causes great discomfort because it prevents you from opening doors, fastening a seat belt and each of these motions causes extreme weakness in the set of muscles that you use, as well as pain. Generally, the rotator cuff tears are typically located around the shoulder.
You can see a tear in the image below which is located in the infraspinatus muscle, the muscle that helps with the external rotations. The tears can be minor, partial or complete.
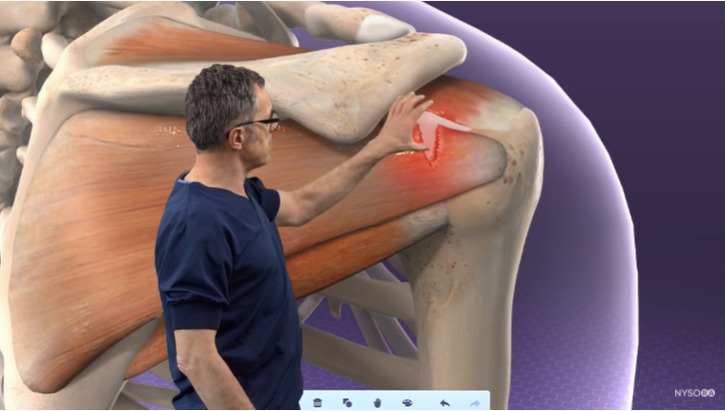
Infraspinatus muscle tear
See the below image for the whole group of tears ranging from very minor to complete. Keep in mind, in a complete or major tear, you lose so much functionality that this has to be fixed surgically as soon as possible, otherwise you will rapidly start losing the muscle mass in the shoulder area.
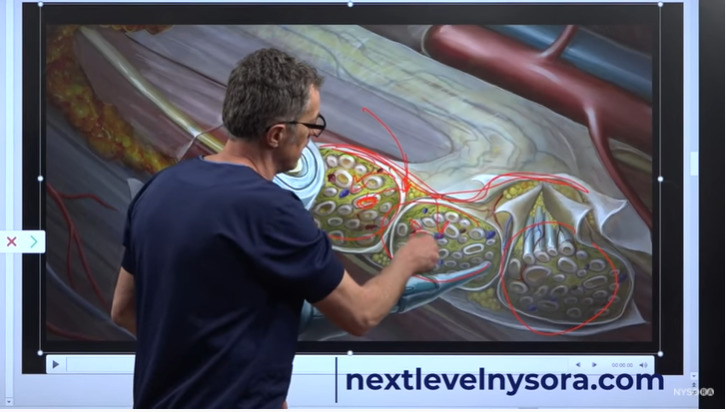
Local anesthesia basically interrupts the pain pathway. In the image below, you can see a group of nerves that connect the shoulder to the brain, so if we administer local anesthetic in that area, we basically interrupt the pain transmission from the shoulder to the brain.
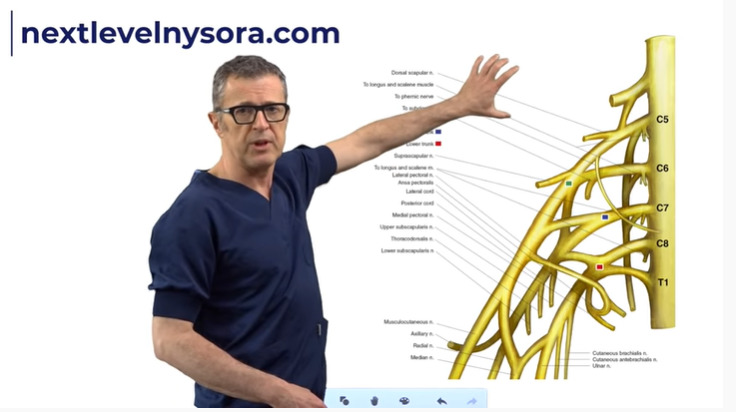
Nerves that connect the shoulder to the brain
We therefore prevent the brain from the painful impulses that provoke a whole set of negative physiologic reactions.
The interscalene brachial plexus block can be so powerful that patients won’t need to be sedated by way of any other medication if they chose not to. In fact, they could watch the surgery live on camera during the whole procedure if they desire.
While going through moments from the operation, Dr. Hadzic shared that he was so comfortable during the operation while his trainees took care of him that they decided to give him a sip of water. After the surgery, he was out on the street within an hour and drove himself home, as he wasn’t given sedatives or opioids. You can see the image below.
Dr. Hadzic was able to drive home independently after his surgery
This is how local regional anesthesia works, for example a brachial plexus block, for shoulder surgery.
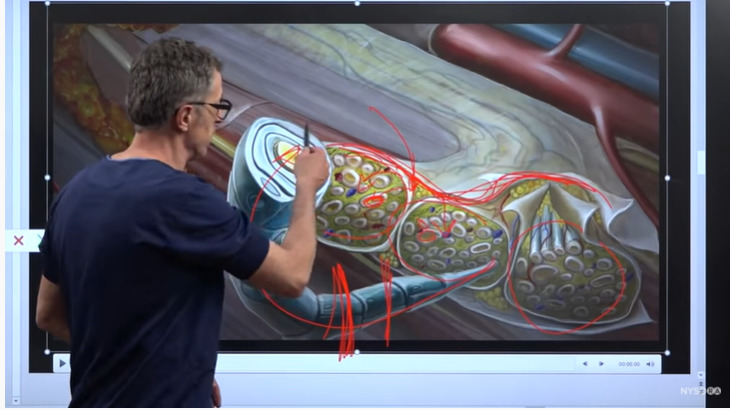
As seen on the image below, these nerves are sort of like wires that conduct electrical currents, or information, from one part of the body (pain from the shoulder) to the brain, or information relevant to the brain dictates the hand or the arm to take action. As outlined in the below image, the smaller circlers are the tiny wires, almost like telephone cables, that conduct that information. These wires are called the axons.
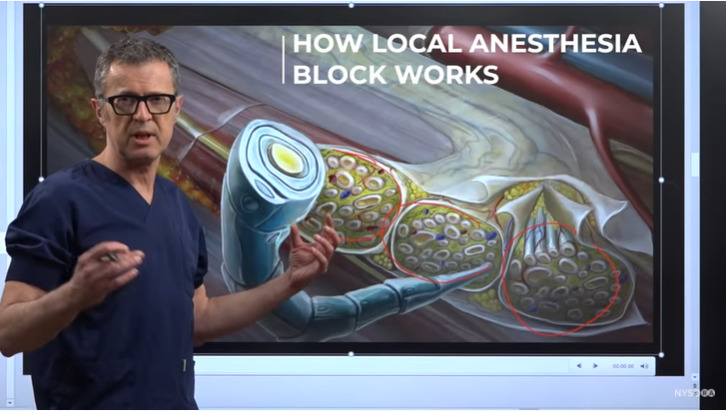
Visual explanation of axons
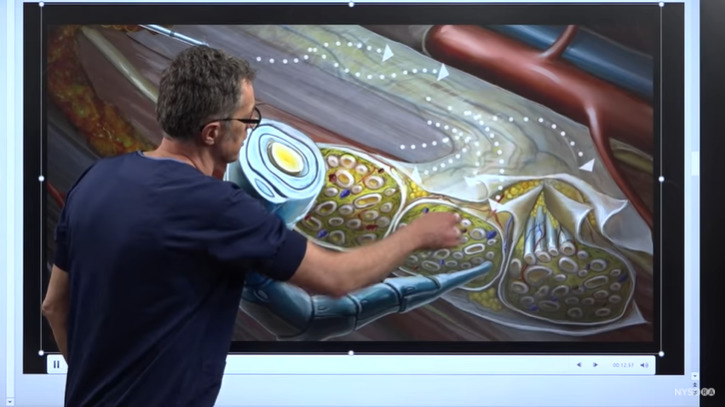
So, what we really do with the local anesthesia, is that we want to inject the local anesthetic underneath this tissue space or tissue sheath, which we call fascia. As the local anesthetic or numbing medicine is injected here (as shown in the image below with an arrow) it slowly goes inside the nerve and gradually blocks the wires that conduct the “electricity”.
Description of local anesthetic entering the tissue sheath
For example, if this wire, as shown in the image as a trunk, is connected to the brain, then if we interrupt that conduction by administering numbing medicine or local anesthetic inside this tissue space underneath the sheath, we basically prevent the flow of information between the injury and the brain. This typically interrupts the pain completely.
Continued explanation on the workings of local anesthetics within the tissue sheath to prevent pain receptor’s response
Now, we are going to demonstrate how the new medication works with this example.
If you inject a local anesthetic, the local anesthetic travels underneath this fascial sheath and it reaches these small axons to interrupt the pain pathways.
Explanation on how EXPAREL works in the body
With the new medication, the medication actually contains not only a small amount of the free local anesthetic, but it also contains liposomes. Liposomes are full of the numbing medication or local anesthetic, and as the main local anesthetic at the very beginning absorbs, these structures (the liposomes) continue leeching small amounts of the local anesthetic or numbing medicine. Just enough to cause the interaction of the pain impulses over a period of 72 hours or so, but not necessarily cause the motor deficit. This is because the small amount of the medicine that the liposomes leach out is sufficient to stop the pain, but most of the time insufficient to cause a dense motor block or inability to move the arm.
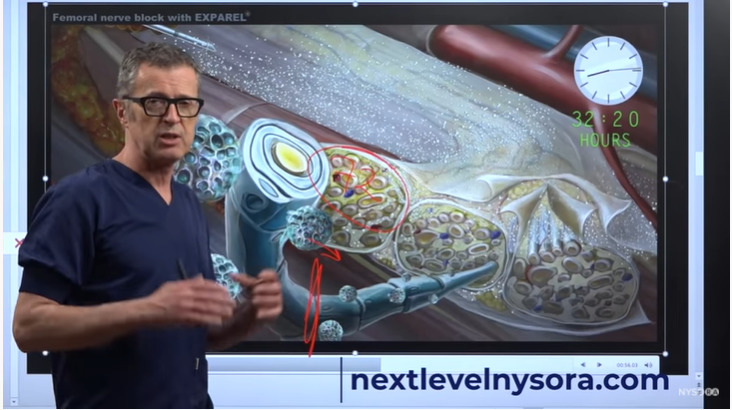
Explanation of the time release process that liposomes from EXPAREL allow
This process can go on for up to 72 hours or so and eventually the liposomes are dissolved, or metabolized, or written up by the body at which point of time the action of EXPAREL, or prolonged acting local anesthetic/delayed release local anesthetic as it is called, eventually stops, and the nerve function returns to normal. But these 72 hours of pain relief can be established very effectively without a catheter.
Let’s try to understand how we administer an interscalene brachial plexus block using a catheter technique and ultrasound guidance. We have a patient who is in a semi-supine position, and we start scanning from the supraclavicular fossa. Observe the below ultrasound images, where you can see the subclavian artery, the brachial plexus in the supraclavicular fossa and we can recognize the upper trunk, the middle trunk and the lower trunk of the brachial plexus.
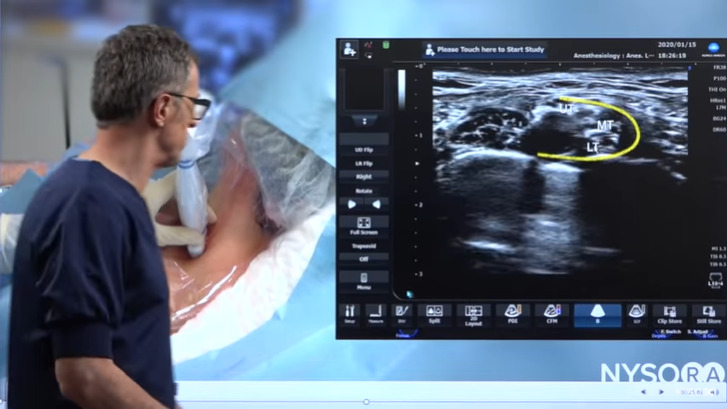
Ultrasound image of subclavian artery, brachial plexus in the supraclavicular fossa
We just scan approximately, until we get to the interscalene brachial plexus. Once we have identified the interscalene brachial plexus, then we inserted local anesthetic to anesthetize the skin and subcutaneous tissues. This makes the whole procedure much more comfortable to the patients. In fact, they may not even feel anything after a small pinch of local anesthetic administration.
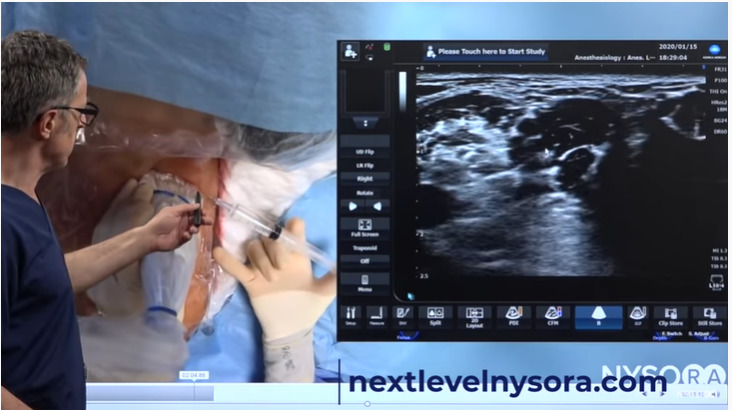
Transducer positioning and explanation of locating the interscalene brachial plexus
You can also use this opportunity to see the angle of the needle that you use with the catheter needle, so that when you insert the catheter needle then you know which angle to assume.
We are now inserting the needle in-plane, which is an 18 gauge needle, that allows placement of the catheter. In this particular case, we have pre-loaded the catheter. The system has been prepared in that the catheter is pre-loaded into the chamber so that it’s much easier to advance the catheter through the needle upon placing the needle into the correct position.
Representation of needle penetration for catheter insertion
The needle is approaching the brachial plexus, and we are now just about to insert the needle through the sheath of the brachial plexus. What you may have noticed is that in this insertion of the needle, so close to the brachial plexus, there was a very distinct “pop” as the needle popped through the sheath of the brachial plexus. The sheath is usually formed by the anterior scalene muscle and the middle scalene muscles.
Ultrasound image of needle insertion
So the placement of the catheter in the interscalene space consists of five specific steps:
Step 1:– The placement of the needle into the appropriate space, which is the interscalene brachial plexus.
Step 2:– We need to confirm the needle placement by an injection. So, we want to perform an injection to make sure that the injection displaces the brachial plexus away from the needle. When that happens, we are 100% sure that we are inside the brachial plexus sheath.
Step 3:– The placement of the catheter. Now we’re going to use the catheter through the needle to place it inside the space.
Step 4:– When the catheter is inside, we need to make sure that the catheter is functional. So, we confirm the catheter placement by injecting local anesthetic and, again, seeing the same effect – that is the local anesthetic accumulating in the space around the brachial plexus in the interscalene space.
Step 5:– Once we invest so much energy, time, effort and knowledge into placing a catheter, we want to secure it.
Now, we have a needle at the correct space, and we are going to insert the catheter.
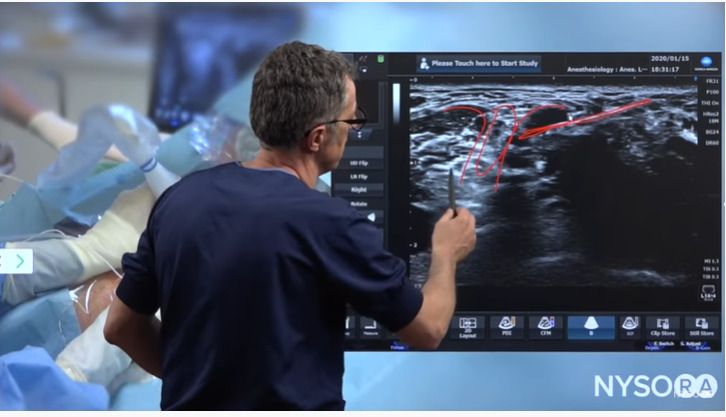
When we start inserting in the catheter, the catheter enters the interscalene brachial plexus space. We have advanced it, and at some point in time, it exits. In this frame, (as shown in the image below) we see how the catheter exits the needle. As outlined in the below image, we can see the brachial plexus, the middle scalene muscle, the anterior scalene muscle, and as we are advancing the catheter into that space between the two muscles, it is very important to prevent that catheter from going outside of that particular space. The best way to do that is, as soon as the catheter enters the interscalene brachial plexus space. We slowly withdraw the catheter by half a centimeter or a centimeter which basically weakens it. Now the catheter does not have that much support to go through, and starts bending inside the space, which is what we want. Typically, we want to place the catheter at least 5 centimeters inside the brachial plexus space because it results in a lot of motion.
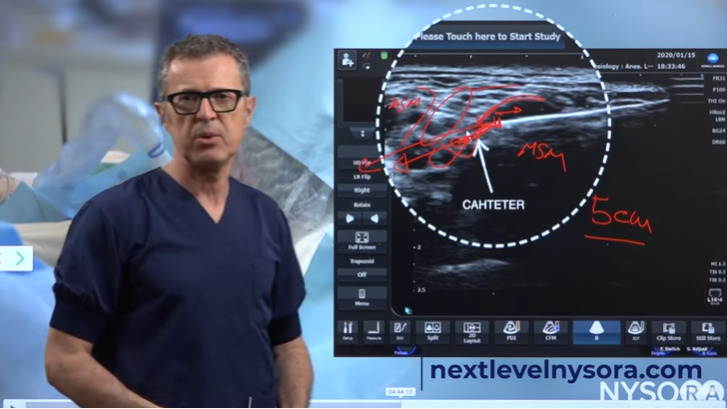
Ultrasound image of catheter insertion
We will now take the needle out, leaving the catheter in place. The injection through the catheter results in a spread of the local anaesthetic inside the interscalene brachial plexus sheath.
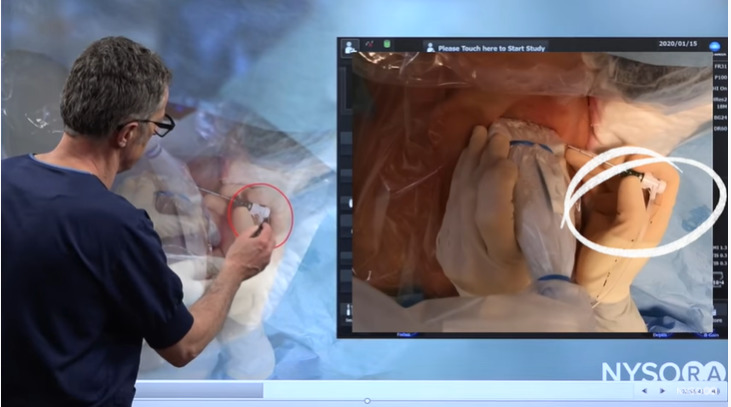
And the final step is to secure the catheters. We clean the skin and apply the glue over the catheter insertion site to prevent the leakage around it. We covered it with the transparent dressing and we secured the catheter injection port away from the surgery, so that the catheter does not interfere with the surgical site, being the left shoulder.
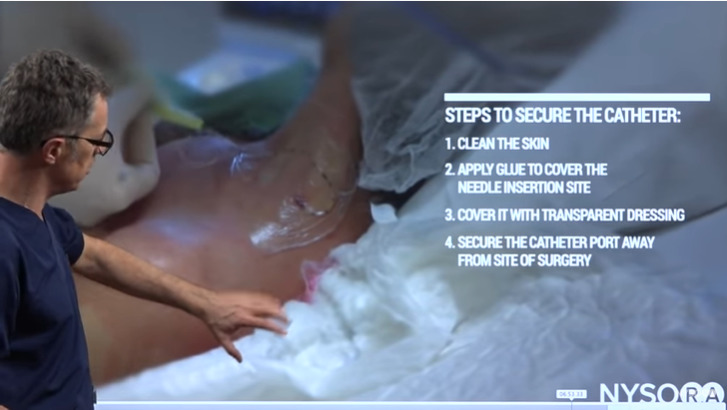
Description of properly securing a catheter
Watch the full video here: